10.1 Movement Mechanics
Updated: v2026.02.02

[Screenshot Pending — #1072] Task Group Speed Controls interface
Movement in Aurora C# operates on a Newtonian-inspired but simplified model. Ships travel in straight lines between destinations at speeds determined by their engine power and mass. Understanding how movement is calculated, how speed relates to fuel consumption, and how the time increment system interacts with travel is fundamental to effective fleet management.
Contents
Updated: v2026.02.02
- 10.1 Movement Mechanics
10.1.1 Speed and Distance
Updated: v2026.01.30
Speed Calculation: A ship’s maximum speed is determined by a straightforward formula \hyperlink{ref-10.1-1}{[1]} \hyperlink{ref-10.1-5}{[5]} (see Section 8.3 Engines for engine design details):
Speed (km/s) = Total_Engine_Power * 1000 / Ship_Size_HS
Or equivalently (since 1 HS = 50 tons):
Speed (km/s) = Total_Engine_Power * 50000 / Ship_Mass_tons
Where:
- Total Engine Power is the sum of all engine components on the ship, measured in Engine Power (EP). One unit of engine power is defined as the amount of power required to propel 50 tons (1 HS) against the Trans-Newtonian drag at 1000 km/s.
- Ship_Size_HS is the total ship size in Hull Spaces (including hull, components, fuel, cargo, ammunition, and any other loaded weight)
- Ship_Mass_tons = Ship_Size_HS x 50
Distance and Time: Aurora C# measures distances in kilometers within a star system. Interstellar distances between systems are not directly traversed – ships use jump points (see Section 10.2 Jump Transit). Within a system, distances can range from thousands of kilometers (close orbit) to billions of kilometers (outer system bodies).
Movement Per Increment: The game processes movement in time increments selected by the player (5 seconds, 30 seconds, 2 minutes, 5 minutes, 20 minutes, 1 hour, 4 hours, 8 hours, 1 day, 5 days, 30 days) \hyperlink{ref-10.1-7}{[7]}. During each increment, a ship moves:
Distance = Speed (km/s) x Time Increment (seconds)
For example, a ship traveling at 4,000 km/s over a 5-day increment would cover:
4,000 x 5 x 86,400 = 1,728,000,000 km (1.728 billion km)

Sub-Pulse Resolution: Aurora C# uses sub-pulses for its internal calculations \hyperlink{ref-10.1-3}{[3]}. Each time increment is broken into sub-pulses, which are the actual units of time the game engine uses to calculate events. Ship detection is checked once per sub-pulse, and standing orders are renewed once per sub-pulse. The player may choose the sub-pulse length if desired (using the “Select Sub-Pulse Length” bar on the main game window), but typically it can be left at the automatic value. Usually there will be a few dozen sub-pulses per increment if the automatic value is used (e.g., a five-day increment will use a two-hour sub-pulse). If an event occurs mid-increment (e.g., entering sensor range of a hostile), the game will interrupt the time advance and notify you at the end of the current sub-pulse.
Fuel Consumption: Fuel usage in Aurora C# is time-based, not distance-based \hyperlink{ref-10.1-2}{[2]} \hyperlink{ref-10.1-6}{[6]}. Engines consume fuel measured in Litres per Engine Power Hour:
Fuel Used per Hour = Engine Power x Fuel Consumption Rate (litres/EP-hour)
The base fuel consumption rate starts at 1.0 litres per Engine Power Hour and can be reduced through research (down to 0.1 litres/EP-hour at the highest technology) \hyperlink{ref-10.1-8}{[8]}. See Section 14.1 Fuel for detailed fuel mechanics. Larger engines are also more fuel-efficient due to the engine size modifier: SQRT(10 / Engine Size in HS) \hyperlink{ref-10.1-9}{[9]}. Ships traveling at less than maximum speed consume proportionally less fuel per hour, but cover less distance – so the total fuel consumed for a fixed-distance transit remains roughly the same regardless of speed. However, for time-based operations (patrol duty, loitering on station), lower speed directly reduces total fuel consumed because less distance is covered in the same time period.
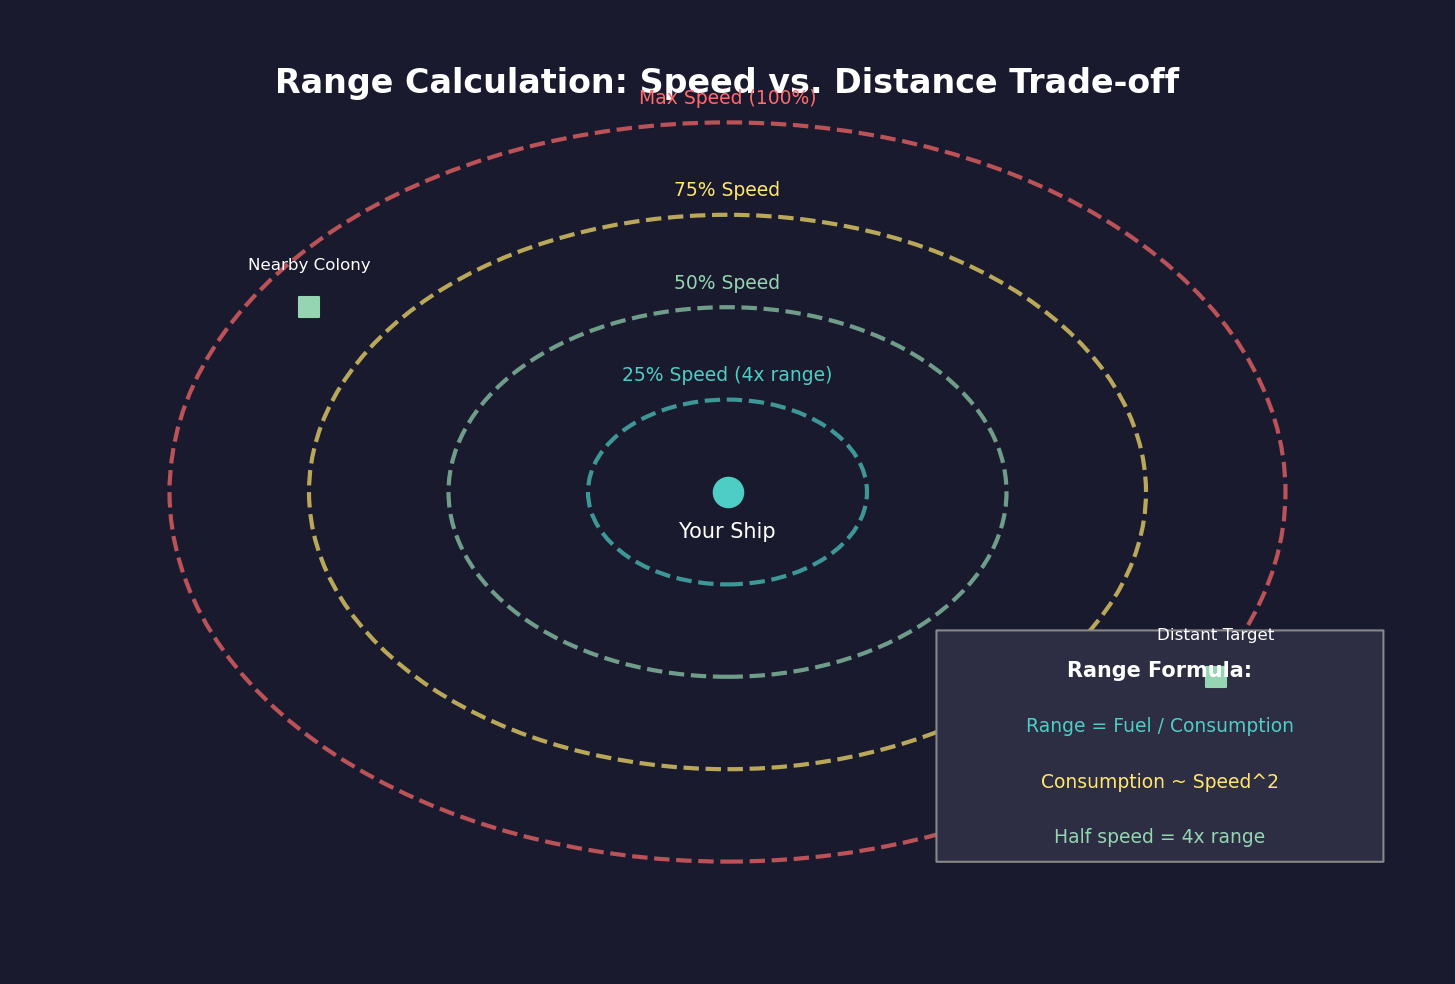
Maximum Range: A ship’s maximum range is determined by its fuel capacity, consumption rate, and speed:
Max Range = (Fuel Capacity / Fuel Used per Hour) x Speed (km/s) x 3600
Or more simply: Range depends on how many hours of fuel you have multiplied by how far you travel per hour. The Ship Designer displays estimated range for each design, which is useful for planning operations.
Warning: Always check your task group’s estimated range before sending it on a long-distance mission. Running out of fuel in deep space means the group is stranded until a tanker arrives – or permanently if you have no tanker capability.
Tip: Heavier ships are slower. A fully-loaded freighter is significantly slower than an empty one. Plan return trips with this in mind – your freighter might take twice as long on the loaded leg of a cargo run.
10.1.2 Speed Groups and Fleet Speed Management
Updated: v2026.01.30
When multiple ships travel together in a fleet (task group), speed management becomes a critical operational consideration. Aurora C# provides several mechanisms for handling mixed-speed fleets. See also Section 9.3.2 Task Group Speed for the organizational perspective on fleet speed.
10.1.2.1 Fleet Speed Determination
A fleet’s speed is determined by its slowest member. This is the fundamental constraint in fleet composition:
Fleet Speed = MIN(Ship_1_Speed, Ship_2_Speed, ..., Ship_N_Speed)
This means adding a single slow freighter to a fast destroyer squadron reduces the entire group to freighter speed. The Task Group window displays both the fleet’s current maximum speed and individual ship speeds, allowing you to identify which vessel is the speed bottleneck.
10.1.2.2 Maximum Squadron Speed Setting
The “Maximum Squadron Speed” setting allows you to impose an artificial speed limit on a task group independent of ship capabilities. This is distinct from the natural speed limit imposed by the slowest ship.
How Maximum Squadron Speed Works:
- Set via the Task Group window’s speed controls
- The task group will not exceed this speed even if all ships are capable of faster travel
- Useful for fuel conservation on long transits
- Allows coordination with other groups without formally combining them
Use Cases:
- Convoy coordination: Set escort groups to match convoy speed without joining the convoy’s task group
- Fuel economy: Limit speed on routine patrols to extend range
- Tactical positioning: Approach at a controlled speed to coordinate with other elements
- Signature reduction: Lower speeds mean reduced thermal signatures from engines (see Section 11.1 Thermal and EM Signatures)
10.1.2.3 Use Maximum Speed Checkbox
Fleets have a “Use Maximum Speed” checkbox on the Naval Organization window. When enabled:
- The system automatically rechecks fleet velocity at the start of each movement sub-pulse
- If fleet composition changes (ship detached, engine repaired), speed updates immediately
- No manual order changes required when the speed bottleneck changes
When to Enable:
- Combat fleets that may detach damaged ships during engagement
- Survey groups where ships may split off to investigate different targets
- Any fleet where speed optimization during transit matters
When to Disable:
- When you want consistent, predictable travel times
- When coordinating with other groups at a fixed speed
- When fuel consumption must remain constant and predictable
10.1.2.4 Speed Groups Within a Task Group
While all ships in a task group move at the same speed, you can organize ships conceptually into speed tiers for operational planning:
Fast Tier: Destroyers, frigates, fast attack craft (typically 4,000-6,000+ km/s) Medium Tier: Cruisers, carriers (typically 2,500-4,000 km/s) Slow Tier: Battleships, freighters, tankers (typically 1,000-2,500 km/s)
Operational Implications:
- Keeping ships of similar speed in the same task group preserves tactical flexibility
- Mixed-speed groups sacrifice the fast ships’ speed advantage
- Consider separate task groups that coordinate rather than combine
Tip: Design your fleet doctrine with speed tiers in mind. If your destroyers do 5,000 km/s and your cruisers do 3,500 km/s, form separate fleets. The destroyers can screen ahead, fall back to the cruisers for support, or operate independently – options lost if you combine them into a single slow group.
10.1.2.5 Engine Damage and Fleet Speed
Combat damage to engines directly affects fleet speed calculations:
- Each destroyed engine component reduces that ship’s maximum speed
- If the damaged ship was not the speed bottleneck, fleet speed is unaffected
- If the damaged ship becomes the new bottleneck, fleet speed drops immediately
- With “Use Maximum Speed” enabled, the fleet adapts automatically
Damage Cascade Scenario:
- Fleet of 5 ships traveling at 4,000 km/s (limited by the slowest ship)
- Combat damages the slowest ship’s engines, reducing it to 2,000 km/s
- Fleet immediately slows to 2,000 km/s
- If the damaged ship is detached, remaining ships accelerate to their new maximum
- With “Use Maximum Speed” enabled, this happens automatically
Warning: Monitor engine damage during combat retreats. A crippled ship can doom an entire fleet if you do not detach it in time.
10.1.3 Conditional Speed Orders
Updated: v2026.01.30
Aurora C# provides two speed-related order types that determine how task groups manage their velocity during transit.
10.1.3.1 Max Speed Order Type
The “Max Speed” order directs a task group to travel at the maximum speed achievable by the slowest ship in the group. This is the default behavior for most movement orders.
Characteristics:
- Highest possible speed for the group’s current composition
- Highest fuel consumption per unit time
- Fastest arrival at destination
- Highest thermal signature from engine emissions
When to Use Max Speed:
- Combat situations requiring rapid response
- Time-critical supply deliveries
- Pursuit or interception operations
- Emergency evacuations
10.1.3.2 Max Squadron Speed Order Type
The “Max Squadron Speed” order directs a task group to travel at the artificially limited speed set in the task group settings, regardless of actual ship capabilities.
Characteristics:
- Speed capped at the configured squadron speed limit
- Reduced fuel consumption compared to max speed
- Predictable travel times for coordination
- Lower thermal signature
When to Use Max Squadron Speed:
- Long-range patrols where fuel endurance matters
- Convoy escort matching cargo ship speeds
- Coordinated fleet movements with multiple task groups
- Stealth approaches where thermal signature reduction is critical
10.1.3.3 Fuel Efficiency vs. Tactical Necessity
The choice between speed modes involves a fundamental tradeoff:
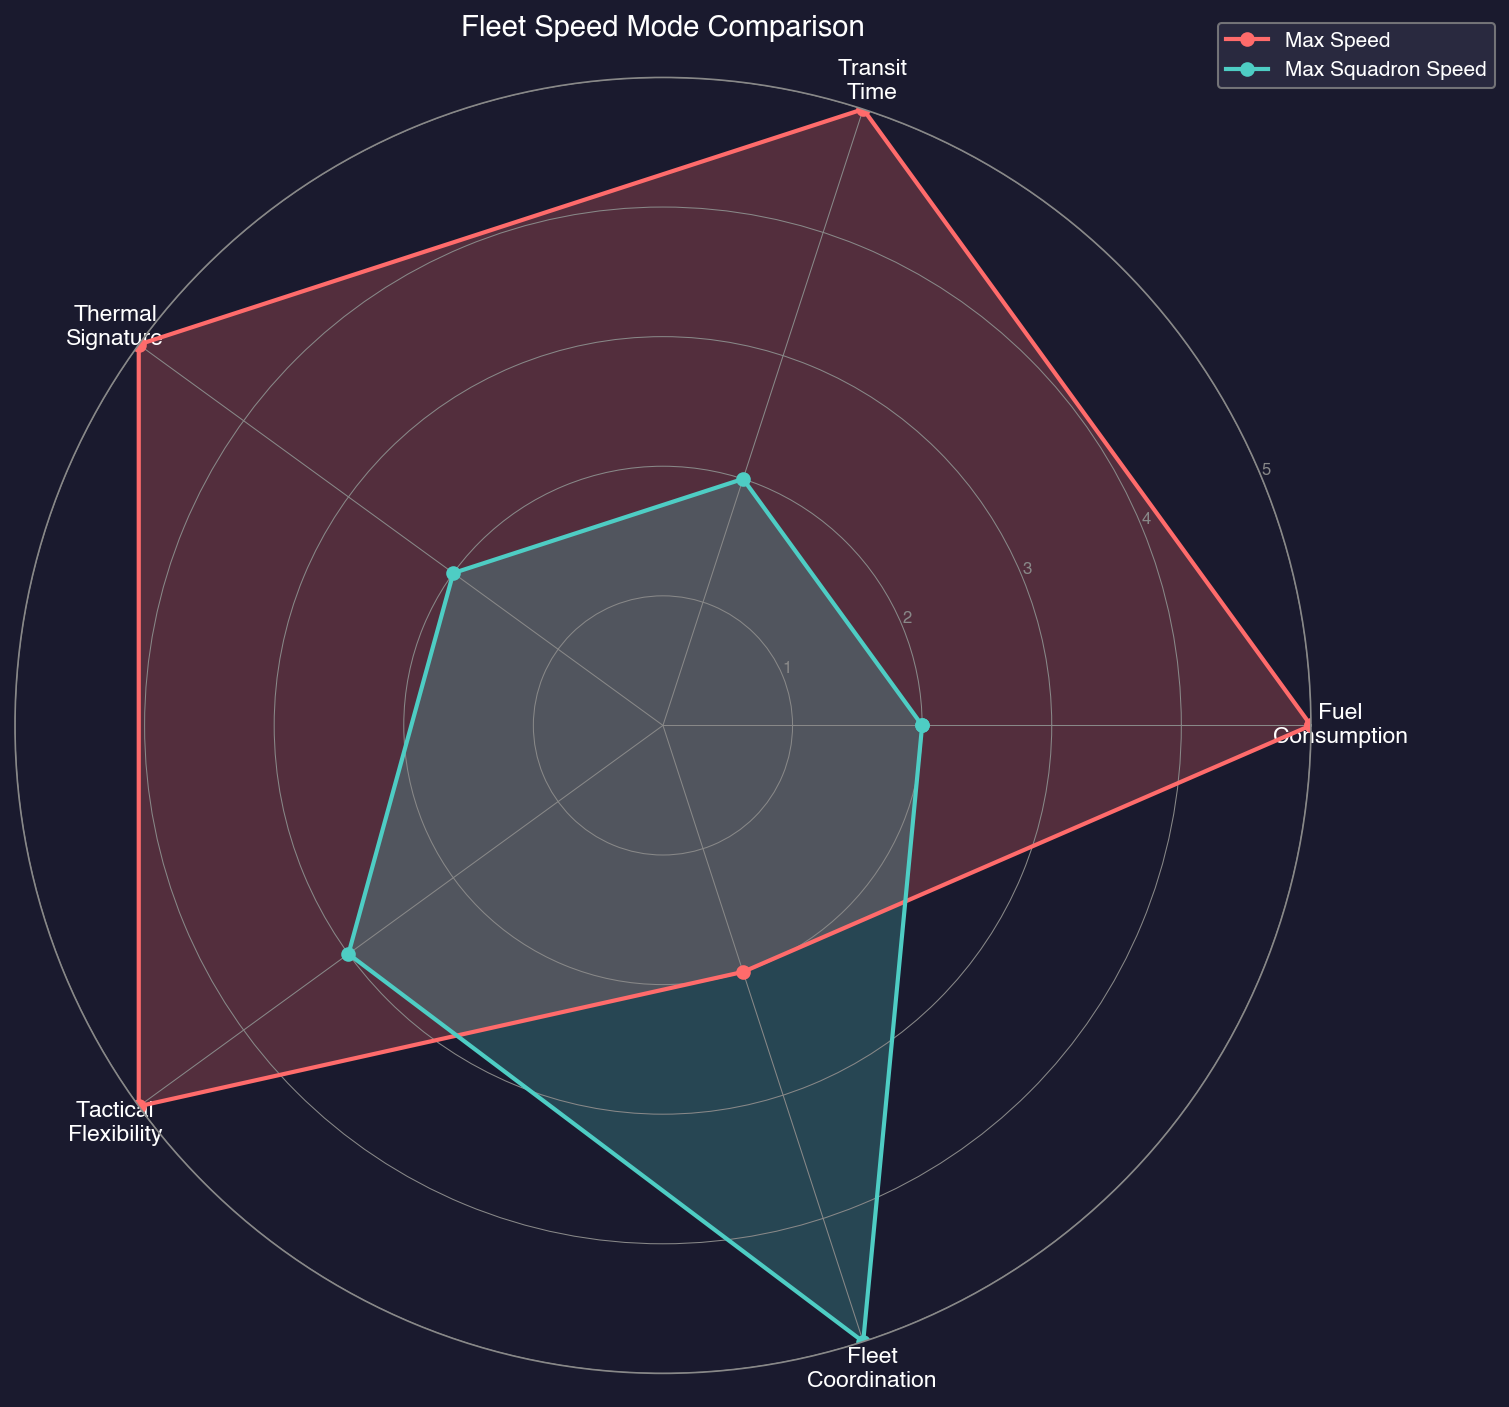
| Factor | Max Speed | Max Squadron Speed |
|---|---|---|
| Fuel consumption | Highest | Adjustable/Lower |
| Transit time | Shortest | Longer |
| Thermal signature | Highest | Reduced |
| Tactical flexibility | Maximum | Constrained |
| Coordination | Harder (variable) | Easier (predictable) |
Rule of Thumb:
- Peacetime/routine: Use reduced speed for fuel economy
- Wartime/tactical: Use max speed for responsiveness
- Unknown contacts: Use max speed until threat is assessed
- Long transits (>30 days): Consider reduced speed to extend range
Tip: Set patrol routes to use reduced squadron speed. Since patrols are time-based (loitering on station), lower speed directly reduces fuel consumed per hour, extending time on station. This does not save fuel for point-to-point transits, where total fuel consumed is roughly the same regardless of speed.
Tip: Always have a conditional order to switch to max speed if hostile contacts are detected. A fuel-efficient patrol becomes a death trap if you cannot accelerate to escape or engage when needed.
10.1.4 Acceleration
Updated: v2026.01.30
Aurora C# uses an instantaneous acceleration model. Ships do not gradually accelerate to their maximum speed – they are always assumed to be traveling at their calculated maximum speed (or the task group’s maximum speed, if lower). When a ship changes course, it immediately moves in the new direction at full speed.
Practical Implications:
- There is no momentum or drift. Ships stop instantly when they reach their destination.
- Course changes are immediate with no turning radius.
- Ships can reverse direction with no time penalty.
- Combat maneuvering is effectively about positioning, not momentum management.
Speed Changes: A ship’s speed can change during play due to:
- Fuel depletion: As fuel is consumed, mass decreases slightly, marginally increasing speed (negligible for most purposes)
- Cargo loading/unloading: Loading cargo increases mass and reduces speed; unloading does the opposite
- Engine damage: Combat damage to engines directly reduces engine power and thus speed
- Component destruction: Loss of any component reduces mass but loss of engines has a far greater impact on speed
Throttle Settings: Task groups can be set to travel at less than maximum speed. This is useful for:
- Conserving fuel on long transits
- Matching speed with a convoy you are escorting but not formally joined to
- Reducing thermal signature (engines at lower power produce less heat for thermal sensors to detect) (see Section 11.1 Thermal and EM Signatures)
Refuelling and Movement: In Aurora C#, refuelling is not instantaneous and directly impacts fleet movement operations. Ships can only refuel at specific locations (spaceports, refuelling stations, refuelling hubs on ships, or vessels with refuelling systems). The “Underway Replenishment” technology allows refuelling while both vessels are moving together, starting at 20% of the normal rate (2,500 RP to research) and advancing to 100% with the highest technology level (40,000 RP) \hyperlink{ref-10.1-4}{[4]}. Without this technology, ships must be stationary to transfer fuel, meaning fleets must stop for refuelling operations. Tankers assigned “Refuel Fleet” status will continuously top up fuel tanks during normal operations, keeping the fleet fueled without dedicated refuelling stops (assuming Underway Replenishment technology has been researched). See Section 9.5.3 Logistics Orders for complete refuelling mechanics.
Tip: In combat, speed is life. A faster ship can dictate engagement range – it can close when advantageous and disengage when not. Always design combat ships with enough engine power to outrun expected threats, or at least match them.
Note: The instantaneous acceleration model means there is no advantage to “building up speed” before a maneuver. A ship at rest can immediately flee at full speed. This affects tactical planning – you cannot trap a faster enemy by catching them stationary.
Tip: Enable “Use Maximum Speed” on combat fleets that may detach damaged ships during an engagement. This ensures the remaining ships immediately benefit from the increased fleet speed rather than continuing at the old, slower rate.
10.1.5 Orbits
Updated: v2026.01.30
Aurora C# treats orbital mechanics in a simplified fashion. Bodies orbit their parent stars in circular or elliptical orbits, and their positions change over time. Ships, however, do not orbit in the traditional sense – they can hold position relative to a body or at arbitrary coordinates.
Planetary Orbits: Planets, moons, asteroids, and comets all move along their orbital paths as game time advances. This means:
- The distance between two planets changes over time as they move in their orbits
- A destination that is close now may be far away in six months
- Jump points (if orbiting a star) may also move over time in some configurations
Ship “Orbits”: When a task group is ordered to orbit a body, it maintains position relative to that body. As the body moves in its orbit, the task group moves with it. This is not a true Keplerian orbit – the ships are simply attached to the body’s reference frame.
Stationary Positions: Ships can also hold at fixed coordinates in space. If ordered to move to a specific point and stop, the task group remains at those absolute coordinates even as planets and other bodies move away from them.
Implications for Navigation:
- Plan transits based on current planetary positions, but be aware that long transits may arrive at a destination that has moved
- The game automatically updates movement orders to track a moving body – if you order a task group to move to Mars, it will intercept Mars at its future position, not fly to where Mars was when the order was issued
- Short-range movements within a system are barely affected by orbital motion
- Long-range movements (outer system) can be significantly affected by orbital positions
Lagrange Points: Aurora C# includes Lagrange Points as navigational shortcuts for inter-body transit. Every planet size 150 and over has a Lagrange Point sixty degrees behind it in its orbit \hyperlink{ref-10.1-10}{[10]}. As the planet orbits the star, the Lagrange Point orbits with it. These Lagrange Points allow for instant intra-system travel – any ship can jump between any LP within a system without requiring special components or suffering jump shock.
Ships moving within a system will automatically use Lagrange Points if it shortens the trip. When you select an LP as a movement destination, you will get a list of possible intra-system jump destinations. Players can also create stabilized Lagrange Points around planets or moons with mass 0.25 Earth masses or larger using ships equipped with a stabilization module \hyperlink{ref-10.1-10}{[10]}.
Lagrange Point Routing Options: Added: v2.8.0
Three radio button options control how fleets interact with Lagrange Points during movement orders:
- Manual LP: Fleets ignore Lagrange Points entirely unless a Lagrange Point is explicitly selected as a waypoint in the order queue. Use this when you need precise control over fleet routing or want to avoid LP transit for tactical reasons.
- Plotted LP: The game evaluates Lagrange Point routing at the time each movement order is created. If using an LP shortens the trip at that moment, it is incorporated into the plotted route. The route remains fixed even if orbital positions change during transit.
- Dynamic LP: The game re-evaluates Lagrange Point routing at order execution and upon completion of each movement segment. This allows fleets to take advantage of LP shortcuts that become available during long transits as orbital positions shift. Best for extended operations where optimal routing may change over time.
When to Use Each Option:
| Option | Best For | Trade-off |
|---|---|---|
| Manual LP | Tactical control, avoiding known threats near LPs | Requires manual LP waypoint selection |
| Plotted LP | Predictable routing, coordinated fleet movements | May miss better routes that develop during transit |
| Dynamic LP | Long-range operations, patrol routes, exploration | Routes may change unexpectedly mid-transit |
Tip: When planning operations in a system, check the System Map to see current body positions. A mining colony on a far-side asteroid might be a 2-day transit now but only 6 hours in three months when it passes closer. Timing operations around favorable orbital alignments can save significant fuel.
Note: Jump points have fixed positions in most game configurations. This makes them natural defensive chokepoints since their location is always known and predictable.
10.1.6 Movement Order Queue Management
Updated: v2026.01.30
Task groups execute orders sequentially from an order queue. Understanding how to manipulate this queue is essential for complex fleet operations.
10.1.6.1 Order Queue Basics
The order queue is a list of instructions that the task group executes in sequence:
-
The task group begins executing the first order in the queue.
-
When that order completes, it is removed from the queue.
-
The next order becomes active.
-
The process repeats until the queue is empty.
-
When empty, the task group holds position (or executes standing orders if configured).
Viewing the Queue: The Task Group window displays the current order queue with:
- Order number and type
- Destination or target
- Any conditions attached to the order
- Estimated completion time (for movement orders)
10.1.6.2 Adding Orders to the Queue
Orders can be added to the queue in two ways:
Append (Default): New orders are added to the end of the queue. The task group finishes its current orders before executing the new one.
Insert: New orders can be inserted at a specific position in the queue, including at the beginning. This allows you to interrupt current operations with higher-priority instructions.
Insert Behavior:
- Select the position in the queue where you want to insert
- Add the new order
- The order is inserted at that position, pushing subsequent orders down
- Useful for emergency diversions or priority tasking
10.1.6.3 Clearing the Order Queue
Several methods exist to clear or modify the queue:
Clear All Orders: Removes all orders from the queue. The task group immediately stops and holds position. Use this when you need to completely redirect a task group.
Remove Single Order: Select and delete individual orders from the queue without affecting others. Useful for removing obsolete waypoints from a long route.
Clear and Add: A workflow where you clear the queue and immediately add new orders. This ensures clean state before new instructions.
Warning: Clearing orders on a task group in hostile territory leaves it stationary and vulnerable. Always have replacement orders ready before clearing the queue in dangerous areas.
10.1.6.4 Conditional Orders and Movement
Conditional orders interact with movement orders in specific ways (see Section 9.5.5 Conditional Orders for full details):
Condition Triggers Movement:
- “If hostile contact detected within 200M km: Move to contact”
- “If fuel below 30%: Move to nearest colony”
- “If cargo hold empty: Move to loading point”
Movement Triggers Condition Check:
- Arriving at a waypoint can trigger conditional orders
- Completing a movement order advances to the next order, which may be conditional
- Conditional orders are evaluated at each sub-pulse during movement
Queue Modification by Conditions:
When a conditional order activates, it typically takes precedence over queued movement orders. The original queue may be:
- Suspended (conditional orders execute, then queue resumes)
- Replaced (conditional orders clear the queue and substitute new orders)
- Modified (conditional orders insert themselves at the queue front)
The specific behavior depends on the conditional order type and configuration.
Tip: When setting up complex order sequences, step through a few increments manually to verify the queue behaves as expected before fast-forwarding.
10.1.7 Patrol Route Creation
Updated: v2026.01.30
Patrol routes establish repeating movement patterns for persistent area surveillance. They are one of the most common uses of the order queue system.
10.1.7.1 Basic Patrol Setup
Step-by-Step Patrol Configuration:
-
Create waypoints defining the patrol path (see Section 10.4 Waypoints).
-
Select the task group that will patrol.
- In the Task Group orders, add movement orders to each waypoint in sequence:
- Move to Waypoint A
- Move to Waypoint B
- Move to Waypoint C (and so on)
-
Enable “Repeat Orders” or “Cycle Orders” to create a continuous loop.
- The task group will continuously cycle through the waypoints.
10.1.7.2 Patrol Order Behavior
Repeat Orders: When enabled, the task group returns to the first order in the queue after completing the last. This creates an indefinite patrol cycle:
Waypoint A -> Waypoint B -> Waypoint C -> Waypoint A -> Waypoint B -> ...

Repeat Orders X Times: Limits the number of patrol cycles. Entering “3” executes the orders four times total (original plus three repeats) \hyperlink{ref-10.1-11}{[11]}. After the final cycle, the task group holds at the last waypoint or executes standing orders.
10.1.7.3 Patrol Patterns
Linear Patrol (Two Waypoints):
- Simplest pattern: back and forth between two points
- Best for monitoring narrow corridors (jump point approaches, shipping lanes)
- Provides coverage of a defined lane
Triangle Patrol (Three Waypoints):
- Covers a broader area than linear
- Good for monitoring multiple approaches to a defended position
- More fuel-efficient than box patterns for similar coverage
Box/Perimeter Patrol (Four+ Waypoints):
- Maximum coverage of a defined zone
- Commonly used around colonies or strategic installations
- Higher fuel consumption due to longer route
Picket Line (Multiple Groups):
- Several task groups, each patrolling a segment
- Creates a detection barrier across a likely approach
- Each group covers its sector, reporting contacts to the main force
10.1.7.4 Combining Patrol with Conditional Orders
Patrol routes become powerful when combined with conditional triggers:
Break Patrol on Contact:
1. Move to Waypoint A
2. Move to Waypoint B (Repeat)
3. IF hostile contact within 150M km: Move to contact
4. IF hostile contact within 150M km: Engage target
5. IF no hostile contacts: Resume patrol (return to order 1)
Break Patrol on Low Fuel:
1-4. [Patrol waypoints]
5. IF fuel below 25%: Move to nearest colony
6. IF fuel below 25%: Refuel at colony
7. IF fuel below 25%: Return to Waypoint A
Contact Reporting Patrol:
1-4. [Patrol waypoints]
5. IF hostile contact detected: Hold position (stops to track contact)
6. IF no hostile contacts for 1 hour: Resume patrol
10.1.7.5 Patrol Speed and Endurance
Patrol groups continuously consume fuel while moving. Plan patrol parameters carefully:
Speed vs. Coverage Frequency:
- Faster patrols detect contacts sooner (more frequent passes)
- Slower patrols extend endurance (longer time on station)
- Balance based on threat level and resupply availability
Patrol Endurance Calculation:
Patrol Duration (hours) = Fuel Capacity / Fuel Used per Hour
Where Fuel Used per Hour = Engine Power x Fuel Consumption Rate (litres/EP-hour). Consider the round-trip distance to refueling and add margin for unexpected maneuvers.
Recommended Fuel Thresholds:
- Combat patrol in contested space: Return at 30-40% fuel
- Peacetime surveillance: Return at 20-25% fuel
- Deep space patrol (long return): Return at 40-50% fuel
10.1.7.6 Sensor Coverage Along Patrol Routes
Effective patrols require sensor overlap between waypoints (see Section 11.2 Passive Sensors):
Waypoint Spacing Guidelines:
As a rule of thumb, space waypoints at about 150-180% of sensor range to ensure continuous coverage as the ship transits between points. Tighter spacing (100-150%) provides overlapping coverage for faster-moving contacts, while wider spacing (180-200%) trades detection reliability for longer patrol routes per ship.
Coverage Gaps:
- Waypoints too far apart create blind spots
- Fast-moving contacts may pass through gaps between patrol passes
- Use overlapping patrol routes for critical areas
Tip: For jump point monitoring, a simple two-point patrol perpendicular to the expected threat axis works well. Place waypoints 50-100M km from the jump point on either side, giving your picket time to detect and report threats before they close.
Tip: Set conditional combat orders on patrol groups. A patrol that detects a hostile should have standing instructions on whether to engage, shadow, or retreat and report.
Tip: For long patrols, ships will automatically use Lagrange Points when beneficial. The automated routing improves fuel efficiency over multi-month patrol cycles by taking advantage of instant intra-system jumps.
10.1.8 Fuel-Optimal Navigation
Updated: v2026.01.30
Long-range operations require careful fuel management. Understanding the relationship between speed, fuel consumption, and transit planning can dramatically extend your fleet’s operational reach.
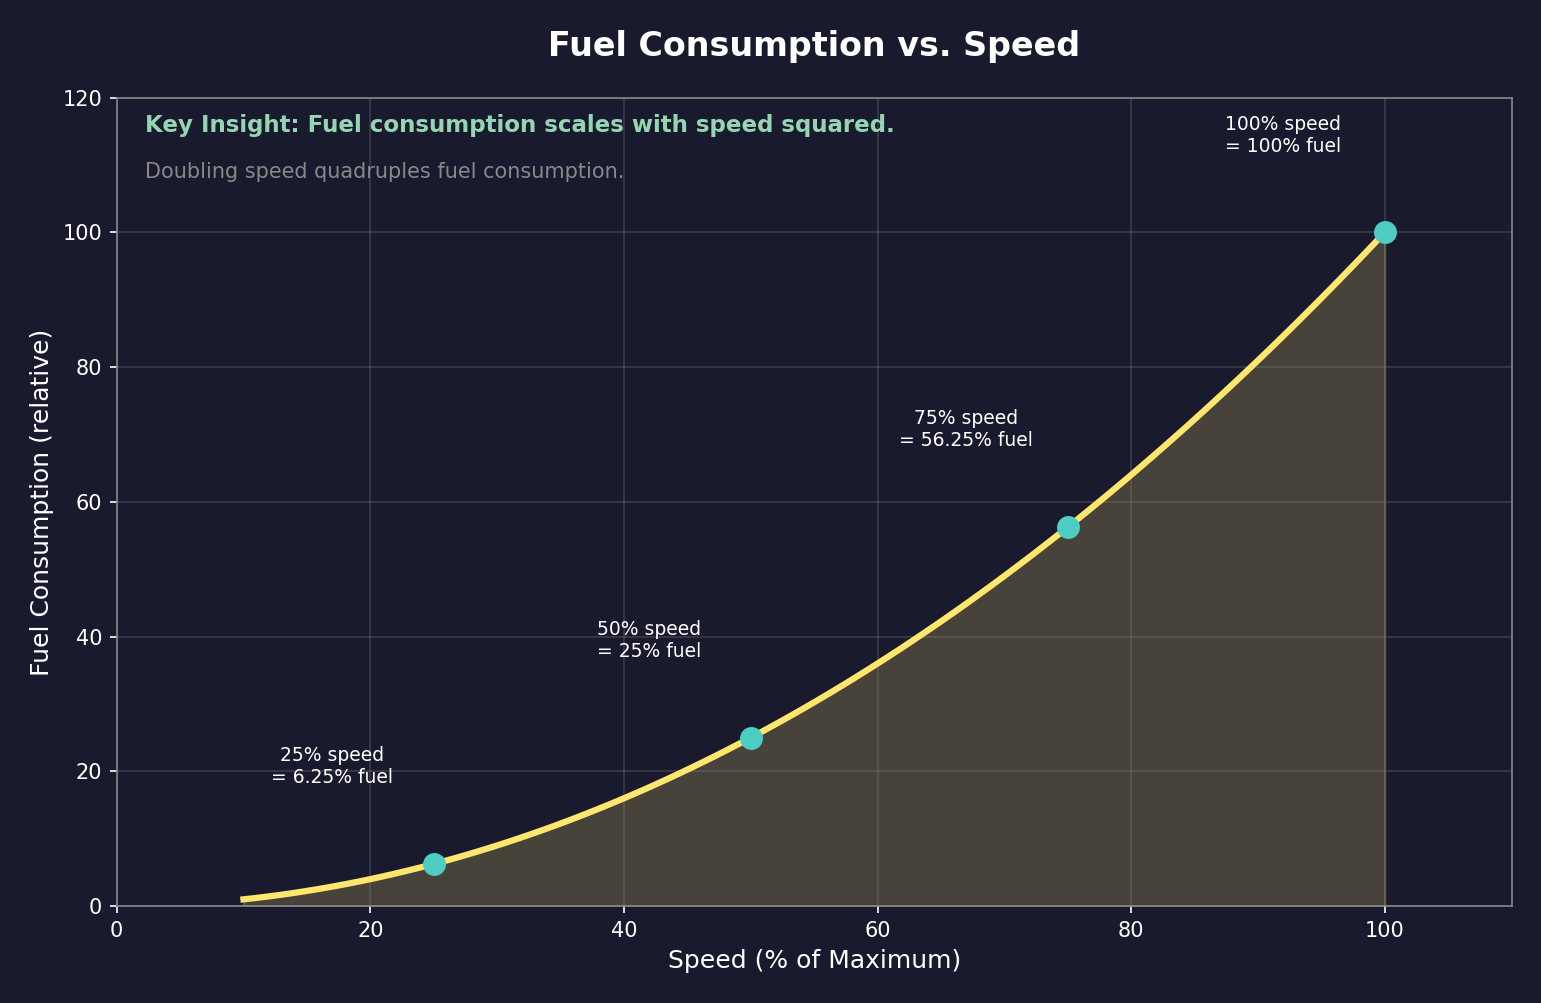
10.1.8.1 Speed vs. Fuel Consumption
Fuel consumption in Aurora C# is time-based (Litres per Engine Power Hour), not distance-based \hyperlink{ref-10.1-2}{[2]}:
Fuel Used per Hour = Engine Power x Fuel Consumption Rate (litres/EP-hour)
Key Insight: Because fuel consumption is time-based and speed is proportional to engine power, traveling a given distance uses roughly the same fuel regardless of speed. Reducing speed reduces fuel burn per hour, but increases travel time proportionally.
Practical Example:
- Ship maximum speed: 4,000 km/s
- Fuel consumption at max speed: 10 litres/hour
- At 2,000 km/s (50% speed): ~5 litres/hour (reduced proportionally)
- Same distance takes twice as long but uses approximately the same total fuel
- Time-based costs (crew supplies, deployment clock) double at reduced speed
10.1.8.2 Reduced Power Settings
Reducing speed reduces fuel burn per hour, which matters primarily for time-based operations (patrols, loitering) where less distance covered means less fuel consumed overall. For fixed-distance transits (point A to point B), total fuel consumed is roughly the same regardless of speed.
When to Use Reduced Speed:
- Long-range patrols where time on station matters more than area covered
- Convoy escort matching cargo ship speeds
- Reducing thermal signature for stealth approaches
- Any situation where you want to minimize fuel burn per hour of operation
When to Use Maximum Speed:
- Combat situations or threat response
- Time-critical supply delivery
- Pursuit or interception operations
- Any situation where arrival time matters more than fuel
10.1.8.3 Sprint vs. Cruise
Military operations often involve “sprint and drift” or “sprint and cruise” patterns:
Sprint: Maximum speed for rapid repositioning or engagement
- Use when closing to engagement range
- Use when evading threats
- Use when responding to distress calls
- Fuel cost is high but time is critical
Cruise: Reduced speed for sustained operations
- Use during routine patrol legs
- Use during long transits through secure space
- Use when preserving fuel reserves for combat maneuvering
- Fuel-efficient but slower response to emerging situations
Combined Approach:
- Cruise toward the operational area at 50-75% speed
- Sprint when contacts are detected or combat is imminent
- Return to cruise after the situation resolves
- This preserves fuel for the maneuvers that matter
10.1.8.4 Long Transit Planning
For transits exceeding several weeks, fuel optimization becomes critical:
Pre-Transit Checklist:
- Calculate total distance to destination
- Verify fuel capacity exceeds requirement with margin (20%+ recommended)
- Identify refueling points along the route
- Set conditional orders for low-fuel situations
- Consider reduced speed if schedule permits
Refueling Waypoints:
For very long transits, establish refueling points:
- Position tankers at intermediate waypoints
- Use colonies with fuel stockpiles as waypoints
- Plan the route through systems with refueling infrastructure
- Consider “leapfrog” tanker positioning for exploration missions
Fuel Reserve Management:
- Always maintain minimum 15-20% fuel reserve
- Deep space operations: 25-30% reserve (no nearby refueling)
- Combat operations: 30-40% reserve (need maneuvering fuel)
- Set conditional return orders at your chosen threshold
Tip: For routine cargo runs, speed does not significantly affect total fuel consumed for the trip (fuel per distance is roughly constant). However, faster delivery means the freighter completes more runs per unit time, improving throughput. Choose speed based on schedule requirements rather than fuel conservation.
Tip: When planning exploration missions into unknown space, assume you will need to return the way you came. Budget fuel for round-trip distance plus a 30% margin for unexpected detours or combat.
Tip: Position deep-space refueling points along major transit routes. A tanker stationed at the midpoint of a long route effectively doubles the operational range of ships traveling that corridor.
Related Sections
- Section 8.3 Engines – Engine design and power output
- Section 9.3 Task Groups – Task group movement and formation
- Section 9.5 Orders – Order types, conditional orders, and standing orders
- Section 10.4 Waypoints – Creating waypoints for patrol routes and navigation
- Section 11.1 Thermal and EM Signatures – How speed affects detectability
- Section 11.2 Passive Sensors – Sensor range for patrol spacing
- Section 14.1 Fuel – Fuel consumption and logistics
- Section 14.3 Supply Ships – Tanker and underway replenishment operations
- Appendix A: Formulas – Movement and fuel calculation formulas
References
\hypertarget{ref-10.1-1}{[1]} AuroraWiki Engine page - Speed formula definition: “One unit of engine power are the amount of power required to propel 50 tons (1 HS) against the Trans-Newtonian drag at 1000 km/s.”
\hypertarget{ref-10.1-2}{[2]} Aurora database FCT_TechSystem table - Fuel Consumption technology entries showing “Litres per Engine Power Hour” units.
\hypertarget{ref-10.1-3}{[3]} Aurora4x Fandom Wiki “Time, Turns and Interrupts” - Time increment and sub-pulse mechanics.
\hypertarget{ref-10.1-4}{[4]} Aurora database FCT_TechSystem table - Underway Replenishment technologies showing 20% to 100% rate progression.
\hypertarget{ref-10.1-5}{[5]} Aurora database FCT_ShipClass table - Speed calculations verified against EnginePower, Size, and MaxSpeed columns.
\hypertarget{ref-10.1-6}{[6]} Aurora2.pentarch.org forum - Propulsion Design Theory thread confirming fuel consumption formulas.
\hypertarget{ref-10.1-7}{[7]} Aurora4x Fandom Wiki “Time, Turns and Interrupts” and AuroraWiki “Time, Turns and Interrupts” - Time increment buttons from 5 seconds to 30 days. Note: the game UI shows 2 minutes (not 1 minute) and 4 hours (not 3 hours) as increment options.
\hypertarget{ref-10.1-8}{[8]} Aurora database FCT_TechSystem table - Fuel Consumption technology entries: 13 levels from “1 Litre per Engine Power Hour” (TechSystemID 25141) down to “0.1 Litres per Engine Power Hour” (TechSystemID 25140).
\hypertarget{ref-10.1-9}{[9]} AuroraWiki “Engine” page and Aurora2.pentarch.org forum “Propulsion Design Theory” - Engine size modifier formula SQRT(10 / Engine Size in HS) for fuel consumption scaling.
\hypertarget{ref-10.1-10}{[10]} AuroraWiki “Lagrange Point” - Planet size 150+ creates natural Lagrange Points 60 degrees behind in orbit; stabilised Lagrange Points require mass >= 0.25 Earth masses.
\hypertarget{ref-10.1-11}{[11]} AuroraWiki “C-Ship Movement” and Aurora2.pentarch.org forum “Repeat fleet orders X times?” - Repeat Orders X behavior: entering N executes orders N+1 times total (original plus N repeats).