5.1 Establishing Colonies
Updated: v2026.02.15

Note: Claims in this section have been verified against the AuroraDB.db v2.7.1 game database where possible. Numbered references indicate verified sources.
Contents
Updated: v2026.02.15
- 5.1 Establishing Colonies
- Contents
- 5.1.1 Colony Ships
- 5.1.2 Colony Cost
- 5.1.2.1 Colonization Restrictions
- 5.1.2.2 What Determines Colony Cost
- 5.1.2.3 Colony Cost Values and Their Meaning
- 5.1.2.4 Colony Cost as Mining Output Multiplier
- 5.1.2.5 Infrastructure Requirements
- 5.1.2.6 Reducing Effective Colony Cost
- 5.1.2.7 Colony Cost Projection
- 5.1.2.8 Eccentric Orbit Effects on Colony Cost
- 5.1.2.9 Colony Cost of Comets
- 5.1.2.10 Potential Colony Locations
- 5.1.3 Conventional Start
- 5.1.4 Initial Setup
- 5.1.5 Deep Space Populations
- 5.1.6 Deleting Empty Colonies
- 5.1.7 Populations as Text
- UI References and Screenshots
- Related Sections
- References
5.1.1 Colony Ships
Updated: v2026.01.30
Colony ships are the primary means of establishing new colonies on surveyed bodies. They transport colonists and basic infrastructure to a new world, creating the initial settlement.
5.1.1.1 Designing Colony Ships
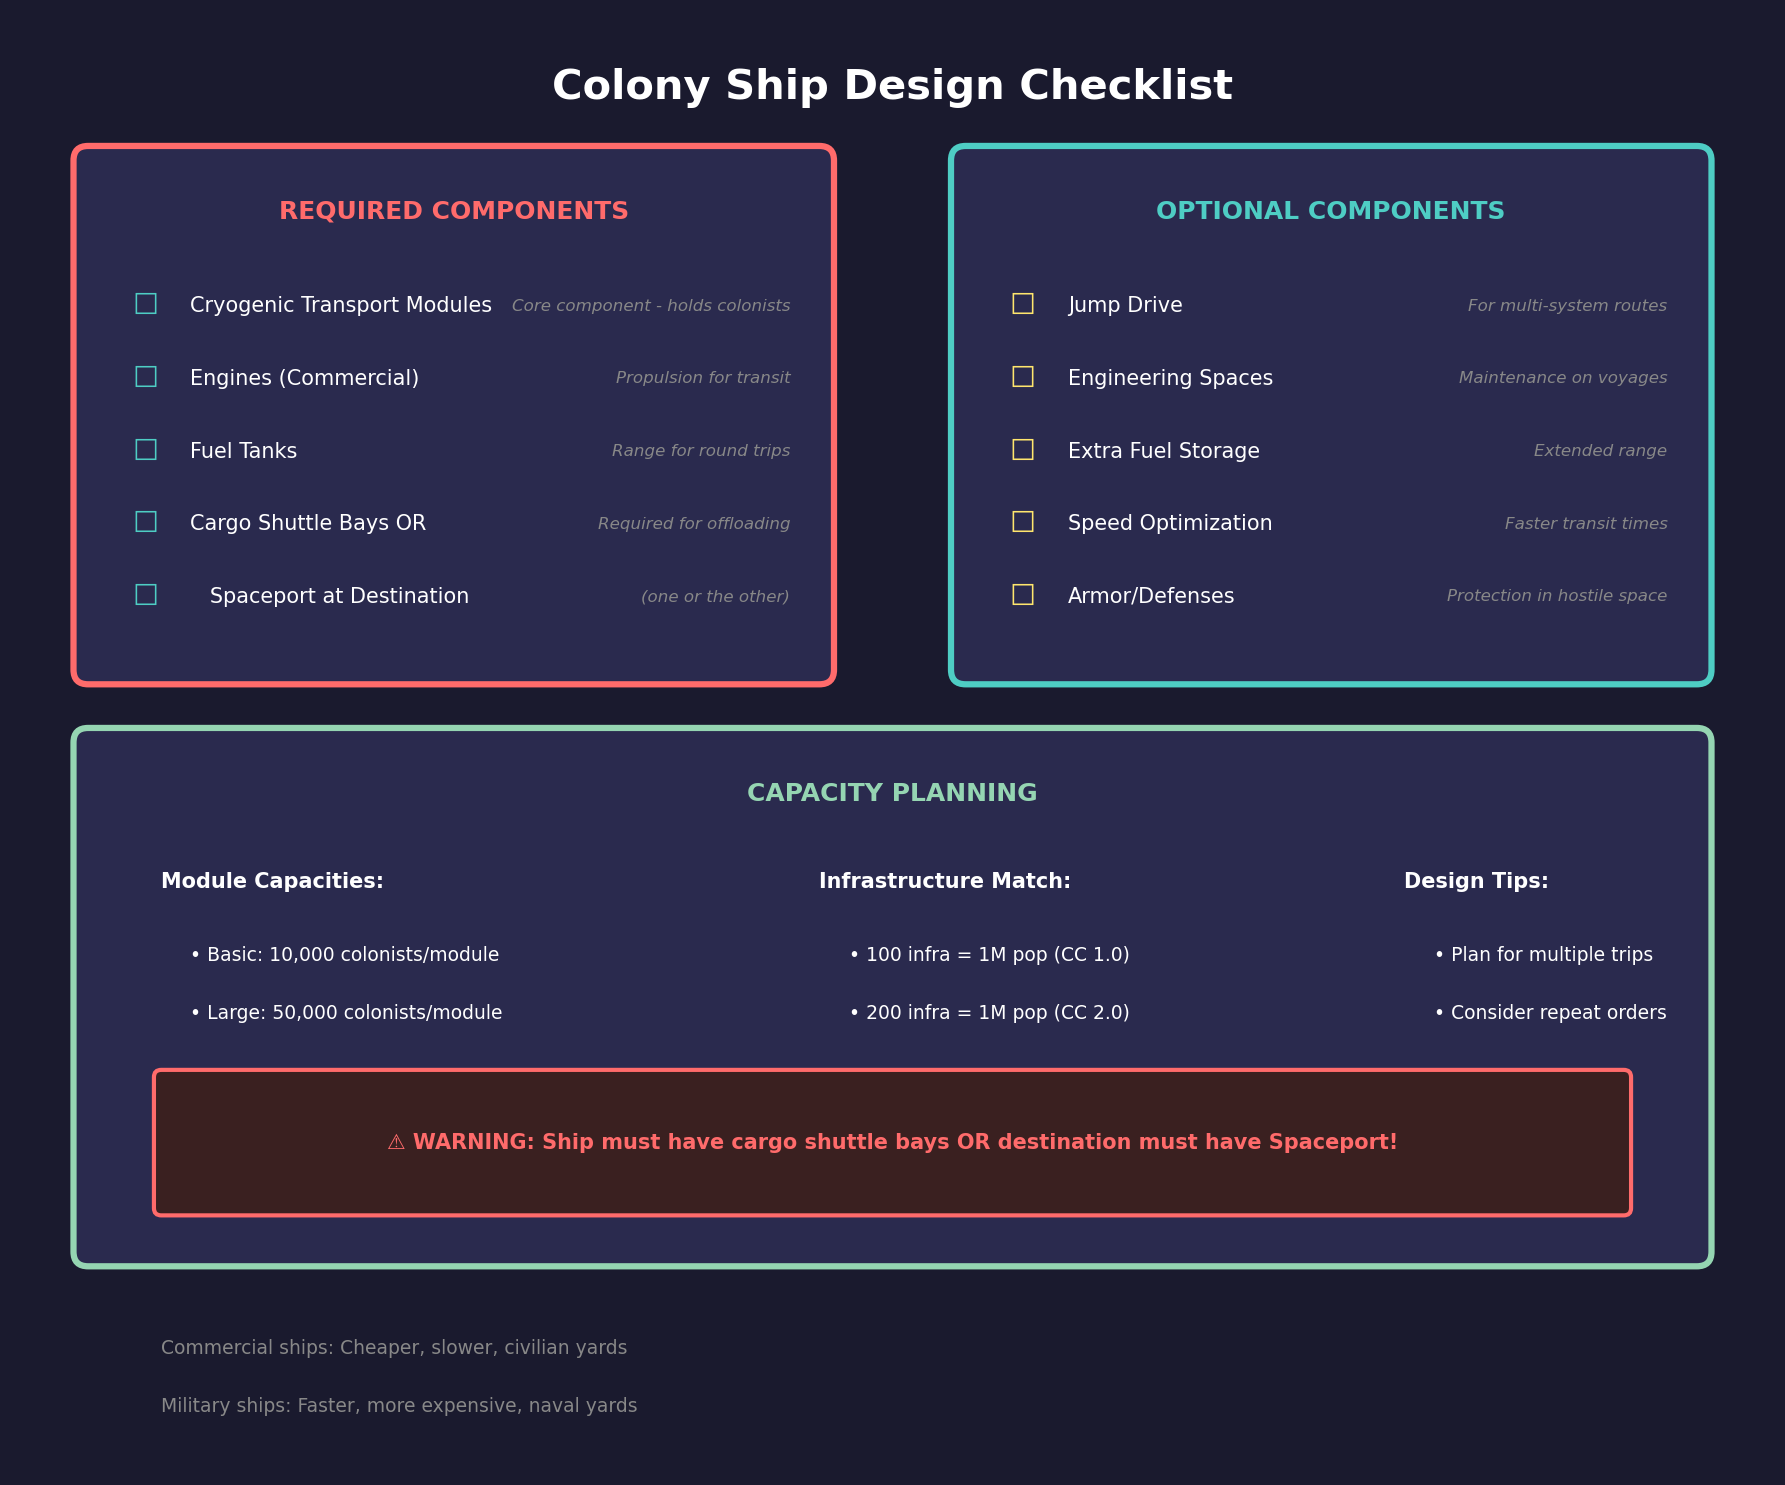
Colony ships are designed in the Ship Designer (see Section 8.1 Design Philosophy) using specialized components:
Cryogenic Transport Modules:
- The core component for colony ships, each module holds a fixed number of colonists in cryogenic suspension
- Module capacity depends on your current cryogenic transport technology level
- Multiple modules can be stacked on a single ship for larger colony expeditions
- Base capacity starts at 10,000 colonists per module at the initial tech level \hyperlink{ref-5.1-1}{[1]}
Supporting Components:
- Engines: Colony ships need propulsion but are rarely speed-optimized. Commercial engines are typical.
- Fuel Tanks: Sufficient range to reach the target colony site. Plan for round trips if the ship will be reused.
- Jump Drive (or escort): Required if the colony target is in another system without jump gates.
- Cargo Shuttle Bays (or destination Spaceport/Cargo Shuttle Station): Required to unload colonists. The colony ship must have cargo shuttle bays installed, OR the destination colony must have a Spaceport or Cargo Shuttle Station already in place. Without either, colonists cannot be offloaded.
- Engineering Spaces: For maintenance during long voyages, though colony ships often operate with minimal crew.
Warning: A common new-player trap is designing a colony ship without cargo shuttle bays and sending it to an uninhabited body with no Spaceport. The ship arrives but cannot unload its colonists. Either include cargo shuttle bays in your colony ship design, or ensure a Spaceport/Cargo Shuttle Station is already present at the destination before your colony ship arrives. For first-time colonization of a new body, cargo shuttle bays on the ship are the only reliable option.
5.1.1.2 Commercial vs. Military Colony Ships
Commercial Colony Ships:
- Use commercial engines (larger, slower, more fuel-efficient per ton)
- Have commercial jump drives if jump-capable
- Cheaper to build and operate
- Slower but more cost-effective for established routes
- Can be built by civilian shipyards
Military Colony Ships:
- Use military engines (faster, more expensive)
- Can be equipped with military jump drives
- Faster transit times, useful for emergency colonization or contested regions
- More expensive per colonist transported
- Built by naval shipyards
5.1.1.3 Colony Ship Operations
Loading Colonists:
- The colony ship must be in orbit around a colonized body with available population.
- Select the colony fleet and open Movement Orders.
- Click the source colony (e.g., Earth) and select “Load Colonists.” This order is only available on ships equipped with cryogenic transport modules.
- The ship will load colonists up to its capacity. Population is deducted from the source colony.
Delivering Colonists:
- Click the destination body (e.g., Luna) in Movement Orders and select “Unload Colonists.”
- If no colony exists on the body, one is automatically created.
- Colonists are added to the target colony’s population.
Setting Up Repeat Colony Runs:
For sustained colonization, use repeat orders to automate multiple trips:
- Select the colony fleet and open Movement Orders.
- Add “Load Colonists” at the source body.
- Add “Unload Colonists” at the destination body.
- Set the repeat count for the desired number of trips (e.g., 5 trips x 200,000 colonists per trip = 1,000,000 total delivered).
- Add a refuel/resupply order after the repeating block to ensure the ships do not run dry.
Population Capacity Planning:
When planning colonist deliveries, match population to infrastructure capacity:
- 100 infrastructure units support 1 million population on a colony cost 1.0 world \hyperlink{ref-5.1-3}{[3]}
- Each Large Cryogenic Transport module moves approximately 50,000 colonists per trip \hyperlink{ref-5.1-2}{[2]}
- A fleet of two colony ships with 2x Large Cryogenic Transport each delivers 200,000 colonists per trip
- 1,000 infrastructure units support 10 million population on a colony cost 1.0 world \hyperlink{ref-5.1-3}{[3]}
- Do not exceed infrastructure-supported population, or colonists will suffer and may die from inadequate life support
Warning: Delivering more colonists than your infrastructure can support causes immediate population losses. Always verify that sufficient infrastructure is in place (or in transit) before committing to large colonist shipments.
Natural Growth After Delivery:
Once population is established, natural growth occurs automatically. A colony that received 3,000,000 colonists may show 3,010,000 shortly after due to births. The population growth modifier set during game creation significantly affects this rate. Approximately 60% of the total population will be available as workers. (requires live testing — #733)
Tip: In the early game, a single colony ship making repeated trips is usually sufficient. As your empire expands, consider building 3-5 colony ships and assigning them to different routes. Civilian shipping lines will eventually begin moving colonists on their own once populations are established.
5.1.2 Colony Cost
Updated: v2026.02.15
Colony cost is the single most important number when evaluating a potential colony site. It determines how much infrastructure is required to support population on that world and how efficient conventional mining operations will be.
5.1.2.1 Colonization Restrictions
Certain bodies cannot be colonized at all:
- Gas Giants and Super Jovians cannot be colonized
- High Gravity: Bodies with gravity higher than the species’ maximum tolerance cannot be colonized
- Very Low Gravity: Bodies with gravity below 0.1g cannot retain atmosphere and therefore cannot be terraformed (though they can still be colonized with infrastructure) (requires live testing — #733 – gameplay mechanic not stored in database)
5.1.2.2 What Determines Colony Cost
Colony cost is determined by taking the single highest cost factor from several environmental checks. The factors are not additive – only the worst one applies. For detailed formulas and thresholds for each factor (temperature, atmospheric composition, gravity, hydrosphere), see Section 5.3.1 Colony Cost Factors.
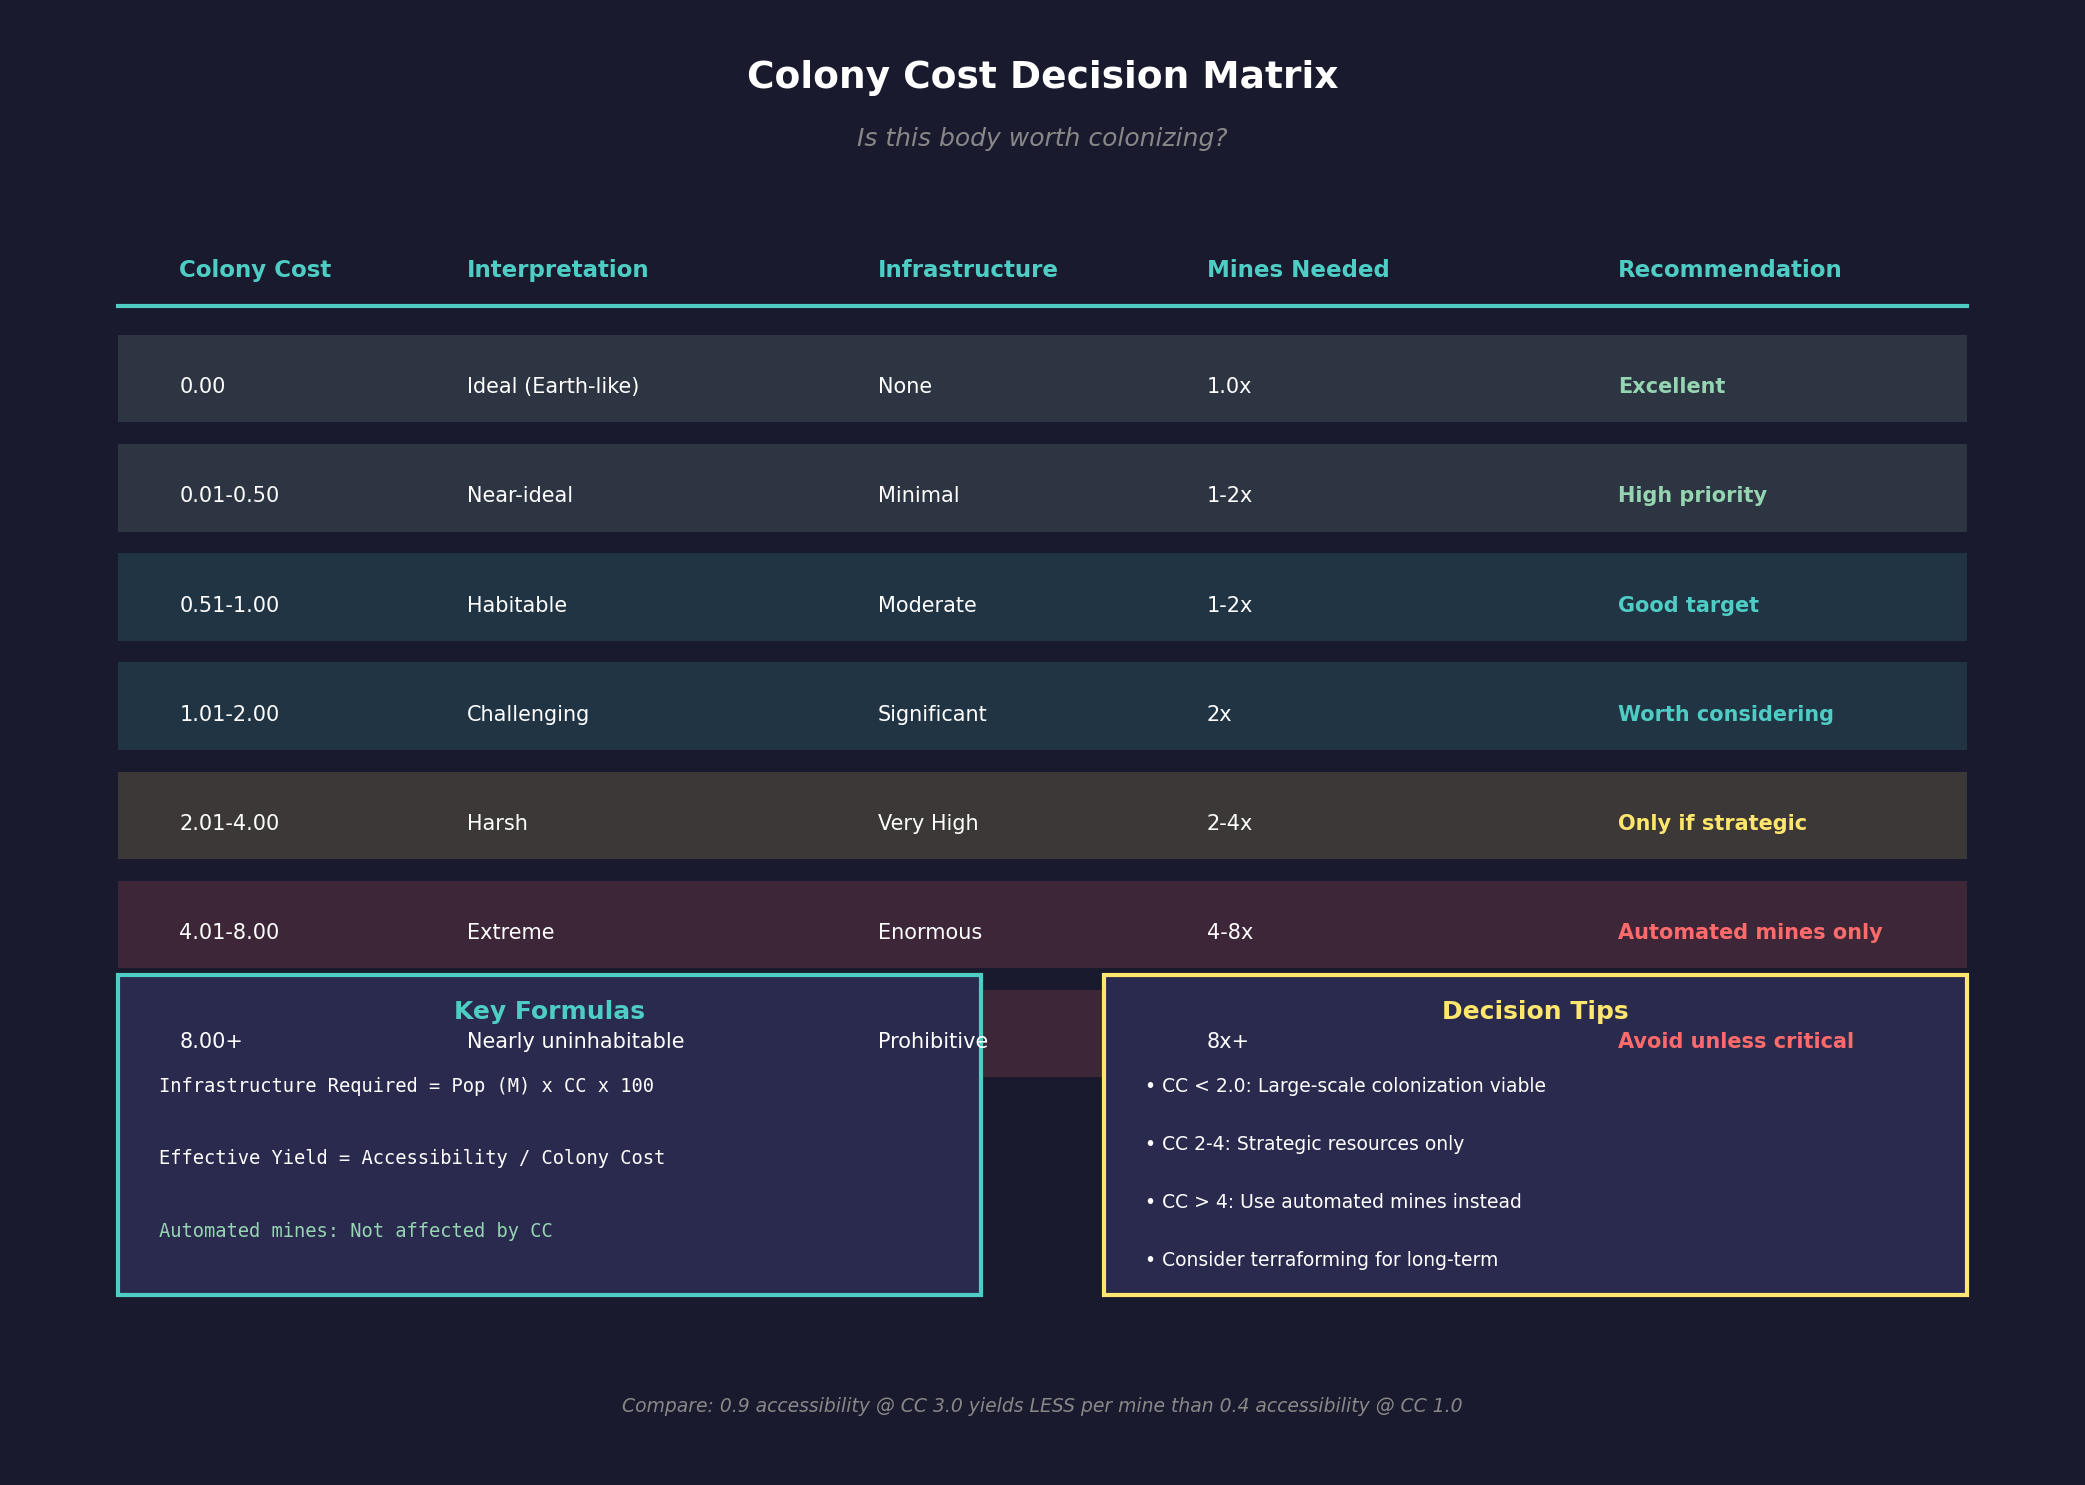
5.1.2.3 Colony Cost Values and Their Meaning
| Colony Cost | Interpretation | Infrastructure Needed |
|---|---|---|
| 0.00 | Ideal (Earth-like) | None for survival |
| 0.01-0.50 | Near-ideal | Minimal |
| 0.51-1.00 | Habitable with support | Moderate |
| 1.01-2.00 | Challenging | Significant |
| 2.01-4.00 | Harsh | Very high |
| 4.01-8.00 | Extreme | Enormous |
| 8.00+ | Nearly uninhabitable | Prohibitive |
5.1.2.4 Colony Cost as Mining Output Multiplier
Beyond infrastructure requirements, colony cost directly reduces conventional mining efficiency. The colony cost value acts as a divisor on mine output, meaning more mines are needed on hostile worlds to match the production of an Earth-like colony (requires live testing — #733 – colony cost mining divisor is a gameplay mechanic not stored in the database):
- Earth (CC 0.00): Each mine produces its full base output (10 units per year x accessibility) \hyperlink{ref-5.1-4}{[4]}
- CC 2.0 world: Each mine produces at half efficiency, requiring 2 mines to match 1 mine on a CC 0 world (requires live testing — #733)
- CC 24.49 world (e.g., Venus): It takes approximately 24.49 mines to produce what 1 mine produces on Earth (requires live testing — #733)
Automated mines are unaffected by colony cost – they produce at their full base rate regardless of environmental conditions, making them the preferred option for hostile worlds (requires live testing — #733 – automated mine colony cost exemption is a widely reported gameplay mechanic but not directly confirmed in the database).
This relationship is critical when evaluating whether a mineral-rich body is worth colonizing. A body with excellent mineral deposits but extreme colony cost may require an impractical number of conventional mines to achieve meaningful output. In such cases, automated mines or terraforming to reduce colony cost (see Section 5.5 Terraforming) may be more effective strategies.
Tip: When comparing potential mining colonies, divide the mineral accessibility by the colony cost to get effective per-mine yield. A 0.9 accessibility deposit on a CC 3.0 world produces less per mine than a 0.4 accessibility deposit on a CC 1.0 world.
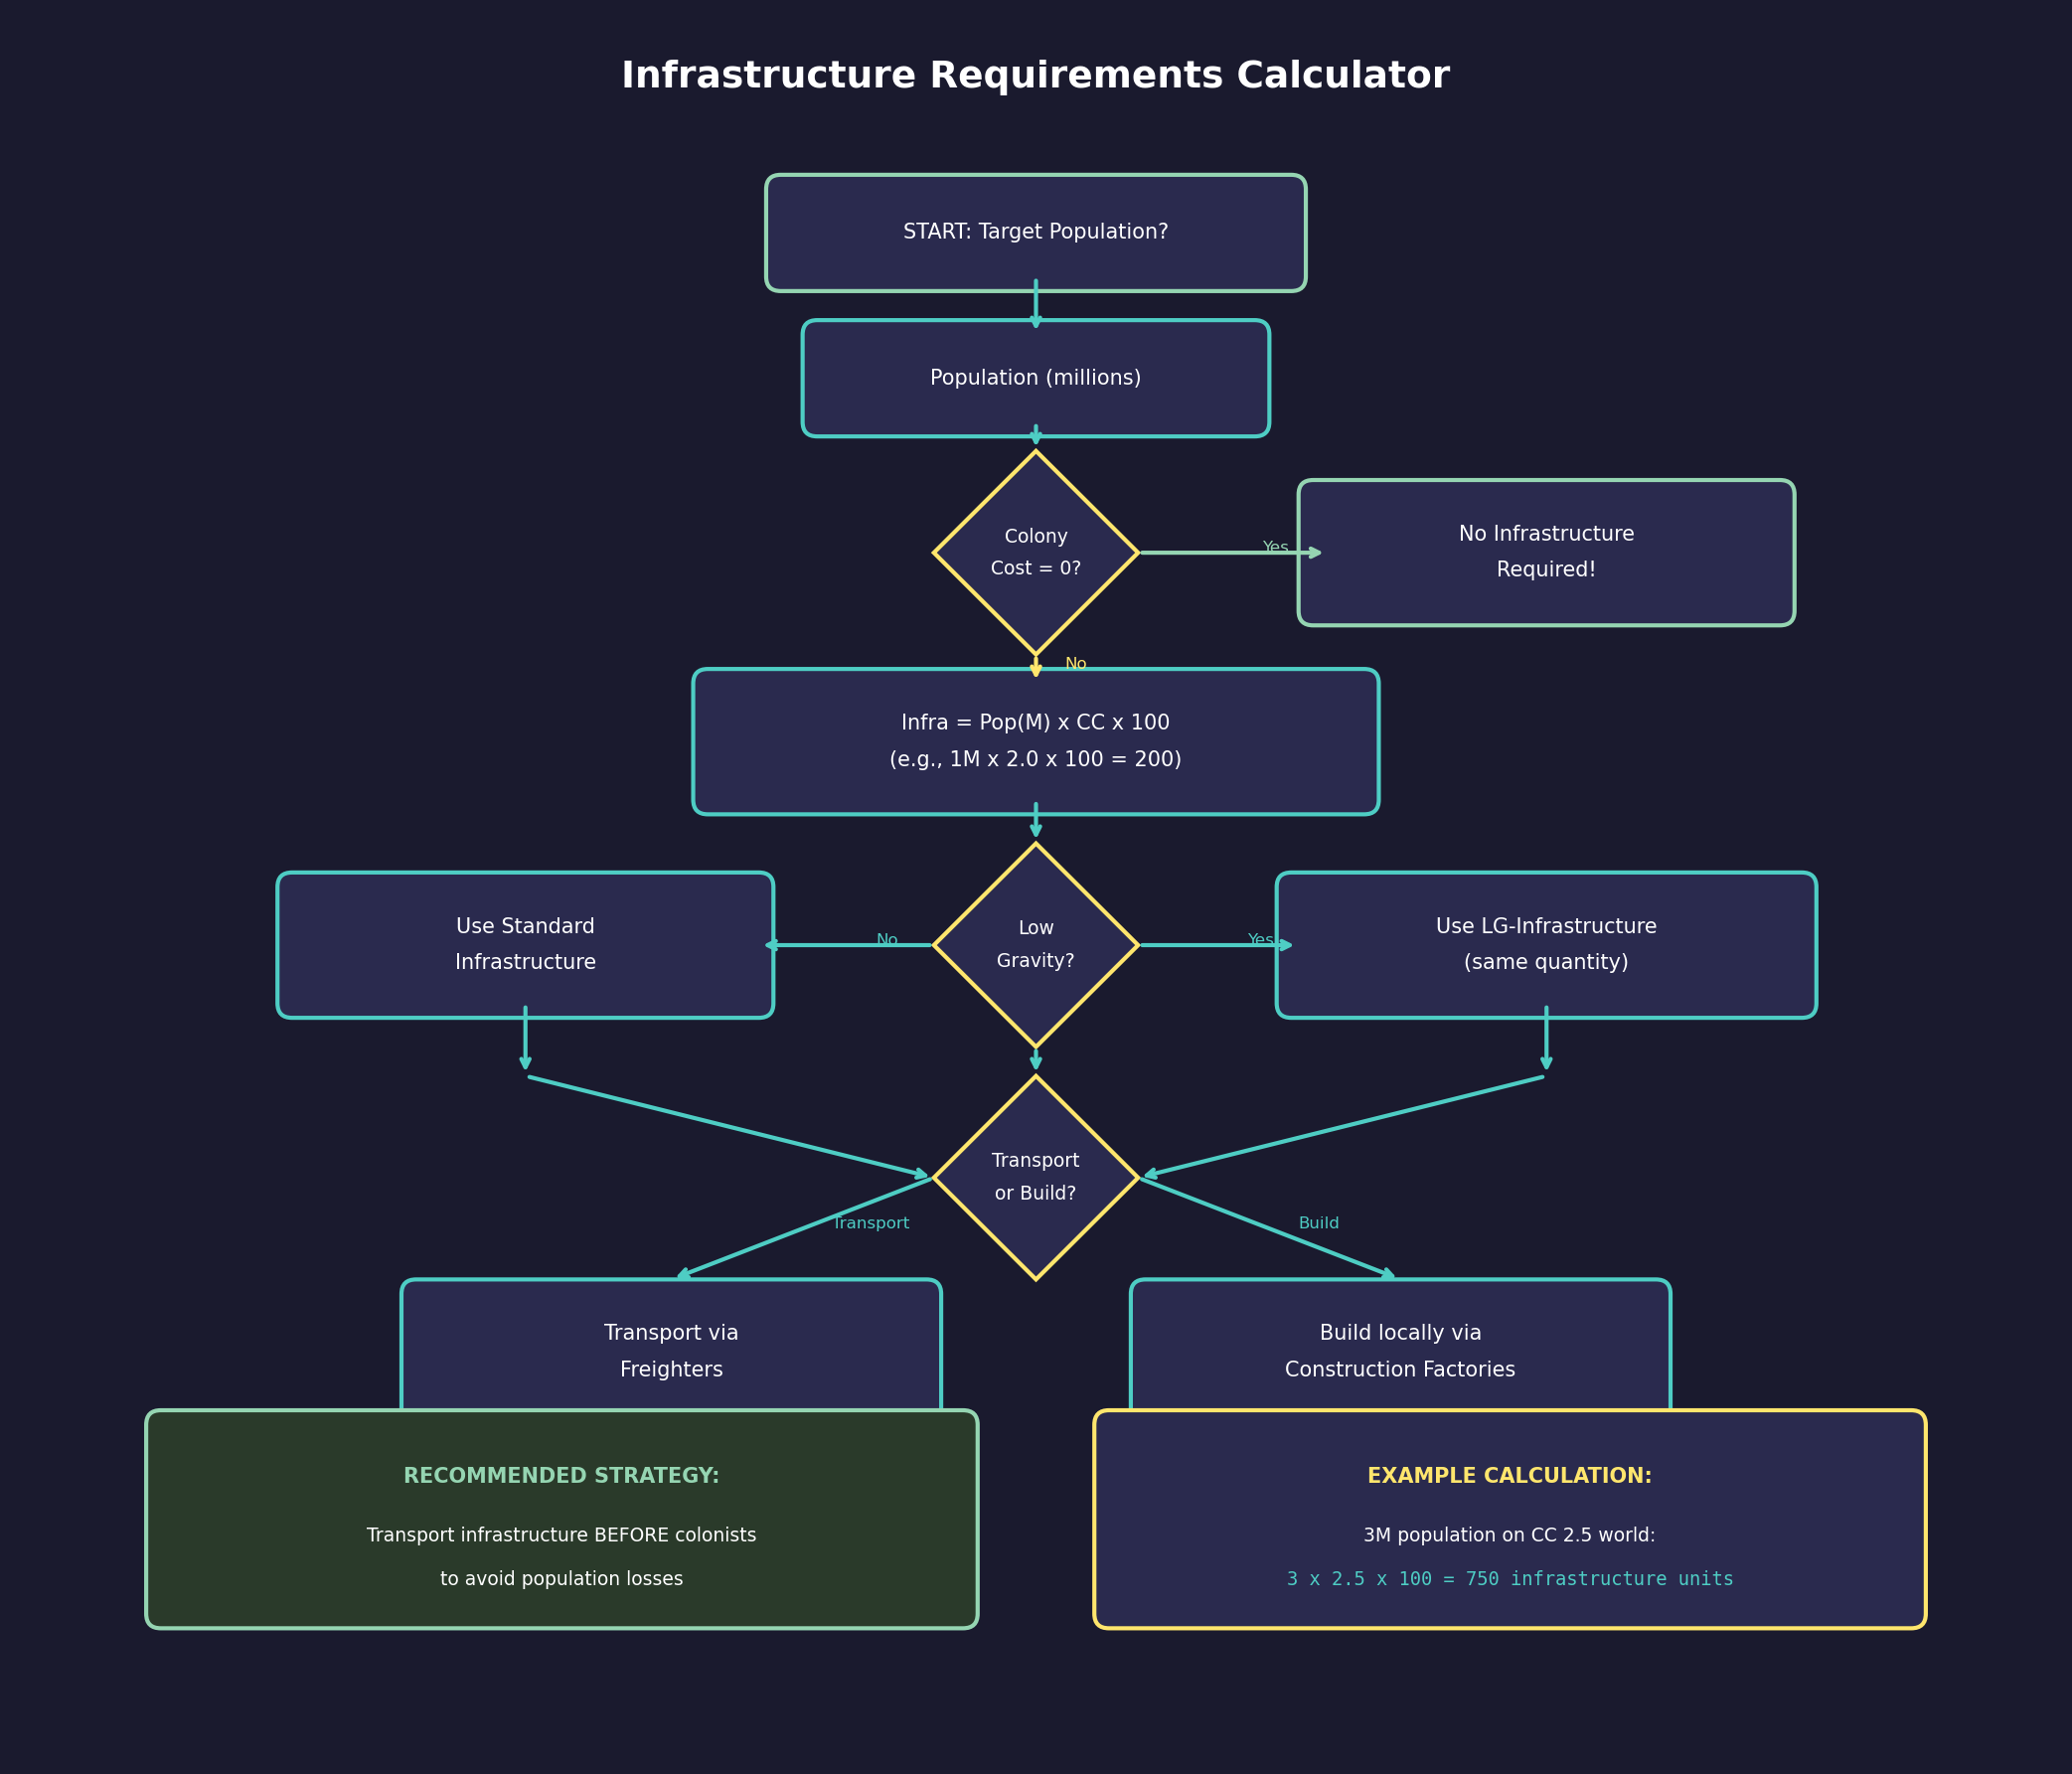
5.1.2.5 Infrastructure Requirements
The colony cost directly determines how many infrastructure units are needed per million colonists:
- Formula: Required Infrastructure = Population (in millions) x Colony Cost x 100 \hyperlink{ref-5.1-3}{[3]}
- A colony cost of 2.0 means you need 200 infrastructure units per million people
- A colony cost of 0.0 means no infrastructure is required (the world is naturally habitable)
- Low Gravity worlds require standard infrastructure at double the normal ratio (2 x Colony Cost x 100 per million population). Prior to v2.6.0, a separate LG-Infrastructure installation type was used; this was replaced with doubled standard infrastructure requirements.
Infrastructure must be transported to the colony or built there using construction factories. This represents the sealed habitats, life support systems, temperature regulation, and other equipment needed to keep colonists alive.
5.1.2.6 Reducing Effective Colony Cost
Several factors can reduce the effective colony cost:
- Terraforming: Changing the atmosphere, temperature, or hydrosphere can permanently reduce colony cost (see Section 5.5 Terraforming)
- Technology: Some technologies reduce the infrastructure requirements per unit of colony cost
- Genetic Modification: Certain research paths allow populations adapted to specific environments, effectively shifting what counts as “ideal” conditions for that species
Tip: A colony cost of 2.0 or below is generally considered viable for large-scale colonization. Costs above 4.0 are usually only worth it for critical strategic resources. If you find a mineral-rich world with colony cost above 5.0, consider using automated mining installations instead of a populated colony.
5.1.2.7 Colony Cost Projection
The System View window includes a colony cost projection feature that projects colony cost into the future based on various time intervals (weeks, months, quarters, years, up to centuries). This is particularly useful for bodies with eccentric orbits, where colony cost changes as distance from the parent star varies.
Projection Granularity:
- Wide view with SpaceMaster mode: Up to 12 future periods per granularity level
- Wide view without SpaceMaster mode: Up to 12 future periods
- Normal view without SpaceMaster mode: Up to 7 future periods
Orbital Limitations:
- For planets, projections extend up to one complete orbit
- For moons, projections show one orbit of the parent body
- Example: Mars displays 12 future months but only 2 future years; Pluto can project 300 years ahead due to its 248-year orbit
Bodies with very long orbital periods and extreme distances (such as Pluto) show minimal cost variation across projected periods since they cannot get significantly colder.
5.1.2.8 Eccentric Orbit Effects on Colony Cost
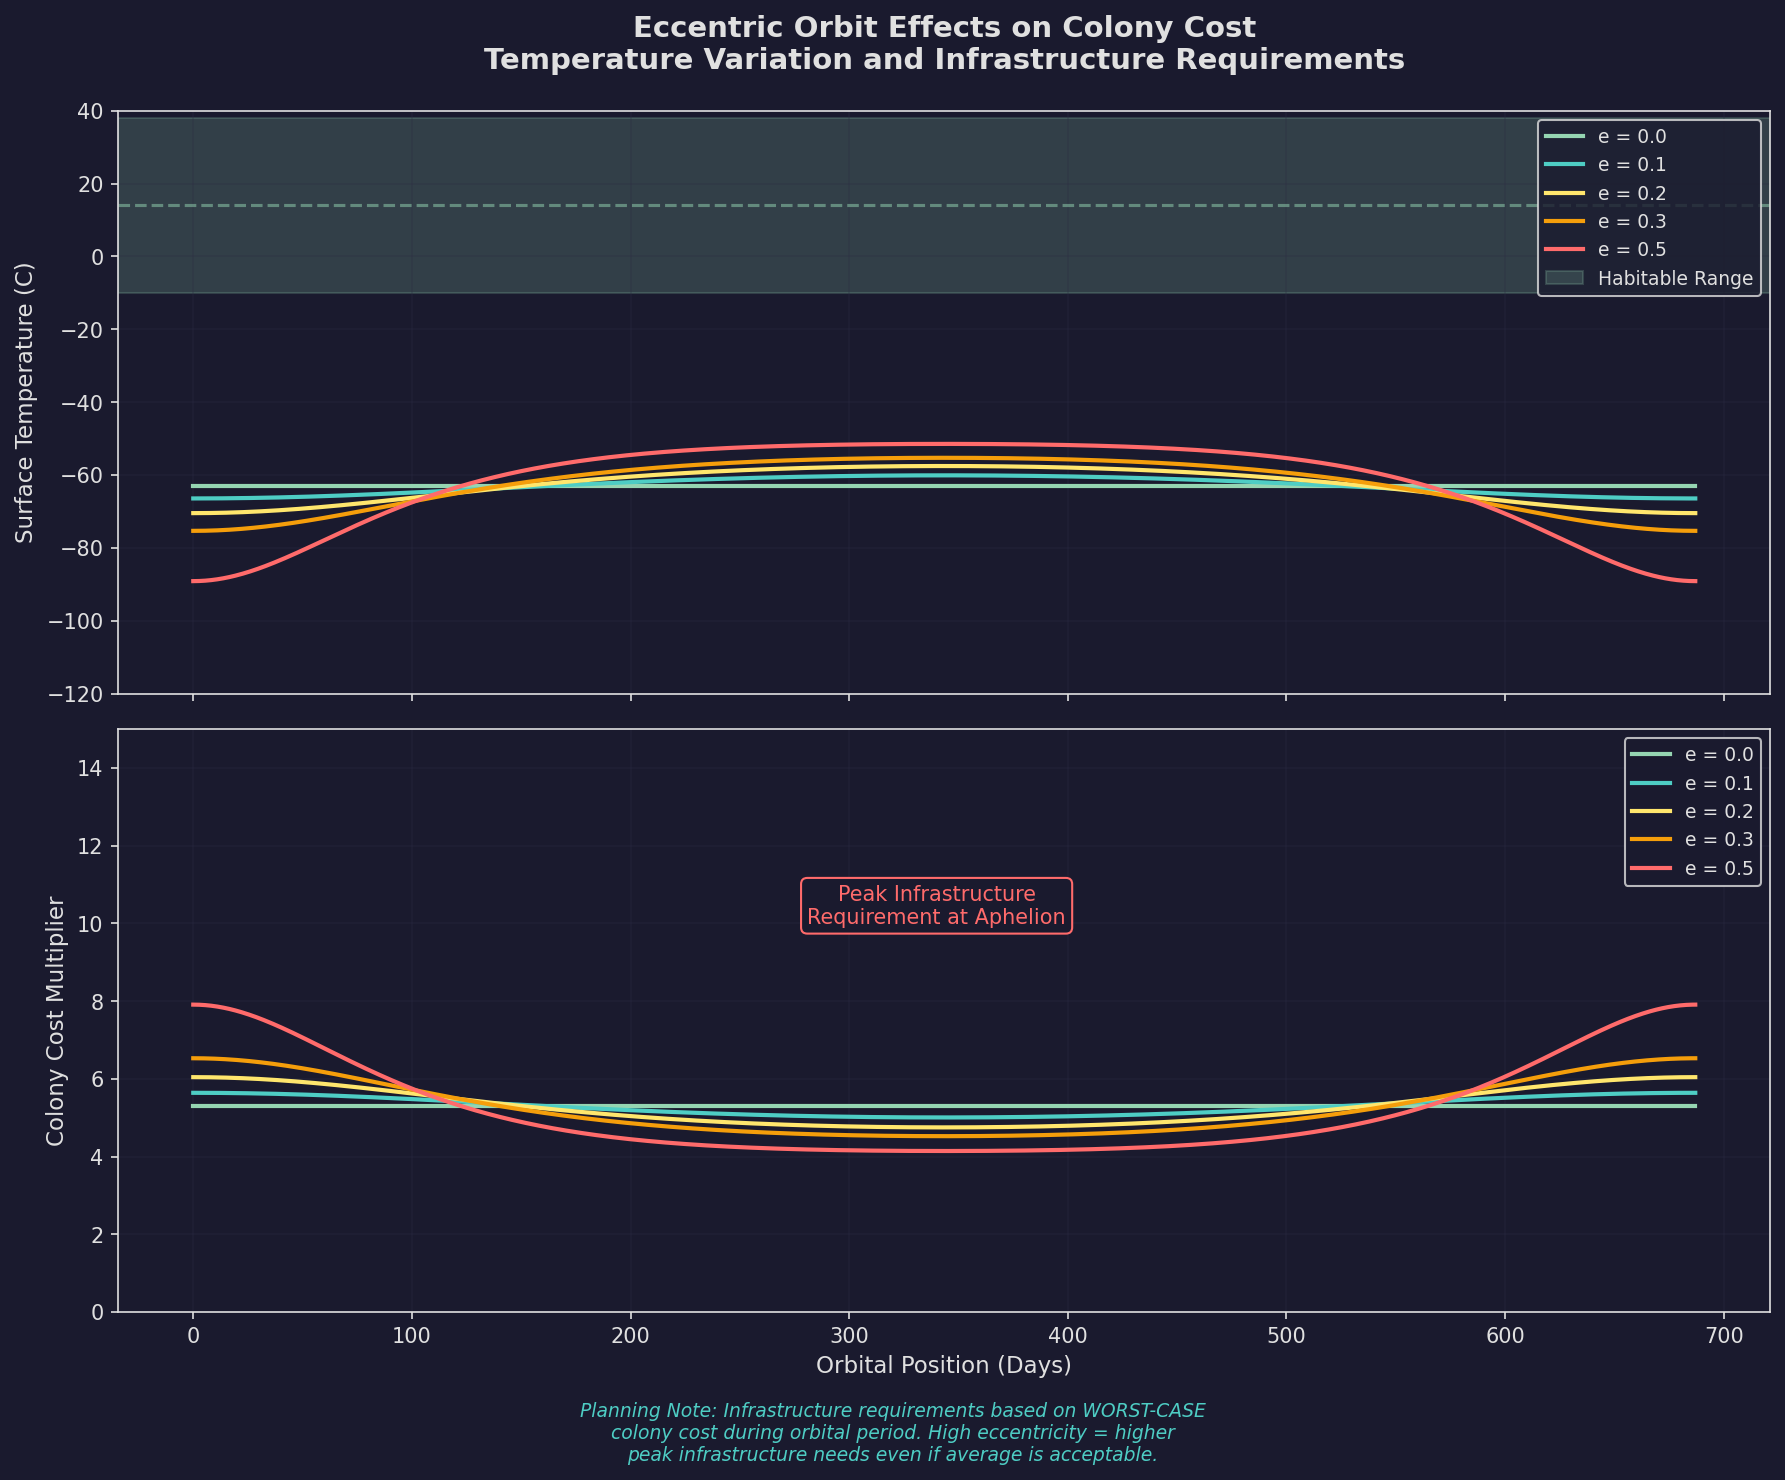
Planets and moons with eccentric orbits experience variable colony costs as their distance from the parent star changes over the orbital period. The colony cost displayed in the System View and Economics windows is always the current value, not an average or worst-case figure. As a body moves closer to its star, surface temperature rises, potentially reducing temperature-based colony cost; as it moves farther away, temperatures drop and colony cost may increase. Since infrastructure supports population based on current colony cost (Required Infrastructure = Population x Colony Cost x 100) \hyperlink{ref-5.1-3}{[3]}, the maximum supported population fluctuates in step with these orbital changes. Players colonizing eccentric-orbit bodies should plan infrastructure levels around the worst-case (highest) colony cost during the orbital period, or risk periodic population losses when the body reaches aphelion and supported population temporarily drops below actual population.
5.1.2.9 Colony Cost of Comets
In C# Aurora, comet colony costs are dynamic rather than static. Temperature and colony cost update in real time as comets move toward and away from the parent star. The System View displays current distance rather than maximum distance, and players can toggle between current and maximum colony cost viewing in the System View, Economics window Colony Summary, and the Tactical Map’s Body Info tab.
Dynamic Population Capacity: Since infrastructure supports population based on colony cost, population capacity fluctuates as comets orbit. A comet approaching perihelion may support fewer or more colonists depending on temperature changes.
Civilian Traffic Restrictions: The Unload Colonists standing order will ignore comets, preventing automated civilian traffic from depositing colonists on bodies that may be ejected from the system or experience extreme environmental changes.
5.1.2.10 Potential Colony Locations
Rather than a separate window, the colony site search function is integrated into the System View window. Players can click “All System View” to access search filters across all systems simultaneously.
Search Filters:
- Colony cost thresholds
- Mineral presence
- Gravity acceptability
- Oxygen atmosphere
- Population capacity minimums
- Ownership (excluding alien-controlled systems)
Sorting Options:
- Colony cost (primary)
- Hydro extent
- Mineral deposit size
This integrated approach allows narrowing the search for potential colony sites across all systems while retaining all the functionality of the System View window, eliminating the need to switch between multiple interfaces.
5.1.3 Conventional Start
Updated: v2026.01.30
The Conventional Start is a game setup option that provides players with a pre-industrial civilisation that has not yet discovered Trans-Newtonian Theory. This represents a modern-day or near-future civilisation beginning its expansion into space.
5.1.3.1 Starting Installations
The conventional start provides the following facilities, scaled based on starting population:
Shipyard Facilities:
- 1,000-ton Naval Shipyard (requires live testing — #733 – starting configuration, not stored in installation table)
- 10,000-ton Commercial Shipyard (requires live testing — #733)
Research and Development:
- Research Facilities proportional to manufacturing population: one facility per 12 million manufacturing population (requires live testing — #733 – starting game configuration)
Military Infrastructure:
- Military Academy
- Naval Headquarters
- 5 Maintenance Facilities (requires live testing — #733 – starting game configuration)
Economic Facilities:
- Spaceport
- Conventional Industry equal to eight times the manufacturing population in millions (requires live testing — #733 – starting game configuration)
Support Infrastructure:
- Deep Space Tracking Station
- Infrastructure as needed for the colony cost
5.1.3.2 Population-Based Scaling
The setup scales based on initial population. For example, a starting population of one billion will have approximately 1,600 conventional factories and 16 research facilities.
5.1.3.3 Conventional Industry
Conventional Industry is a general-purpose installation available before the discovery of Trans-Newtonian Theory. Each unit of Conventional Industry provides the combined output of:
- 0.1 Construction Factories \hyperlink{ref-5.1-5}{[5]}
- 0.05 Ordnance Factories \hyperlink{ref-5.1-5}{[5]}
- 0.025 Fighter Factories \hyperlink{ref-5.1-5}{[5]}
- 0.05 Fuel Refineries \hyperlink{ref-5.1-5}{[5]}
- 0.025 Financial Centres \hyperlink{ref-5.1-5}{[5]}
- 0.15 Mines \hyperlink{ref-5.1-5}{[5]}
This means 10 Conventional Industry units produce the equivalent of 1 Construction Factory, and approximately 7 units equal 1 Mine. While versatile, Conventional Industry is far less efficient than dedicated TN installations and should be replaced as soon as possible after researching Trans-Newtonian Theory.
5.1.3.4 Converting Conventional Industry
Once Trans-Newtonian Theory is researched, Conventional Industry can be converted to any of six dedicated TN installation types. Each conversion costs 20 BP plus 20 units of a type-specific mineral \hyperlink{ref-5.1-6}{[6]}:
| Conversion Target | Mineral Cost |
|---|---|
| Construction Factory | 10 Duranium + 10 Neutronium |
| Mine | 20 Corundium |
| Fuel Refinery | 20 Boronide |
| Financial Centre | 20 Corbomite |
| Ordnance Factory | 20 Tritanium |
| Fighter Factory | 20 Vendarite |
Conversions can be queued simultaneously with percentage-based priority allocation. For recommended conversion strategies, see Section 6.3 Construction.
5.1.3.5 Installations Available Before Trans-Newtonian Theory
Since players start with certain installations in a conventional start, it does not make sense to require Trans-Newtonian Theory for their construction. The following 15 installations can be built without any advanced technology: \hyperlink{ref-5.1-7}{[7]}
- Naval Shipyard Complex
- Commercial Shipyard Complex
- Research Facility
- Spaceport
- Ground Force Construction Complex
- Military Academy
- Naval Headquarters
- Refuelling Station
- Ordnance Transfer Station
- Cargo Shuttle Station
- Maintenance Facility
- Financial Centre
- Deep Space Tracking Station
- Infrastructure
- Repair Yard
This allows early-game expansion of basic infrastructure and support facilities without gating progress behind advanced technology requirements.
5.1.3.6 Key Differences from Trans-Newtonian Start
- No missile bases or ICBMs are included in the conventional start
- All starting installations listed above can be constructed before Trans-Newtonian Theory research
- The focus is on early naval and industrial capability development
- Players must research TN Theory before building specialised installations (mines, construction factories, fuel refineries, etc.)
Tip: In a conventional start, your first research priority should be Trans-Newtonian Theory. Until that is complete, you are limited to Conventional Industry for all production. Once TN Theory is researched, immediately begin building dedicated Construction Factories and Mines to replace the less efficient conventional factories.
5.1.4 Initial Setup
Updated: v2026.01.30
5.1.4.1 Creating a Colony
Before any freight, installations, or colonists can be delivered to a body, it must first be explicitly designated as a colony. This is a prerequisite for all logistics interaction.
Procedure:
- Select the target body in the System View.
- Click the “Create Colony” button.
- The body is immediately marked as a colony with zero population and zero infrastructure.
- It now appears in the Economics window colony list and can receive shipments.
A colony with zero population is valid – “colonization” in Aurora means marking a body for interaction, not necessarily sending people there. You can send equipment and installations before any colonists arrive.
Infrastructure-First Colonization:
Sending infrastructure before colonists is a recommended strategy for hostile worlds:
- Transport infrastructure to a zero-population colony via freighters
- Once sufficient infrastructure is in place, deliver colonists safely
- This avoids population losses from inadequate life support during the setup period
Zero-Population Colony Uses:
- Automated mines on small asteroids (which may only support 200,000-300,000 people – visible as “maximum population” in System View wide view)
- Logistics bases at gas giant moons supporting fuel harvester ships operating at the nearby gas giant (fuel harvesting is performed by ship-mounted modules, not ground installations – see Section 6.2.5)
- Pre-staging infrastructure before colonist delivery
- Any body where you want to place installations without human presence
Warning: Without clicking “Create Colony” first, you cannot issue freight delivery orders to a body. If your freighters cannot deliver installations to a surveyed body, verify that it has been explicitly created as a colony. Unloading colonists from a colony ship will auto-create the colony, but infrastructure-first approaches require the manual creation step.
5.1.4.2 First Steps After Colonization
Once a colony ship delivers its first load of colonists (or after creating the colony and delivering infrastructure), the new colony needs immediate attention to become self-sustaining and productive.
1. Assess the Colony:
- Check the colony cost and current infrastructure levels
- Review available mineral deposits (from prior geological surveys)
- Note the body’s temperature, atmosphere, and gravity
2. Transport Infrastructure (if colony cost > 0):
- Load infrastructure units onto freighters at an established colony
- Transport them to the new colony
- Without sufficient infrastructure, population will suffer and may decline
- Prioritize getting infrastructure levels above the minimum threshold
3. Establish Basic Industry:
- Construction Factories: Allow the colony to build its own installations locally, reducing dependence on transport from the homeworld
- Mines: Begin extracting local mineral resources
- Research Labs (optional): Only if the colony will specialize in research
4. Set Up Defenses (if in contested space):
- Ground force units for planetary defense
- Consider orbital defense platforms
- Establish sensor coverage
5.1.4.2.1 Captured Zero-Population Colonies (v2.6.0)
Added: v2.6.0
When a colony with zero population is captured through ground combat, it is automatically assigned Imperial Population status rather than the typical Conquered status \hyperlink{ref-5.1-8}{[8]}. This reflects that there is no hostile civilian population to subjugate – the victor inherits an empty colony that can be immediately developed without occupation penalties.
Practical Implications:
- Captured zero-population colonies operate at full production efficiency (100% production modifier) \hyperlink{ref-5.1-8}{[8]}
- No occupation forces are required to maintain order
- No progression through Conquered → Occupied → Subjugated → Imperial status is needed
- The colony can immediately receive colonists and installations without political status penalties
This mechanic is particularly relevant for:
- Capturing automated mining outposts from enemy races
- Seizing strategic forward bases before enemy colonization
- Acquiring enemy infrastructure on uninhabited bodies
Tip: When planning an invasion of enemy mining colonies, check whether the colony has population. Zero-population targets can be immediately put to productive use after capture, while populated colonies require lengthy occupation and pacification.
5.1.4.3 Priority Installations for New Colonies
The installations you should transport first depend on the colony’s purpose:
Mining Colony:
- Mines (or automated mines if unpopulated)
- Mass driver (to export minerals back to homeworld)
- Infrastructure (to support population)
- Maintenance facilities (to support ground operations)
Industrial Colony:
- Infrastructure (to support larger population)
- Construction factories (to build more installations locally)
- Mines (for local resource extraction)
- Fuel refineries (if Sorium is available locally)
Strategic/Military Outpost:
- Infrastructure (minimal, just enough to support garrison)
- Ground forces
- Sensor installations
- Fuel stockpiles
5.1.4.4 Common Early-Game Colonization Targets
In the Sol System (if using Earth start):
- Mars: Low colony cost, reasonable minerals, terraforming candidate
- Luna: Very close to Earth, no atmosphere (moderate colony cost), often has good minerals
- Asteroid Belt: Multiple mining targets with automated mines
- Jupiter’s Moons: Fuel harvesting potential plus mineral-rich moons
In Other Systems:
- Bodies with colony cost below 2.0 and good mineral surveys
- Gas giants with harvestable Sorium for fuel production
- Bodies at strategic jump point locations for naval bases
5.1.4.5 Managing Multiple Colonies
As your empire grows, colony management becomes more complex:
- Governor Assignment: Assign governors (see Section 16.1 Officer Generation) to colonies for production bonuses
- Shipping Routes: Establish regular freighter routes (see Section 14.1 Fuel) between colonies for mineral and installation transport
- Specialization: Let each colony focus on what it does best (mining, industry, research, fuel production)
- Population Balance: Use colony ships to move population from overcrowded worlds to developing colonies
Tip: Resist the urge to colonize every surveyed body. Each colony requires management attention and transport resources. Focus on high-value targets: low colony cost worlds, mineral-rich bodies, strategic locations, and fuel sources. A few well-developed colonies will outperform a dozen neglected outposts.
5.1.5 Deep Space Populations
Updated: v2026.01.30
Deep Space Populations (DSPs) are colonies established in open space rather than on a planetary body. They can be created by clicking a button on the Tactical Map’s Miscellaneous tab, selecting a location, and choosing a name. DSPs appear as yellow dots on maps and function as populations with significant restrictions.
5.1.5.1 Core Limitations
DSPs lack an associated system body, which means:
- No survey destination capability
- No mineral deposits exist at the location
- Cannot receive ground-based planetary installations (e.g., mines, construction factories, infrastructure)
- Cannot store population (except via Ark Modules), fuel, MSP, ground units, or ship components
- Ground combat cannot occur (both attack and defense are impossible)
- Environmental tab displays blank information
- Cannot be made independent
5.1.5.2 Operational Capabilities
Despite their limitations, DSPs support several useful functions through ship-mounted modules (which are part of stationed vessels, not ground-based installations):
- Mineral Storage: Minerals can be delivered to and collected from DSPs (stored as free-floating resources)
- Shore Leave: DSPs can provide ship shore leave if vessels stationed there are equipped with Recreation Modules
- Maintenance: Maintenance Modules and Repair Bays on stationed vessels can operate at DSPs, using ship-carried MSP and minerals for repairs
- Shipyards: Shipyards can operate at DSPs but require Ark Module-based populations
- Repair Bays: Ship-mounted repair bays function without population requirements
5.1.5.3 Population Requirements
Only Ark Modules can provide population to DSPs. Both orbital and surface populations generate trade goods, meaning an orbital-only colony including a DSP will produce trade goods. Infrastructure and PPV requirements consider only surface-based colonists.
5.1.5.4 Movement and Location
DSPs do not orbit the system’s sun and normally remain stationary at their creation point. However, clicking on a gas giant while creating a DSP will place it in orbit around that gas giant, causing it to follow the planet’s orbital path. This is useful for establishing permanent fuel harvesting or logistics operations at gas giants. Movement orders are limited to those available for waypoints plus mineral-related operations.
5.1.6 Deleting Empty Colonies
Updated: v2026.01.30
The “Delete Empty” button provides a utility for cleaning up abandoned colonies, particularly useful since ground survey mechanics create many temporary settlement outposts during exploration.
5.1.6.1 Deletion Criteria
A colony is only eligible for deletion when all of the following conditions are met:
- No colonist population present
- No installations exist
- No abandoned installations remain
- No ground forces stationed there
- No ordnance stockpiled
- No component storage
- No orbiting fleets
- No fleets using it as a destination
- Zero ground survey potential remaining
- Colony not flagged as exempt
5.1.6.2 Protection Mechanism
An “Empty Exempt” toggle allows players to mark colonies they intend to develop later, preventing accidental deletion. This exempt status displays on the colony summary for reference.
5.1.7 Populations as Text
Updated: v2026.01.30
The “Pop as Text” feature is a utility located in the Economics window designed to assist with After-Action Reports (AARs). It converts population data into formatted text for easy copying.
Two buttons are available:
- Pop as Text: Displays information for a single selected population
- All Pop as Text: Generates text for all populations simultaneously
Data displayed includes:
- Population amount
- Naval shipyard capacity
- Commercial shipyard capacity
- Maintenance capacity
- Installation counts (Research Facility, Ground Force Construction Complex, Construction Factory, etc.)
The text is automatically highlighted for immediate copying with Ctrl-C. When using “All Pop as Text,” populations appear in the same order as the population tree on the left of the Economics window.
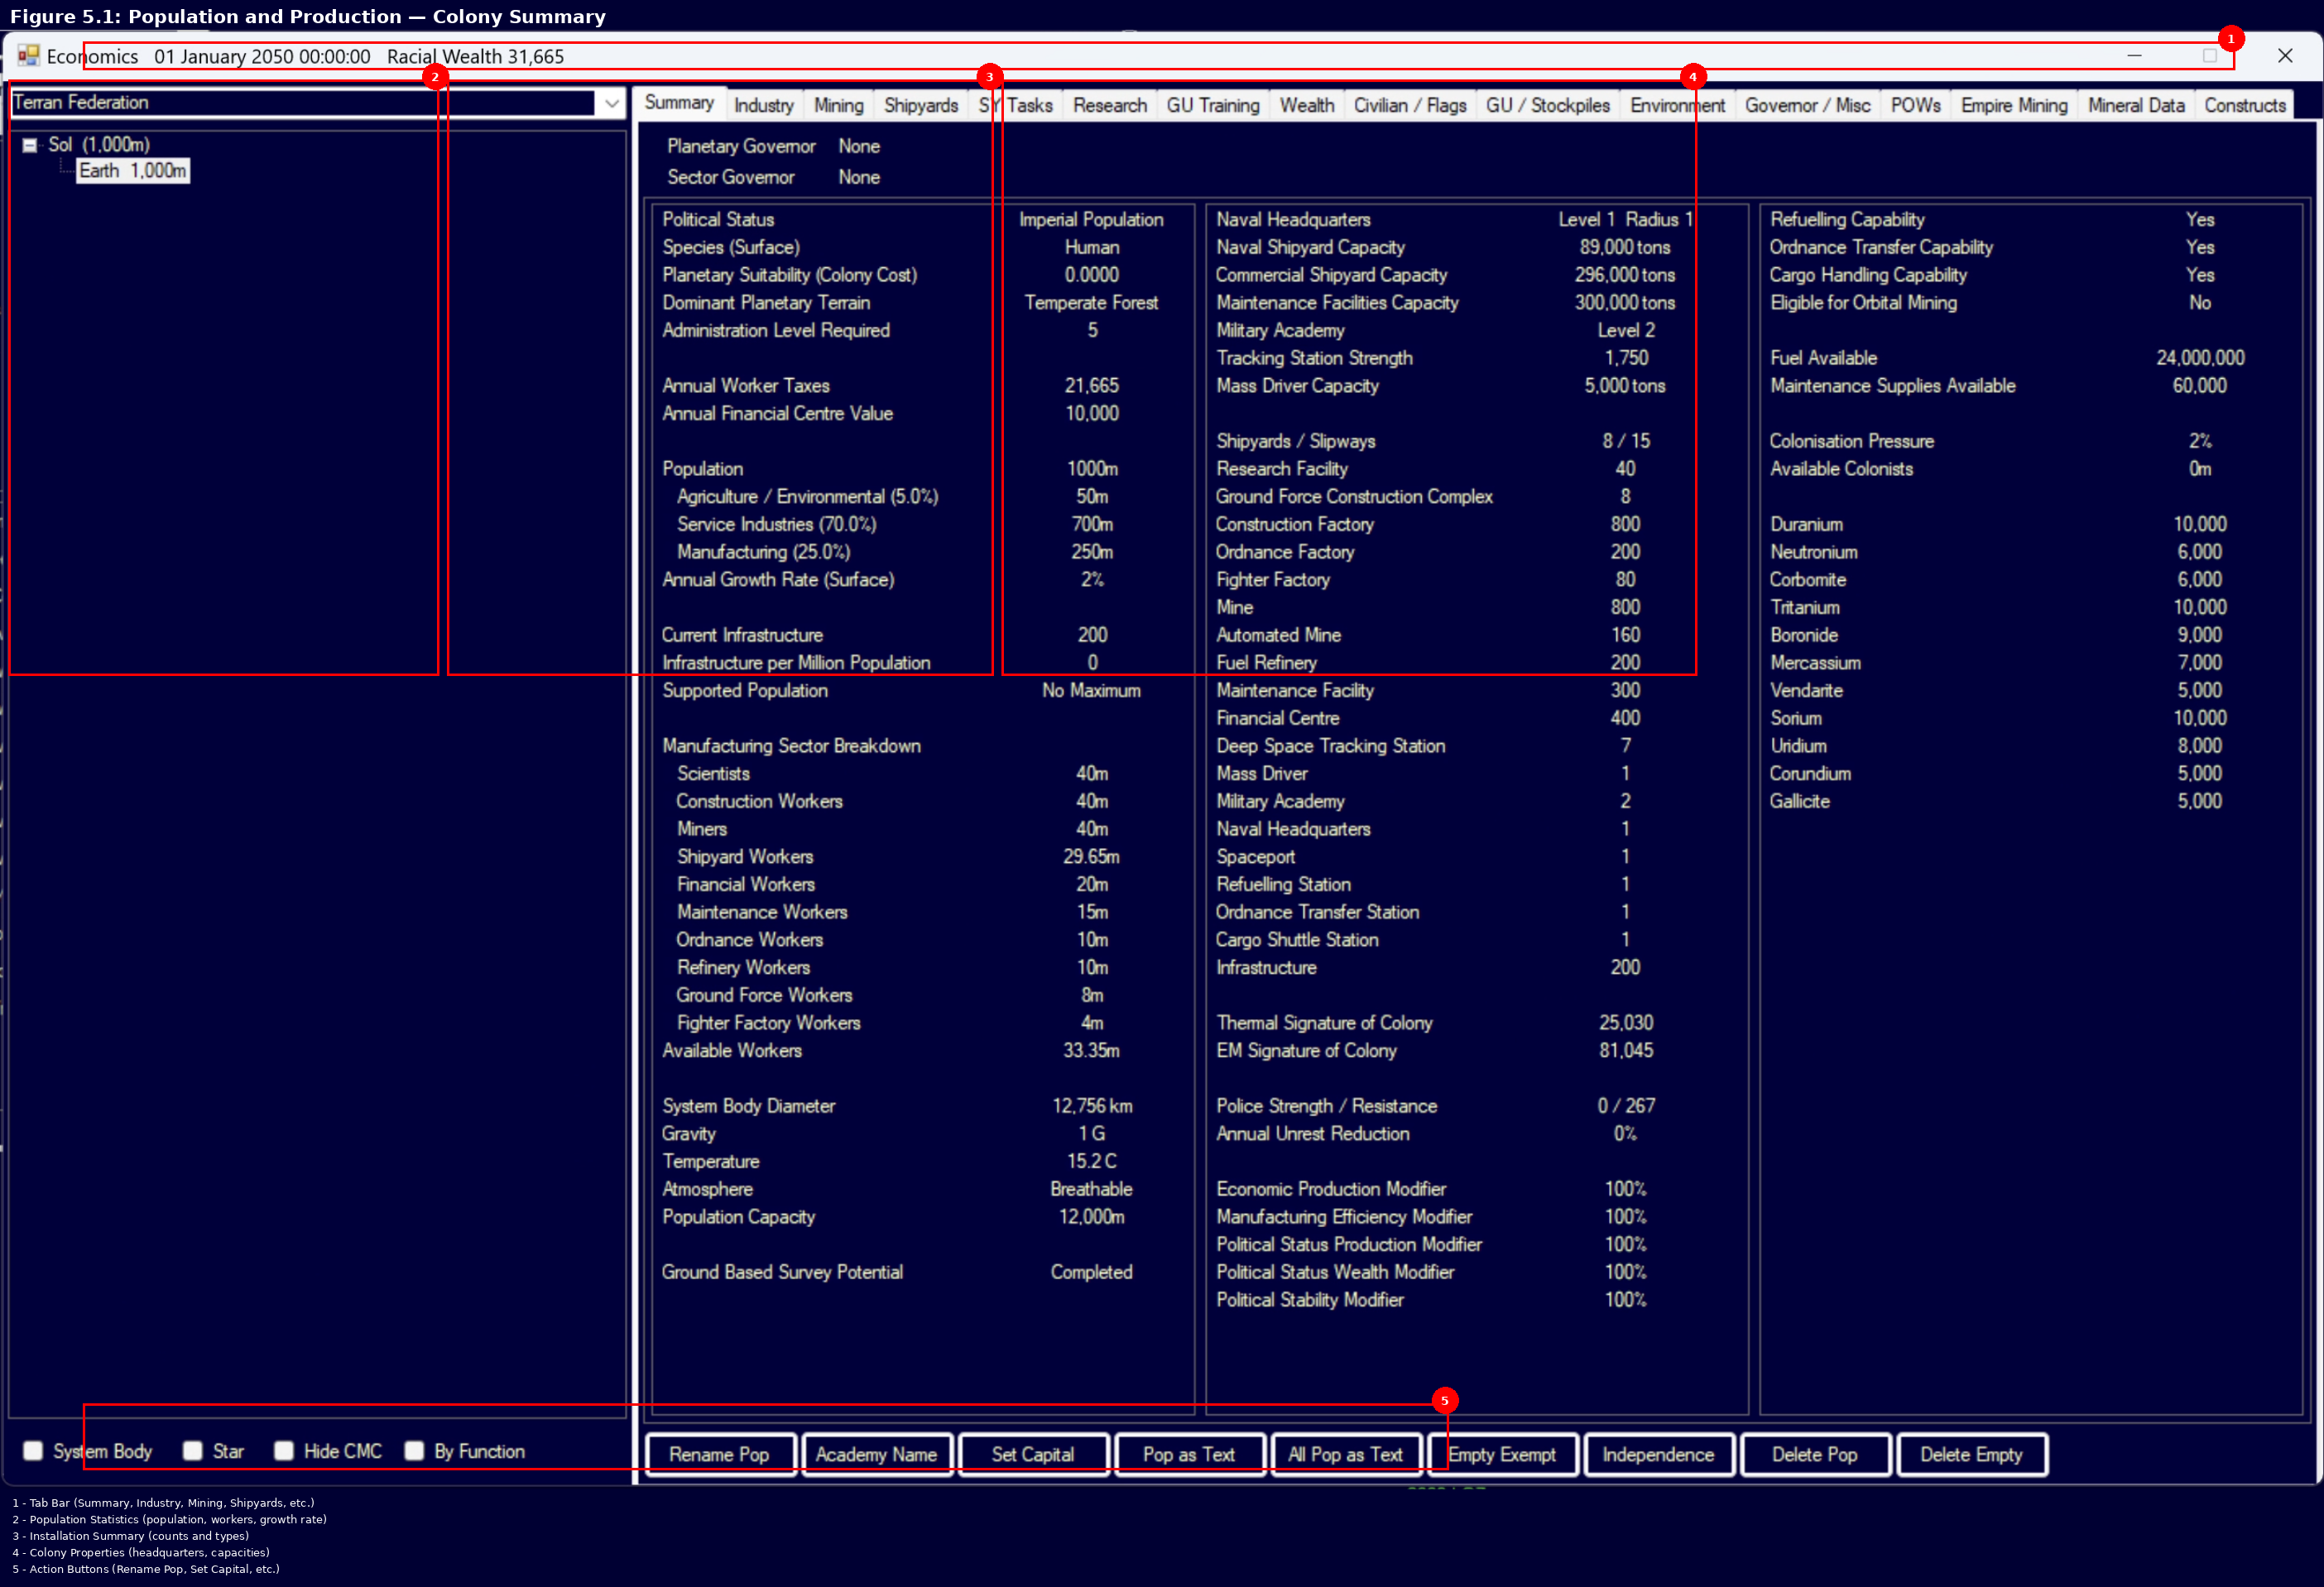
UI References and Screenshots
Updated: v2026.02.15
- Colony Window Layout — colony management interface with installation, construction, and environment tabs
Related Sections
- Section 6.2 Mining – Mining operations at colony sites
- Section 6.3 Construction – Building installations and shipyards
- Section 8.1 Design Philosophy – Designing colony ships and freighters
- Section 14.1 Fuel – Shipping routes and supply operations
- Section 16.1 Officer Generation – Governor assignment and bonuses
- UI Reference: Colony Window – Annotated interface diagram
References
\hypertarget{ref-5.1-1}{[1]}. Aurora C# game database (AuroraDB.db v2.7.1) – FCT_TechSystem: “Cryogenic Transport” (TechSystemID 479) has AdditionalInfo=10000, confirming 10,000 colonist base capacity per module.
\hypertarget{ref-5.1-2}{[2]}. Aurora C# game database (AuroraDB.db v2.7.1) – FCT_TechSystem: “Cryogenic Transport - Large” (TechSystemID 78588) has AdditionalInfo=50000, confirming 50,000 colonist capacity.
\hypertarget{ref-5.1-3}{[3]}. Aurora C# game database (AuroraDB.db v2.7.1) – DIM_PlanetaryInstallation: Infrastructure (ID 9) has InfrastructureValue=1.0, confirming the formula Required Infrastructure = Population (millions) x Colony Cost x 100.
\hypertarget{ref-5.1-4}{[4]}. Aurora C# game database (AuroraDB.db v2.7.1) – DIM_PlanetaryInstallation: Mine (ID 7) has MiningProductionValue=1.0 and Automated Mine (ID 12) has MiningProductionValue=1.0, confirming equal base output. Base rate of 10 tons/year is the standard game value.
\hypertarget{ref-5.1-5}{[5]}. Aurora C# game database (AuroraDB.db v2.7.1) – DIM_PlanetaryInstallation: Conventional Industry (ID 38) has ConstructionValue=0.1, OrdnanceProductionValue=0.05, FighterProductionValue=0.025, RefineryProductionValue=0.05, FinancialProductionValue=0.025, MiningProductionValue=0.15. All values confirmed.
\hypertarget{ref-5.1-6}{[6]}. Aurora C# game database (AuroraDB.db v2.7.1) – DIM_PlanetaryInstallation: Six CI conversion entries, all Cost=20.0 BP. Construction Factory (ID 27): Duranium=10, Neutronium=10. Mine (ID 28): Corundium=20. Fuel Refinery (ID 30): Boronide=20. Ordnance Factory (ID 36): Tritanium=20. Fighter Factory (ID 37): Vendarite=20. Financial Centre (ID 50): Corbomite=20.
\hypertarget{ref-5.1-7}{[7]}. Aurora C# game database (AuroraDB.db v2.7.1) – DIM_PlanetaryInstallation: 15 installations have RequiredTechID=0 and NoBuild=0, meaning they can be built without Trans-Newtonian Technology. The list includes Repair Yard (ID 51) which was previously omitted. Corrected from 14 to 15.
\hypertarget{ref-5.1-8}{[8]}. Aurora Forums – v2.6.0 Changes List, https://aurora2.pentarch.org/index.php?topic=13463.0 – “Captured zero-population colonies set as Imperial Populations.” DIM_PopPoliticalStatus confirms Imperial Population (StatusID 1) has ProductionMod=1.0 and WealthMod=1.0 (full production and wealth).