8.6 Other Components
Updated: v2026.02.15

Beyond weapons, sensors, and engines, ships require a variety of support systems to function effectively. Fire controls direct weapons, magazines store ammunition, hangars house fighters, and engineering spaces keep everything running. This section covers the essential support components that complete a ship design.
Contents
Updated: v2026.02.15
- 8.6 Other Components
- Contents
- 8.6.1 Fire Controls
- 8.6.2 Magazines
- 8.6.3 Hangars and Parasite Craft
- 8.6.4 Engineering Spaces
- 8.6.5 Deployment Time
- 8.6.6 Fuel Tanks and Cargo
- 8.6.7 Jump Drives
- 8.6.8 Maintenance Storage Bays
- 8.6.9 Fractional Capacitors
- 8.6.10 Bridges
- 8.6.11 Mobile Repair Bays
- 8.6.12 Miscellaneous Components
- 8.6.13 Shields
- 8.6.14 Power Plants
- 8.6.15 Ship Class Templates
- 8.6.16 Tractor Beams
- Related Sections
- References
8.6.1 Fire Controls
Updated: v2026.02.15
Fire controls are the targeting systems that direct weapons onto targets. Without a fire control assigned, weapons cannot fire. Aurora C# uses two distinct fire control types: beam fire controls (for direct-fire weapons) and missile fire controls (for missile launchers).
Beam Fire Controls (BFC):
Beam fire controls direct lasers, railguns, plasma carronades, gauss cannons, mesons, particle beams, and microwave weapons. Each BFC can control multiple weapons simultaneously, but all weapons assigned to one fire control must fire at the same target.
Design parameters:
- Range: Calculated as Basic Range * Range Multiplier. The range multiplier can be set from 0.2x to 4x of the base range technology value. Higher multipliers increase the fire control’s maximum engagement distance.
- Tracking Speed: Calculated as Basic Speed * Speed Multiplier. The speed multiplier can be set from 0.5x to 4x of the base tracking speed technology value. Crucial for hitting fast-moving ships and essential for point defense. Measured in km/s – the fire control can accurately track targets moving at up to this speed relative to your ship.
- Size: Typically 1 HS (50 tons). Some technologies allow reduced-size fire controls.
- Electronic Hardening: Available on all fire controls. Increases resistance to electronic warfare (ECM/ECCM) at the cost of additional size and resources. Electronic Hardening levels range from 0 (100% ECM effectiveness against this fire control) to 6 (only 5% ECM effectiveness) \hyperlink{ref-8.6-22}{[22]}. As of v2.7.0, the Electronic Hardening level for fire controls is displayed in the Class Window component summary, making it easier to review a ship’s ECM resistance at a glance without opening individual component details.
- ECCM (Electronic Counter-Countermeasures): Available on all fire controls. Reduces the effectiveness of enemy ECM against this fire control’s targeting.
Single-Weapon Fire Control (v1.13.0+):
As of v1.13.0, fire controls can be designated as “single-weapon” variants. A single-weapon fire control receives a 50% reduction in both size and cost compared to a standard fire control with the same parameters \hyperlink{ref-8.6-1}{[1]}. The trade-off is that it can only control one weapon at a time. This is ideal for point defense mounts or ships with a single large weapon that benefits from dedicated fire control.
Tracking speed and hit probability:
The hit probability of beam weapons depends on the ratio between the fire control’s tracking speed and the target’s actual speed (relative to your ship):
- If tracking speed >= target speed: High hit probability (further modified by range and ECM)
- If tracking speed < target speed: Hit probability decreases proportionally
This makes tracking speed the single most important stat for point defense fire controls (missiles move very fast) and important for offensive fire controls facing fast ships.
How many BFCs do you need?
- Each BFC can control unlimited weapons, but they all fire at one target
- Multiple BFCs allow engaging multiple targets simultaneously
- Dedicated PD fire controls should have maximum tracking speed but can have shorter range
- Offensive BFCs should have maximum range to match your weapons
Rule of thumb: One offensive BFC per target you want to engage simultaneously, plus 1-2 dedicated PD fire controls per ship that needs point defense.
Missile Fire Controls (MFC):
Missile fire controls provide targeting data to missiles after launch. Unlike beam fire controls, MFCs guide missiles in flight – they determine how many missiles can be directed at targets simultaneously.
Missile fire controls use the same sensitivity formula as active sensors:
MFC Sensitivity = Size (HS) * Grav Strength Tech * Sensitivity Multiplier
The detection/guidance range is then:
MFC Range (km) = SQRT(MFC_Sensitivity * Target_Cross_Section) * 1,000,000
This means MFCs are effectively specialized active sensors optimized for missile guidance rather than search detection.
Design parameters:
- Range: Determined by the active sensor formula above. Maximum distance at which the MFC can guide missiles. Beyond this range, missiles go autonomous (using onboard seekers only).
- Resolution: Like active sensors, MFCs have a resolution determining what size target they can lock. Resolution 1 = anti-missile (for AMMs), higher resolutions for anti-ship missiles.
- Number of missile links: Each MFC can guide a limited number of missiles simultaneously. More links = more missiles per salvo it can handle. This is determined by technology (Missile Fire Control Links).
- Size: Typically 1 HS.
- Electronic Hardening: Available on MFCs as on beam fire controls. Increases ECM resistance.
- ECCM: Available on MFCs to counter enemy electronic countermeasures.
MFC tactical considerations:
- Each MFC can direct its linked missiles at one target at a time
- If you have 6 launchers but your MFC only links 4 missiles, only 4 fire in a coordinated salvo (the other 2 wait)
- Multiple MFCs allow multi-target engagements and larger salvos
- MFC range should exceed your missile’s fuel range (otherwise the MFC becomes the limiting factor)
Tip: Do not under-invest in fire controls. A ship with 8 lasers and only 1 fire control can only shoot at one target — all 8 lasers focus on the same ship. For flexible engagement, carry 2-3 BFCs so you can split fire. For missile ships, ensure your MFC links match or exceed your total number of launchers to avoid wasted launch capacity.
8.6.2 Magazines
Updated: v2026.02.15
Magazines store missiles for use by standard launchers. Without magazines, standard launchers cannot reload after their initial salvo. Magazine capacity and placement are critical for sustained missile combat.
Magazine mechanics:
- Magazines store a set number of missiles based on size
- Standard missile magazines hold missiles of any size up to their internal capacity
- Magazine capacity is measured in MSP (Missile Size Points)
- A size 4 missile takes 4 MSP of magazine space
- Larger magazines (more HS) hold proportionally more missiles
- Magazines serve three functions: feeding on-board launchers, reloading parasite craft ordnance, and supplying ordnance to allied vessels when operating as colliers (ammunition resupply ships)
Magazine capacity formula:
The usable capacity of a magazine is determined by:
Magazine Capacity (MSP) = (Magazine_Size - Armor_Size) * Feed_Efficiency * 20
Where:
- Magazine_Size is the total size of the magazine in HS
- Armor_Size is the size consumed by internal armor layers (if any are applied)
- Feed_Efficiency is the feed system technology level (affects what percentage of internal volume is usable storage vs. feed mechanisms)
- The 20 multiplier converts the remaining HS into MSP capacity
Feed efficiency technology affects the proportion of magazine volume that is usable for missile storage vs. occupied by the feed mechanisms that transfer missiles to launchers. Higher feed efficiency technology increases usable storage percentage. Feed efficiency ranges from 75% to 99%, with research costs escalating from 1,000 RP to 250,000 RP at the highest levels \hyperlink{ref-8.6-2}{[2]}. Importantly, the magazine feed system does not impact module cost – it only affects the final missile capacity.
Magazine sizing:
Each magazine component has a size in HS. A standard magazine is typically 1 HS and can be scaled up. The feed mechanism connects magazines to launchers – all magazines on a ship form a common pool that any launcher can draw from.
Magazine armor and extra HTK:
Magazines can be fitted with internal armor layers, which reduce usable capacity (as shown in the formula above) but provide additional protection. The type of armor selected does not influence module weight – it only impacts the capacity of the final magazine (higher armor tiers reduce capacity but increase protection). Magazines can also be designed with extra HTK points up to 10 through internal armor, making them harder to destroy at the cost of additional size and resources.
Planning magazine capacity:
- Calculate total launcher capacity (number of launchers * reloads desired)
- Each reload cycle requires one missile per launcher
- For prolonged engagements: 5-10 reloads worth of magazine capacity
- For shorter actions: 3-5 reloads may suffice
- Remember that box launchers do not need magazines
Magazine example:
A ship with 6 size-4 launchers wanting 8 reloads needs:
- 6 launchers * 8 reloads * 4 MSP per missile = 192 MSP of magazine capacity
Magazine HTK (C# Aurora):
Magazines in C# Aurora have a base HTK (Hit to Kill) value equal to the square root of their size in HS, rounded down. This is a major change from VB6, where all magazines had a uniform HTK of 1 regardless of size. Larger magazines are now significantly harder to destroy in a single hit.
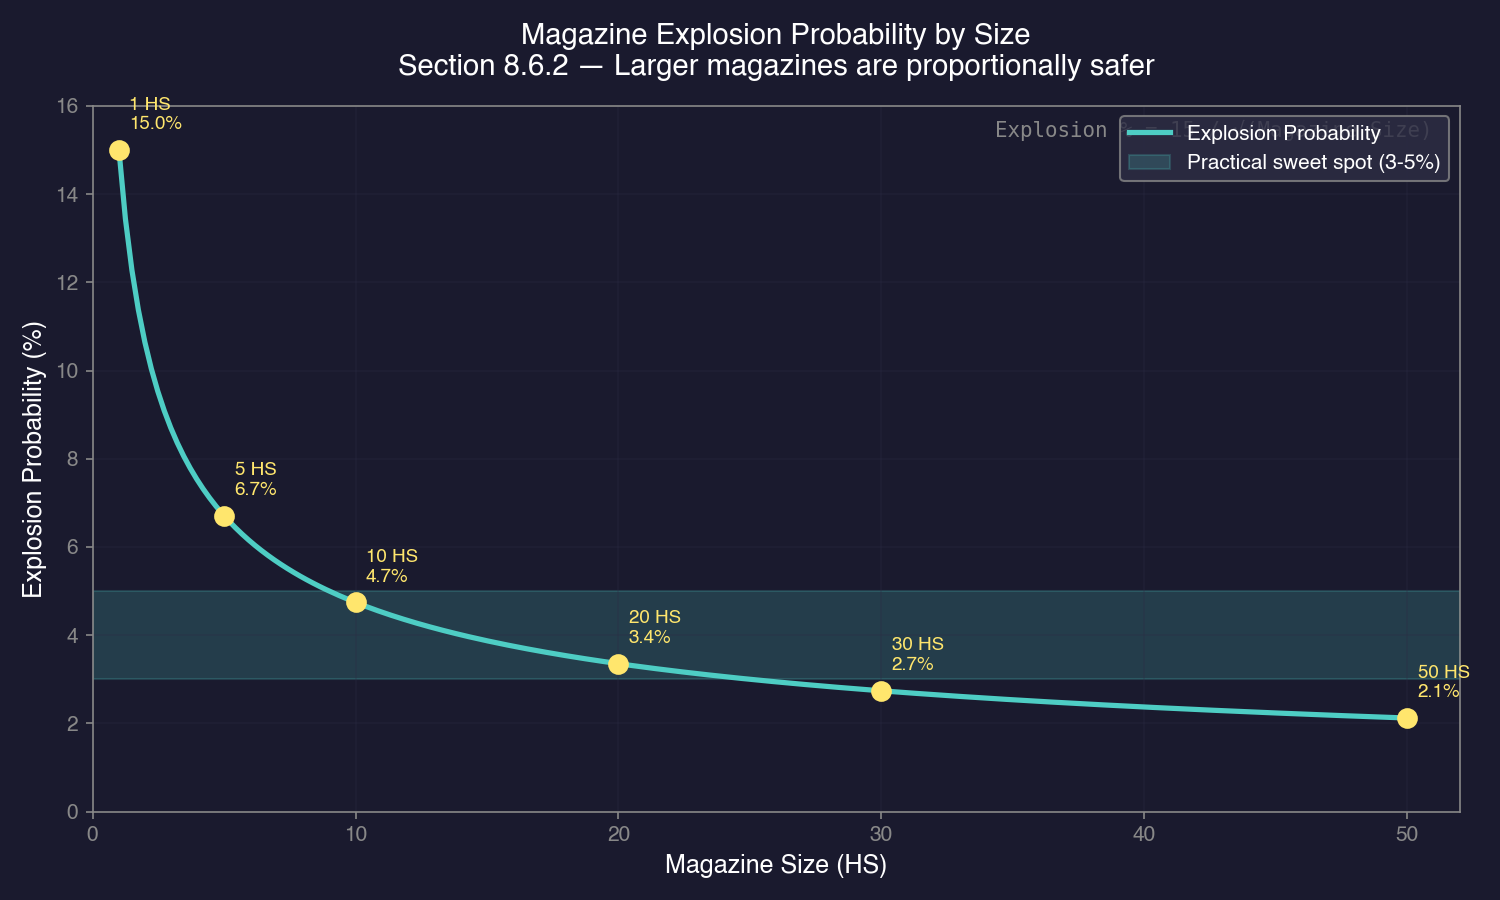
Magazine Explosion Mechanics (C# Aurora):
The explosion system has been completely redesigned:
Explosion Probability:
- Base explosion chance is divided by the square root of magazine size
- Example: A 15% base chance becomes ~6.7% for size 5, ~4.7% for size 10, ~3.4% for size 20
- Result: Much rarer explosions on larger vessels
Chief Engineer Bonus:
- If the ship has a Chief Engineer, any explosion chance (for magazines or engines) is reduced by the engineer’s Engineering Bonus
- Example: 5% base chance with a 30% Engineering Bonus becomes 3.5% actual chance
Ordnance Loss on Damage:
- When a magazine is damaged, a proportion of remaining ordnance is destroyed based on: destroyed magazine capacity / total ship magazine capacity
- Destroyed ordnance detonates at full warhead strength
- As of v1.12.0, second-stage missile warheads (multi-stage missiles) also contribute their warhead damage to magazine explosions, making ships carrying multi-stage ordnance particularly vulnerable to catastrophic detonation
- This is a significant change from VB6, where only excess ordnance exploded at 20% strength
- Result: Far more devastating consequences when explosions do occur
Magazine Neutralisation System:
The “ejection” technology from VB6 has been replaced by the Magazine Neutralisation System. This system reduces the explosion chance when a magazine takes damage, representing warhead inactivation during magazine damage events rather than physical ejection of ordnance. Higher neutralisation technology levels progressively reduce the base explosion probability, making magazine-heavy designs significantly safer when researched.
Design Philosophy:
These changes create a deliberate dynamic: magazine explosions are much rarer on larger vessels (due to higher HTK and reduced explosion probability), but when they do occur, the consequences are far more devastating (full warhead detonation of destroyed ordnance). This rewards careful magazine sizing and makes the Chief Engineer assignment strategically important.
Commercial Magazines:
Commercial magazines provide a cheaper but less space-efficient alternative to military magazines. Two models are available:
| Model | Size (HS) | Capacity (MSP) | Cost (BP) | Crew | HTK | Research (RP) |
|---|---|---|---|---|---|---|
| Commercial Magazine - 100 \hyperlink{ref-8.6-13}{[13]} | 12 | 100 | 25 | 5 | 1 | 2,000 |
| Commercial Magazine - 500 \hyperlink{ref-8.6-13}{[13]} | 50 | 500 | 100 | 20 | 1 | 5,000 |
Critical differences from military magazines:
- 100% explosion chance if hit – commercial magazines always detonate when struck \hyperlink{ref-8.6-13}{[13]}
- Vulnerable to shock damage even through armor (“one of the magazines could still explode due to shock damage”)
- HTK of only 1, making them extremely fragile
- Significantly cheaper in build points per MSP of capacity
Commercial ammunition transports should never be deployed with battle fleets. These vessels are intended purely for logistics and support roles – resupplying warships at safe rear-area locations.
Tip: For missile-heavy ships, magazine capacity often dominates the tonnage budget. A destroyer carrying 6 launchers with 10 reloads might devote 30-40% of its hull to magazines. Consider using larger magazines rather than many small ones – the square root scaling of both HTK and explosion probability means larger magazines are more survivable. Always assign a skilled Chief Engineer to missile-heavy ships to reduce explosion risk. If you expect short, decisive engagements, fewer reloads frees space for engines or armor. For fleet logistics, commercial magazines on dedicated supply ships offer economical bulk storage – just keep those ships far from combat.
8.6.3 Hangars and Parasite Craft
Updated: v2026.02.15
Hangars allow ships to carry, launch, and recover smaller craft — fighters, FACs (Fast Attack Craft), shuttles, and other parasite vessels. Carrier operations add significant tactical flexibility but require substantial hull tonnage.

Figure 8.6.3: The carrier sortie cycle showing the 7-step process from launch through combat engagement and return to ready status. Transit times depend on fighter speed; rearm times are modified by the commander’s Carrier Operations bonus.
Hangar mechanics:
- Hangar space is measured in HS, with each HS of hangar accommodating a proportional tonnage of carried craft
- Fighters/FACs land in hangars for maintenance, crew rest, and refueling
- Ships in hangars are protected from combat damage until the carrier itself is hit
- Launching and recovering craft takes time — carriers are not instant-deploy
Hangar sizing:
The military Hangar Deck is 21 HS (1,050 tons) in size, costs 100 BP, and requires 12 crew members \hyperlink{ref-8.6-3}{[3]}. The commercial Hangar Deck is 32 HS (1,600 tons), costs 100 BP, and requires 15 crew. Hangar capacity is measured in tonnage of carried craft (1 HS of hangar = 50 tons of capacity, with a 5% size overhead for structural support):
- A 500-ton fighter requires 10 HS of hangar capacity
- A 1,000-ton FAC requires 20 HS of hangar capacity
- Carrying a squadron of 6 fighters at 500 tons each needs 60 HS of hangar capacity (multiple hangar deck modules)
This means carriers must be very large ships to carry meaningful fighter groups. A carrier with 12 fighters needs approximately 120 HS (6,000 tons) of hangar capacity, before engines, armor, sensors, or anything else.
Boat Bays and Hangar Deck (v1.13+):
Boat bays and hangar decks provide alternatives to full military hangar bays for carrying parasite craft. Three sizes are available:
| Type | Size (tons) | Capacity (tons) | Cost (BP) | Crew | Mineral Cost |
|---|---|---|---|---|---|
| Small Boat Bay \hyperlink{ref-8.6-3}{[3]} | 52.5 | 50 | 5 | 1 | 1 Duranium, 4 Vendarite |
| Boat Bay \hyperlink{ref-8.6-3}{[3]} | 262.5 | 250 | 25 | 3 | 5 Duranium, 20 Vendarite |
| Hangar Deck \hyperlink{ref-8.6-3}{[3]} | 1,050 | 1,000 | 100 | 12 | 20 Duranium, 80 Vendarite |
Each module is slightly larger than its stated capacity (5% overhead), representing the structural support and mechanisms required. Boat bays and hangar decks are more compact than the military Hangar Deck (21 HS / 1,050 tons) \hyperlink{ref-8.6-3}{[3]}, making them practical for ships that need to carry small shuttles, utility craft, or modest fighter complements without dedicating the tonnage required for full hangar decks. The ship designer correctly distinguishes boat bays from hangar bays for berth calculations.
Maintenance Suspension (Military Hangars):
Ships docked inside military hangars (including boat bays and hangar decks) receive a critical maintenance benefit: they do not roll for malfunctions, do not require separate maintenance facilities, and do not consume maintenance supplies while docked (unverified — #848, changelog-derived). The carrier’s own Damage Control rating also enhances repair speed for all housed vessels. This makes military hangars essential for sustaining fighter operations on extended deployments.
Nesting Restriction:
Ships carried inside a hangar cannot themselves carry ships in their own hangars. If a ship has fighters or craft in its hangar, that ship cannot be landed inside another vessel’s hangar until its own hangar is emptied. (unverified — #1212)
Commercial Hangars:
Commercial Hangar Decks are larger than military Hangar Decks (32 HS vs. 21 HS), matching military hangars in cost (100 BP) with 15 crew. They are intended for:
- Transport of other commercial vessels
- Temporary transport of military vessels
- Reloading of box launchers
- Repairing commercial ships
A critical distinction: military vessels retain their normal maintenance requirements while docked in commercial hangars (unverified — #848, changelog-derived). This prevents players from using commercial hangars as a maintenance substitute. Commercial hangars are designed for logistics and transport, not for sustained parasite craft operations.
Commercial hangars enable creative logistics solutions such as large ships combining commercial hangar space with maintenance modules, or logistics hubs with multiple vessels providing complementary capabilities.
Commercial vs Military Hangar Repair Capabilities (v2.0.0):
As of v2.0.0, repair capabilities differ between hangar types due to the introduction of Mobile Repair Bays (unverified — #848, changelog-derived):
- Commercial hangars can only repair commercial ships. Military vessels docked in commercial hangars can perform self-repairs but lose access to the parent ship’s damage control rating, cannot repair armour, and must rely on their own maintenance capacity. Maintenance supplies from the parent ship remain available.
- Military hangars retain full repair functionality for both military and commercial vessels, including armour repair on both ship types.
Automated Hangar Resupply (v1.13+):
Motherships automatically resupply ships in their hangars with Maintenance Supply Points (MSP):
- Conventional technology rate: 10 MSP per hour per ship
- TN technology rate: 20 MSP per hour per ship
- The mothership is treated as having a single virtual cargo shuttle bay for hangar resupply purposes only
- This virtual shuttle bay works on all parasite vessels simultaneously (not limited to one ship at a time)
- The mothership can set a minimum supply amount for itself; no parasite will resupply MSP below that threshold
- The commander’s Carrier Operations bonus multiplies the resupply transfer rate
Automated Hangar Refuelling:
Motherships also automatically refuel parasites in their hangars, using the same logistics framework as the resupply system. The Carrier Operations commander bonus applies to fuel transfer rates as well.
Armour Repair in Hangars (v1.13+):
Motherships automatically repair the armour of ships docked in their hangars:
- On a successful repair attempt, a number of armour boxes equal to the armour strength are repaired
- Armour is restored beginning with the most damaged columns first
- No more than one armour point in a single column is repaired per increment
- Repair uses the same cost structure and probability mechanics as standard component repairs
- This eliminates the need to manually dock damaged parasites at external repair facilities for armour restoration
Carrier Operations Bonus:
The Carrier Operations bonus (formerly called Fighter Operations) is a commander attribute that enhances parasite logistics within a carrier’s hangar:
- Applies to the rate at which fuel is transferred to hangared parasites
- Applies to the rate at which maintenance supplies are transferred
- Applies to the rate at which ordnance is transferred
- The base transfer rates are multiplied by the commander’s bonus value
Assigned Mothership Display:
Ships with an assigned mothership show this information in multiple locations:
- The ship design display tab shows the assigned mothership as a dedicated field
- The Fleet tab in the Naval Organization window includes the assigned mothership name and fleet designation
- Strike group achievements are tracked separately with an “(SG)” suffix for the mothership
Land on Assigned Mothership as Sub-Fleet (v1.10+):
This movement order operates identically to standard “Land on Assigned Mothership” but preserves fleet identity:
- Landed ships automatically form a new sub-fleet within the carrier fleet
- The sub-fleet adopts the name of the originating fleet (e.g., “Squadron 01” becomes a sub-fleet named “Squadron 01”)
- Useful for task forces that need to maintain organizational identity while embarked on larger vessels
Automated Parasite Assignment:
This feature (accessible via the Shipyard tab of the Economics window) automates assignment of parasites to newly constructed ships:
- A dropdown menu selects a fleet as the source of parasites for that population
- When a new ship with a designated strikegroup is completed, the system automatically creates a squadron named after the ship with “Strikegroup” appended
- Parasites from the designated source fleet are automatically assigned and landed
- If the full strikegroup complement is unavailable, a partial strikegroup is assigned based on available ships in the source fleet
Flight Crew Berths:
In C# Aurora, the ship designer automatically adds 20 flight crew berths for each hangar bay present on a carrier. These berths provide accommodation for crews of parasite warships docked in the carrier’s hangars. This eliminates the VB6-era requirement for players to manually calculate and add extra crew space for unknown future parasite configurations.
The berths are assumed to be sufficient for whatever parasite warships are present, providing a standardized capacity rather than requiring precise calculations. Survivors on parasites in hangars transfer to the mothership unless held in cryogenic modules, and the system assumes mothership life support assists docked parasites.
Light Naval Design Considerations:
Light Naval vessels (1,000 tons or less, also referred to informally as “fighters” or “FACs”) are designed in the same Class Design window but have distinct characteristics. See Section 9.6 Light Naval Operations for comprehensive coverage of Light Naval mechanics.
- They can be built in Light Naval Factories (much faster and cheaper than shipyard construction)
- They use military engines by default
- They typically lack the space for full sensor suites or deep magazines
- They depend on their carrier for maintenance, fuel, and ordnance resupply
Common fighter configurations:
- Missile fighters: Box launchers with 1-2 anti-ship missiles. Fire and return to carrier for rearming.
- Beam fighters: Small lasers or particle beams for close-range attacks.
- Interceptors: Fast, with anti-missile weaponry for fleet defense.
- Bombers: Larger FACs (500-1,000 tons) with significant ordnance loads.
Carrier considerations:
- Carriers need to be fast enough to support fleet operations but are inevitably slow due to hangar mass
- Armor is critical — a carrier hit means its entire air wing is at risk
- Carriers should carry some self-defense weapons (point defense at minimum)
- Consider dedicated maintenance facilities aboard to keep fighters operational
Fighter Pods and Fighter Pod Bays:
Fighter Pods are a flexible ordnance system allowing small craft to carry specialized equipment for ground support and various combat roles. They function as ordnance (built by ordnance factories, transported in magazines) but are non-expendable – unlike missiles, pods are reusable across multiple combat engagements.
Pod design is done in the Missile Design window with variants including:
- Bombardment pods: For ground attack operations
- Autocannon pods: For ground strafing
- Air-to-air pods: For atmospheric combat
Bombardment pod capabilities follow these formulas:
- Armour penetration = Racial Weapon Modifier * ((Tons / 20) ^ 0.6)
- Damage = Racial Weapon Modifier * ((Tons / 20) ^ 1.6)
Fighter Pod Bays mount on fighter-sized ships and hold only Fighter Pods. They are significantly more space-efficient than box launchers – fighter pod bays are equivalent in size to the pods they carry, whereas box launchers are three times larger than the missiles (or pods) they fire. Pods require only a minimal-size missile fire control (0.1 HS) to operate.
Different pod types can be assigned to bays while fighters occupy hangars, enabling role-switching without redesigning aircraft. Pods can also load onto standard box launchers, allowing space-combat fighters to support ground operations as needed (though less efficiently).
Ship engines scale down to 0.1 HS in C# Aurora, enabling dedicated ground-support aircraft designs requiring smaller powerplants than space-combat equivalents.
Maintenance of parasite craft:
Fighters and FACs require maintenance like any ship. Without hangars (or appropriate maintenance facilities), their maintenance clock ticks down. Once maintenance failures start, fighters become unreliable — they may suffer engine failures during combat or sensor malfunctions during scouting.
Tip: Carriers are a major investment. Before committing to carrier operations, consider whether the same tonnage invested in conventional warships would be more effective. Fighters excel at alpha strikes (launching a massive missile volley from multiple small platforms) and scouting, but they are fragile and maintenance-intensive. If you do build carriers, make them large and well-protected — losing a carrier with 12 fighters aboard is a catastrophic loss. Consider fighter pods for ground-support roles – they provide reusable ordnance that does not require resupply after each engagement.
8.6.4 Engineering Spaces
Updated: v2026.02.01
Engineering spaces represent the maintenance workshops, damage control stations, and repair facilities aboard a ship. They directly affect how well a ship handles wear, tear, and combat damage.
Maintenance function:
All ships accumulate maintenance clock time while deployed. When maintenance is due, components can fail randomly. Engineering spaces extend the time between failures by providing ongoing maintenance:
- The more engineering spaces relative to ship size, the longer between maintenance events
- The standard recommendation is engineering spaces equal to approximately 5-10% of hull tonnage for warships
- Commercial vessels in safe space can get by with less (or none, for short-range ships)
Annual Failure Rate (AFR) Formulas:
The Annual Failure Rate quantifies how likely a ship is to suffer component failures each year:
Without engineering spaces:
AFR (%) = 0.2 * Ship Tonnage
A 10,000-ton ship without engineering would have an AFR of 2,000% – essentially guaranteed multiple failures per year.
With engineering spaces:
AFR (%) = (0.04 / Engineering_Percentage) * Ship Tonnage
Where Engineering_Percentage is the engineering tonnage as a whole-number percentage of total ship tonnage. For example, if a 10,000-ton ship has 800 tons of engineering spaces, Engineering_Percentage = 8 (not 0.08).
Worked example: A 10,000-ton ship with 800 tons of engineering (8%):
- AFR = (0.04 / 8) * 10,000 = 0.005 * 10,000 = 50%
- Compare to the same ship with only 400 tons (4%): AFR = (0.04 / 4) * 10,000 = 100%
- Without engineering: AFR = 0.2 * 10,000 = 2,000%
Even minimal engineering dramatically reduces the failure rate. (Note: These formulas are unverified – the constants 0.2 and 0.04 are derived from community analysis and may not exactly match the game code.)
Minimum Engineering Requirement:
Commercial ships require at least 50 tons of engineering spaces. Beyond this threshold, additional engineering on commercial vessels provides no further reliability benefit (though it still provides additional MSP storage).
Maintenance Supply Points (MSP):
Note: MSP in the maintenance/logistics context means Maintenance Supply Points (consumables for repairs). This is distinct from Missile Size Points, also abbreviated MSP, used in missile design (see Section 8.5.3 Missile Launchers). Context determines which meaning applies.
Engineering spaces carry MSP — the consumable resources used for repairs. When a component fails due to maintenance issues, MSP are expended to fix it. When MSP run out, failed components stay broken until the ship is resupplied.
- Ships start deployments with full MSP based on their engineering space capacity
- MSP can be resupplied by supply ships or at colonies with maintenance facilities
- Plan MSP capacity based on expected deployment length
MSP Storage Formula:
MSP Stored = floor(12.5 * Ship Build Cost (BP) * Engineering Tons / Total Ship Tons)
This formula means MSP capacity scales with both the ship’s cost (more expensive ships store more per ton of engineering) and the proportion of the hull devoted to engineering. Dedicated Maintenance Storage Bays (10 MSP per ton) provide significantly more raw MSP storage per ton than engineering spaces, but engineering spaces also provide the maintenance personnel needed for repairs.
Engineering Space Variants:
Four size variants are available to accommodate different hull sizes:
| Variant | Size (tons) |
|---|---|
| Standard | 50 |
| Small | 25 |
| Tiny | 12.5 |
| Fighter | 5 |
Damage control:
In combat, engineering spaces serve a second critical function — damage control. When components are damaged or destroyed by enemy fire:
- Damage control teams attempt to repair damaged components
- The number of engineering spaces determines how many repair attempts can be made simultaneously
- More engineering = faster post-battle recovery
- Some components can be repaired in the field; others require a shipyard
Deployment endurance:
The practical deployment time of a ship is often limited by maintenance, not fuel. A ship with generous fuel but minimal engineering will start suffering random failures after months of deployment. Plan engineering spaces based on:
- Expected deployment length
- Distance from maintenance facilities
- Acceptable failure risk
- Whether the ship will see combat (combat damage requires more engineering to repair)
Sizing guidelines:
- System defense ships (stay near base): 3-5% of hull tonnage
- Patrol ships (6-12 month deployments): 5-8% of hull tonnage
- Long-range warships: 8-12% of hull tonnage
- Exploration ships (multi-year deployments): 10-15% of hull tonnage
Maintenance Bays:
Maintenance bays provide dedicated MSP storage to extend a ship’s maintenance life. Five sizes are available:
| Bay Type | Size (tons) | MSP Stored |
|---|---|---|
| Maintenance Storage Bay - Large \hyperlink{ref-8.6-15}{[15]} | 250 | 2,500 |
| Maintenance Storage Bay - Standard \hyperlink{ref-8.6-15}{[15]} | 50 | 500 |
| Maintenance Storage Bay - Small \hyperlink{ref-8.6-15}{[15]} | 10 | 100 |
| Maintenance Storage Bay - Tiny \hyperlink{ref-8.6-15}{[15]} | 2.5 | 25 |
| Maintenance Storage Bay - Fighter \hyperlink{ref-8.6-15}{[15]} | 0.5 | 5 |
Note: Key Metrics in the Class Designer
The Class Design window displays several maintenance-related values that interact with each other:
- MSP Carried: Total Maintenance Supply Points from engineering spaces and maintenance bays combined
- Annual Failure Rate (%): Probability of a component failure per year (reduced by adding engineering spaces)
- Individual/Daily Failure Rate (%): Probability of a failure on any given day
- Annual MSP Consumption: How many MSP are consumed per year of deployment
- Maximum Repair Job (MSP): The cost to repair the largest single component (typically the engine)
- Maintenance Life: How long MSP stores will last at the annual consumption rate
Design Workflow for Maintenance:
- Set deployment time (e.g., 60 months for a survey ship)
- Check if maintenance life exceeds deployment time – if not, add maintenance bays
- Check annual failure rate – if too high, add engineering spaces to reduce it
- Ensure MSP carried covers the maximum repair job cost (so the ship can fix its largest component if it fails)
- Balance bay count vs. engineering spaces for optimal weight
Example: A survey ship with 2 Small Maintenance Bays and 3 Tiny Maintenance Bays plus engineering spaces achieved: maintenance life exceeding 60 months, approximately 40% annual failure rate, approximately 6% daily failure rate, and sufficient MSP for the maximum repair job.
Warning: If maintenance life is shorter than deployment time, the ship will exhaust its MSP and be unable to repair failures before its mission is complete. Always verify maintenance life >= deployment time in the designer.
Tip: New players often neglect engineering spaces entirely, then wonder why their ships start falling apart after a year of deployment. Engineering spaces are not glamorous — they do not shoot or scan — but they keep everything else working. For your first warships, 8% engineering is a safe baseline. You can reduce this on ships that will stay close to repair facilities. For extended deployments, consider supplementing with Maintenance Storage Bays (see Maintenance Storage Bays below) to carry additional MSP without adding extra engineering crew.
8.6.5 Deployment Time
Updated: v2026.01.30
The Class Design window includes an “Intended Deployment Time” field (measured in months) that defines how long a ship is designed to operate before returning to port.
Key details:
- Default deployment time for new designs is 3 months
- The field is directly editable in the class designer
- Setting deployment time affects morale calculations – crew morale degrades when deployment exceeds this value
- The designer displays “Morale check required: Yes” when deployment time is configured
Interaction with other systems:
Deployment time interacts with maintenance life and fuel endurance to determine actual mission duration. The ship must return home when the first of these limits is reached:
- Fuel runs out (range exhausted)
- Deployment time expires (crew morale degrades)
- Maintenance life approaches limit (risk of unrepairable breakdowns)
Whichever limit is reached first determines the effective mission duration.
Practical guidance:
- A 3-month deployment (the default) is too short for survey ships, which need months or years to complete their work
- Survey ships typically use 60 months (5 years) deployment time
- Maintenance life must exceed deployment time, or the ship will break down before its mission is complete
- In practice, ships often return before deployment time expires due to fuel or maintenance constraints
Tip: After setting deployment time, verify that maintenance life exceeds it. If not, add maintenance bays until maintenance life is sufficient. For survey ships, 60 months is a practical target – the ship will likely return for fuel before morale becomes an issue, but the long deployment time prevents unnecessary morale penalties.
8.6.6 Fuel Tanks and Cargo
Updated: v2026.02.15
Fuel tanks and cargo holds are the mundane but essential storage components that define a ship’s operational endurance and logistical utility.
Fuel Tanks:
Fuel tanks store Sorium-based fuel for engine operation. Ships without fuel cannot move – a stranded fleet is a dead fleet.
The Class Design window provides named fuel tank sizes in a dropdown selector:
| Tank Size | Weight (tons) | Capacity (litres) | Ratio |
|---|---|---|---|
| Ultra Large \hyperlink{ref-8.6-12}{[12]} | 5,000 | 5,000,000 | 1,000 L/ton |
| Very Large \hyperlink{ref-8.6-12}{[12]} | 1,000 | 1,000,000 | 1,000 L/ton |
| Large \hyperlink{ref-8.6-12}{[12]} | 250 | 250,000 | 1,000 L/ton |
| Standard \hyperlink{ref-8.6-12}{[12]} | 50 | 50,000 | 1,000 L/ton |
| Small \hyperlink{ref-8.6-12}{[12]} | 10 | 10,000 | 1,000 L/ton |
| Tiny \hyperlink{ref-8.6-12}{[12]} | 5 | 5,000 | 1,000 L/ton |
| Fighter \hyperlink{ref-8.6-12}{[12]} | 1 | 1,000 | 1,000 L/ton |
| Minimal \hyperlink{ref-8.6-12}{[12]} | 0.1 | 100 | 1,000 L/ton |
All tank sizes maintain a consistent ratio of 1,000 litres per ton. The Large tank is 5x the weight of Standard, and tanks range from Minimal (0.1 ton) for the smallest craft to Ultra Large (5,000 tons) for capital ships.
Tip: For survey ships, consider the fuel tank size that best fits your design. Multiple Standard tanks (50,000 L each) provide flexibility, while a single Large tank (250,000 L) is the most space-efficient option for long-range operations. Very Large (1,000,000 L) and Ultra Large (5,000,000 L) tanks are available for capital ships and dedicated tankers.
Additional notes:
- Multiple tanks can be installed (mix and match sizes)
- Fuel is consumed during movement at the rate determined by engine design (see Section 8.3 Engines)
- The designer displays total fuel capacity, range in billion km, and endurance in days at maximum speed
Fuel planning considerations:
- Calculate fuel consumption per hour at maximum speed
- Determine required range for the ship’s mission
- Add a 10-20% reserve for unexpected maneuvers
- The ship designer displays range automatically
Cargo Holds:
Cargo holds carry minerals, infrastructure, supplies, and other bulk goods between colonies. They are essential for freighter designs.
- Standard cargo holds: Various sizes available (Shuttle 50t, Tiny 500t, Small 5,000t, Standard 25,000t, Large 125,000t) \hyperlink{ref-8.6-4}{[4]}
- Cargo capacity measured in tons of material
- Important: Minerals require more cargo space than their mass suggests: 1 ton of minerals occupies 2.5 cargo points \hyperlink{ref-8.6-23}{[23]}. A Standard cargo hold (25,000 cargo points capacity) transports 10,000 tons of minerals (25,000 / 2.5 = 10,000), not 25,000 tons.
- Ships with cargo holds appear in the logistics transport lists
- The cargo hold’s own structural mass is always counted in total ship tonnage and affects speed. However, when the hold is empty, there is no additional cargo payload mass – only when loaded does the cargo payload add mass, reducing speed proportionally.
- Most planetary installations weigh 25,000 tons (fitting one standard cargo hold), and can be disassembled into smaller parts for transport in smaller increments
Base Load Time:
The base loading time for a standard cargo bay is approximately 500,000 seconds (roughly 5 days, 19 hours). This time scales proportionally with cargo capacity size and is displayed in the Class Design window as “Load Time” in days:hours:minutes format. Load times are reduced by cargo shuttle bays, spaceport/cargo shuttle station levels, the logistics skill of both the Naval Admin Command and ship commander, and the logistics skill of the colony governor.
Cargo Shuttle Bays:
In C# Aurora, large trans-Newtonian ships function only in space and cannot move closer to planetary bodies than low orbit. Cargo Shuttle Bays (replacing the VB6 “Cargo Handling Systems”) are required to load or unload cargo at planets.
- Each Cargo Shuttle Bay occupies 10 Hull Spaces
- A ship must have at least one Cargo Shuttle Bay to load/unload cargo at a planet
- As of v1.12.0, Light Naval craft (1,000 tons or less) can load and unload colonists and cargo directly without requiring cargo shuttle bays, reflecting their ability to operate at planetary surfaces
- As of v2.4.0, vessels of 500 tons or less are treated as having a built-in cargo shuttle bay, eliminating the need to mount one explicitly on very small craft
- Alternatively, the planet can have a Spaceport (3,600 BP) or Cargo Shuttle Station (1,200 BP) installation, which counts as one bay equivalent and can service unlimited ships simultaneously
v2.8.0+: The surface interaction limit has been raised from 500 tons to 1,000 tons, meaning all Light Naval vessels can now interact directly with planetary surfaces. See Section 9.6 Light Naval Operations.
Shuttle technology improves loading performance through a handling multiplier system. Each bay’s handling value contributes to the ship’s total Cargo Shuttle Multiplier, which divides the base load/unload time. For example, a multiplier of 4 reduces transfer time to one-quarter:
| Technology | Research Cost (RP) | Handling Multiplier |
|---|---|---|
| Conventional \hyperlink{ref-8.6-5}{[5]} | 1,000 | 1 |
| TN Shuttles \hyperlink{ref-8.6-5}{[5]} | 5,000 | 2 |
| Improved Shuttles \hyperlink{ref-8.6-5}{[5]} | 12,500 | 3 |
| Advanced Shuttles \hyperlink{ref-8.6-5}{[5]} | 40,000 | 5 |
Cargo shuttle bays also reduce loading times for Cryogenic Transports and Troop Transport Bays, and enable maintenance supply transfers between vessels and cargo/colonist/MSP transfers without relying on planetary infrastructure.
Freighter Prerequisite – TransNewtonian Cargo Shuttles:
Every freighter requires cargo shuttle bays to transfer goods to and from planetary surfaces. While Conventional shuttles (handling multiplier 1) are available from game start, researching TransNewtonian Cargo Shuttles (5,000 RP) provides 2x the cargo handling efficiency. This research should be completed around the same time as Nuclear Thermal Engines, when you plan to build your first freighters. The research takes several years at moderate lab allocation, so start it early.
Similarly, colony ships require Cryogenic Transport technology for moving passengers, though very short-range trips (e.g., Earth to Luna) may function without it.
Important: Cargo shuttle bay components upgrade instantly and automatically when better shuttle technology is researched. Existing ships receive the improved handling multiplier without requiring a refit.
Base cargo load times in C# Aurora were reduced approximately 45% compared to VB6 (from 36 seconds per cargo point to 20 seconds; colonists from 18 to 10 seconds).
Cargo Transfers Between Ships:
As of v2.0.0, installations and minerals can be transferred between cargo ships or to stations using standing orders:
- Transfer Installation
- Transfer All Installations
- Transfer All Minerals
Each transferring vessel uses its own cargo handling capabilities. However, if the receiving fleet contains at least one cargo shuttle bay, each transferring ship gains access to one additional virtual shuttle bay. This enables deep-space transshipment points where short-range freighters deliver to cargo stations, which then distribute goods via long-range freighters.
Small Craft Refuelling System:
The Small Craft Refuelling System (v2.0) is a compact refuelling component designed for operations between small vessels:
- Mass: 50 tons (1 HS)
- Flow rate: 15,000 litres per hour \hyperlink{ref-8.6-6}{[6]}
- Development cost: 500 RP \hyperlink{ref-8.6-6}{[6]}
- Can only be mounted on ships of 1,000 tons or less
- Can only refuel ships of 1,000 tons or smaller
- Only one refuelling system may be added to a class design (as of v2.1.0)
- Functions similarly to modern aerial refuelling rather than complex replenishment ships
- Interacts normally with Refuelling Hubs and Colonies
- When tankers with this system are set as conditional order destinations, fleets with ships larger than 1,000 tons will ignore them
Cargo Bay - Shuttle (v2.5.0):
A compact cargo component added in v2.5.0 for small ships:
- Size: 1 HS (50 tons)
- Capacity: 50 cargo points
- Build Cost: 0.2 BP
- Provides basic cargo capability on ships too small for standard cargo holds while also functioning as a shuttle bay for loading/unloading at planets
Cargo Holds (Large):
The Large Cargo Hold is a starting system for both conventional and TN starts in C# Aurora, making cargo capacity accessible from the beginning of any game regardless of starting conditions.
Cryogenic Transport:
For moving colonists/population, ships need cryogenic transport modules instead of (or in addition to) cargo holds:
- Each module carries a set number of colonists in suspended animation
- Essential for colony ships
- Colonists do not consume ship supplies during transport
- Modules are relatively large — colony ships tend to be big
- Development cost: 2,000 RP (increased from 1,000 in earlier versions) \hyperlink{ref-8.6-7}{[7]}
When Cryogenic Transport is researched, the following variants are automatically unlocked:
- Very Large Cryogenic Transport: Added in v2.2.0, the largest variant available
- Large Cryogenic Transport: 5x the standard size, 4x cost, 3x crew requirements
- Small Cryogenic Transport: Smaller variant for compact vessels
- Emergency Cryogenic Transport: Minimal-capacity emergency option
Troop Transport:
Moving ground forces (see Section 13.1 Unit Types and Formation Design) requires troop transport bays:
- Each bay carries a specific tonnage of ground units
- Troops require more space per unit than cargo (they are alive and need life support)
- Dedicated troopships carry bays plus enough speed to reach contested systems
When base Troop Transport technology is researched, larger variants are automatically unlocked (as of v2.2.0, all variants including Very Large are available):
- Large Troop Transport Bay: Standard large variant
- Very Large Troop Transport Bay: 5x larger than the Large variant, 4x cost, 3x crew
- Large Troop Transport Drop Bay: Orbital drop-capable large variant
- Very Large Troop Transport Drop Bay: 5x larger drop bay, 4x cost, 3x crew
These automatic unlocks allow players to quickly scale up troop-carrying capacity without additional research overhead.
Fuel Harvesting Equipment:
Sorium harvesters collect fuel directly from gas giant atmospheres:
- Installed on ships that orbit gas giants
- Harvest rate depends on module size and gas giant sorium concentration
- Multiple harvesters increase collection rate
- Fuel harvesters fill the ship’s own fuel tanks (transfer fuel to tankers for fleet distribution)
Tip: When designing freighters and colony ships, maximize cargo/colonist capacity and keep speed reasonable (1,000-2,000 km/s is fine for most logistics). These ships rarely need weapons or sensors — their escorts handle protection. Pour the tonnage savings into more cargo capacity. A 50,000-ton freighter with 40,000 tons of cargo capacity moves twice as much material per trip as one with 20,000 tons of cargo and unnecessary weapons.
8.6.7 Jump Drives
Updated: v2026.01.30
Jump drives allow ships to transit jump points (see Section 4.4 Jump Points) that have not been stabilized. Without a jump drive, ships can only traverse jump points that have been stabilized by construction of jump gates. Since jump gates are expensive and time-consuming to build, jump drives are essential for exploration and rapid military response.
Jump drive types \hyperlink{ref-8.6-16}{[16]}:
- Military Jump Drive: Smaller and more efficient per ton of transit capacity, but more expensive. Used on warships and dedicated jump tenders.
- Commercial Jump Drive: Larger for equivalent capacity but cheaper. Appropriate for logistics and transport vessels.
Both types can function as self-only (transiting only the equipped ship) or squadron drives (creating a transit window for other ships in the task group).
Jump drive sizing formula:
Jump drive size is determined by the tonnage it must transit, the jump drive efficiency technology, and the squadron parameters:
- Base Jump Drive Efficiency technology \hyperlink{ref-8.6-17}{[17]} ranges from 4 (starting) to 25 (advanced), representing the tons of transit capacity per HS of jump drive
- Max Squadron Jump Size technology \hyperlink{ref-8.6-18}{[18]} determines how many ships can transit simultaneously (3 to 12 ships)
- Max Squadron Jump Radius technology \hyperlink{ref-8.6-19}{[19]} determines maximum distance between ships during squadron transit (50,000 km to 4,000,000 km), with higher radius multiplying the drive cost
Squadron jump drives must be sized for the largest individual ship in the task group, not the total tonnage. Each ship in the squadron must fit within the drive’s per-ship tonnage rating.
Jump sickness:
Ships transiting unstabilized jump points suffer jump sickness – a period of disorientation during which weapons and sensors may not function at full capability (exact duration is unverified). This creates a tactical vulnerability – a fleet jumping into a hostile system is briefly helpless.
- Jump gate transit avoids jump sickness entirely
- Higher-tech jump drives can reduce (but not eliminate) sickness duration (unverified — requires live testing)
- Defenders at a jump point have a significant advantage over attackers jumping in
Jump ship doctrine:
Common approaches to providing jump capability:
- Dedicated jump ships: One ship carries a large squadron jump drive. Escorts rely on it for transit. The jump ship itself is usually unarmed (all tonnage goes to the drive). If the jump ship is destroyed, the fleet is stranded.
- Individual jump drives: Each ship carries its own self-only drive. More expensive in total tonnage but no single point of failure. Ships can scatter and retreat independently.
- Mixed approach: Capital ships carry self-only drives while the fleet jump ship handles escorts and logistics vessels.
Jump point stabilization alternative:
Building jump gates at both ends of a jump point stabilizes it permanently, allowing any ship to transit without a drive. This eliminates the need for jump drives but:
- Requires significant construction resources and time
- Both sides of the jump point must be gate-equipped
- Provides a permanent, visible infrastructure that enemies can target
- Best for well-traveled routes; drives are better for frontier exploration
Tip: For your first exploration phase, a single squadron jump ship supporting 2-3 survey frigates is the most economical approach. Build jump gates only on your most-traveled routes (home system connections, major colony routes). As your empire grows and jump gate construction becomes affordable, you can phase out jump drives on routine patrol routes and reserve them for frontier and military operations.
8.6.8 Maintenance Storage Bays
Updated: v2026.01.30
Maintenance Storage Bays provide additional Maintenance Supply Points (MSP) beyond what engineering spaces carry. They function as dedicated storage for spare parts and repair materials, extending a ship’s ability to perform maintenance and damage control during long deployments.
Naming update (v2.7.0): Maintenance storage bays now follow a standardized naming convention with component suffix format (e.g., “Maintenance Storage Bay - Large”, “Maintenance Storage Bay - Standard”) \hyperlink{ref-8.6-20}{[20]}. This matches the naming pattern used by other component types throughout the game.
Crew change (v2.6.0): Maintenance storage bays no longer require crew to operate \hyperlink{ref-8.6-20}{[20]}. Previously, these bays had crew requirements similar to other ship components. This change reduces overall crew requirements for ships that rely heavily on MSP storage for extended deployments.
Unlike engineering spaces (which provide both maintenance capacity and MSP storage), maintenance storage bays provide only MSP storage without adding maintenance personnel. This makes them useful for:
- Fleet tenders that resupply other ships’ MSP
- Long-deployment warships that need extra repair materials
- Logistics vessels supporting forward-deployed task groups
When designing support ships, combine engineering spaces (for active repair capability) with maintenance storage bays (for extra MSP capacity) to create effective fleet maintenance vessels.
8.6.9 Fractional Capacitors
Updated: v2026.01.30
Fractional capacitors are an enhancement to the capacitor technology system that provides intermediate recharge rate options for beam weapons. When each capacitor technology level is researched, fractional (interpolated) capacitor technologies are automatically unlocked.
How they work:
Researching a capacitor technology level grants quarter-step intermediate versions automatically. For example, researching Capacitor Tech 2 also unlocks capacitor versions 1.25, 1.5, and 1.75 simultaneously.
Available levels:
- Quarter-level technologies (x.25, x.5, x.75) are available up to Capacitor 4 \hyperlink{ref-8.6-14}{[14]}
- Additional intermediate levels: 4.5, 5.5, 7, 9, 11, 13, 14, 15, 16, 20, and 25 \hyperlink{ref-8.6-14}{[14]}
Impact on beam weapon design:
Since beam weapon costs are primarily determined by power requirement, range modifier, and recharge rate, fractional capacitors enable more cost-effective weapon designs. By selecting intermediate recharge rates that better match specific weapon requirements, designers can avoid over-specifying capacitor levels and reduce unnecessary costs.
For example, if a weapon only needs a recharge rate between Capacitor 1 and Capacitor 2, selecting Capacitor 1.5 provides the needed performance without paying for the full Capacitor 2 cost. This makes some beam weapons slightly cheaper and allows finer optimization of ship power budgets.
Tip: When designing beam weapons, always check if a fractional capacitor level meets your recharge needs. A laser with Capacitor 1.75 instead of Capacitor 2 costs less while providing nearly the same fire rate. The savings compound across multiple weapons on a ship.
8.6.10 Bridges
Updated: v2026.01.30
Ships of 1,000 tons or more require a bridge component. In v1.14.0, the automatic bridge system was adjusted:
- The design interface indicates when a vessel needs a bridge at 1,000+ tons through an error message
- However, the bridge is not automatically added until the design reaches 1,100 tons
- This 100-ton buffer allows designers to experiment with systems in the 1,000-1,100 ton range without mandatory bridge installation
- Once designs exceed 1,100 tons, bridges are automatically incorporated without further player intervention
Ships below 1,000 tons (fighters, FACs, and small craft) do not require bridges.
Auxiliary Control and Flag Bridge (v2.4.0+):
As of v2.4.0, Auxiliary Control and Flag Bridge are now starting systems for both conventional and TN technology starts. Players no longer need to research these components separately, making them available for ship designs from the beginning of any game.
8.6.11 Mobile Repair Bays
Updated: v2026.01.30
Mobile Repair Bays (introduced in v2.0) provide forward repair capabilities without requiring planetary infrastructure. They enable ship-based repair yards that can operate anywhere in space.
Specifications:
| Parameter | Value |
|---|---|
| Size \hyperlink{ref-8.6-11}{[11]} | 2,000 tons (40 HS) per unit |
| Build Point Cost \hyperlink{ref-8.6-11}{[11]} | 120 BP per bay |
| Development Cost \hyperlink{ref-8.6-11}{[11]} | 5,000 RP |
| Repair Capacity \hyperlink{ref-8.6-11}{[11]} | 1,000 tons per bay (stackable) |
Functionality:
- When a ship carrying Mobile Repair Bays orbits a population, it appears in that population’s shipyard list under the parent ship’s name
- The bays can perform repair and scrapping tasks identically to fixed Repair Yards of equivalent capacity
- Require no workers to operate (unlike ground-based Repair Yards)
- Cannot be expanded or modified after construction
- Multiple bays on the same ship stack their repair capacity
Operational Restrictions:
- If a ship-based repair yard is actively performing work, the parent fleet cannot receive movement orders
- The fleet remains stationary during all repair operations
Strategic Applications:
- Forward-deployed repair bases without colonist support
- Repair capabilities at Deep Space Populations
- Temporary repair facilities at contested locations
- Mobile repair networks throughout explored space
- Ideal for fleets operating far from established infrastructure
Comparison to Fixed Repair Yards:
Mobile Repair Bays are slightly more expensive than equivalent fixed Repair Yards for larger capacities, but they eliminate all infrastructure requirements. The trade-off is flexibility versus cost-effectiveness – fixed yards are cheaper for permanent installations, while mobile bays provide unmatched strategic mobility.
8.6.12 Miscellaneous Components
Updated: v2026.01.30
Miscellaneous components are a category of ship modules with no game function, serving entirely for roleplaying purposes. They were introduced in v1.13.0 to support narrative-focused gameplay.
Design parameters:
- Size range: 0.1 HS to 100 HS
- Build point cost: Equal to the component’s size in HS
- Mineral requirements: Split between Duranium and Mercassium
- HTK: Equal to the square root of the size (same formula as other components)
Implementation:
These components integrate into the standard ship design workflow through a dedicated component type category on the design window. They appear in class summaries alongside functional components but do not affect vessel performance, combat capability, or any game mechanics.
Example applications:
- Entertainment Lounges for crew morale (flavour only)
- Viewing Galleries on passenger liners
- Ship Libraries for long-deployment vessels
- Diplomatic suites on embassy ships
- Science labs (decorative, beyond sensor function)
- Chapels, gymnasiums, or other crew facilities
These components allow players who invest in roleplaying elements to enhance immersion through fictional ship amenities, adding character and backstory to their designs without affecting gameplay balance.
8.6.13 Shields
Updated: v2026.01.30
Shields provide an energy barrier that absorbs incoming weapon damage before it reaches a ship’s armor. They are essential for frontline warships but consume significant power and hull space, and generate EM emissions that make the ship detectable.
Shield Types:
Shield technology progresses through named types, each providing a higher strength multiplier:
| Shield Type | Strength Multiplier | Research Cost (RP) | Era |
|---|---|---|---|
| Alpha | 1 | 1,000 | Starting |
| Beta | 1.5 | 2,000 | Early |
| Gamma | 2 | 4,000 | Early |
| Delta | 2.5 | 8,000 | Early-Mid |
| Epsilon | 3 | 15,000 | Mid |
| Theta | 4 | 30,000 | Mid |
| Xi | 5 | 60,000 | Mid-Late |
| Omicron | 6 | 120,000 | Late |
| Sigma | 8 | 250,000 | Late |
| Tau | 10 | 500,000 | Advanced |
| Psi | 12 | 1,000,000 | Advanced |
| Omega | 15 | 2,000,000 | Extreme |
All values verified against AuroraDB.db \hyperlink{ref-8.6-8}{[8]}
Each type multiplies the base shield strength, providing progressively more protection per HS of shield generator. In C# Aurora, the progression runs from Alpha (multiplier 1) through to Omega (multiplier 15) across 12 tiers. Note that the progression is not linear – multipliers skip from 6 to 8 to 10, then jump to 12 and 15 at the highest tiers.
Shield Regeneration:
Shields regenerate over time after taking damage. The regeneration rate technology provides levels from 1 to 15 \hyperlink{ref-8.6-9}{[9]}, with higher levels restoring shield points faster. Regeneration occurs continuously during combat, meaning shields can partially recover between enemy salvos if the incoming damage rate does not exceed the regeneration rate.
Regeneration Formula:
Recharge per 5-second increment = Regeneration Tech Level * Generator Size (HS)
The regeneration rate is proportional to both the technology level and the physical size of the generator. Larger generators recharge at the same rate per HS as smaller ones, but since they have more total shield strength to restore, they take proportionally longer to reach full capacity from empty. When shields are first activated, they begin at zero strength and build gradually at this rate.
Non-Linear Size Scaling:
Larger shield generators are more space-efficient than smaller ones. This follows a non-linear scaling curve similar to other components – a single large shield generator provides more total shield strength per HS than multiple smaller generators of equivalent total size. This encourages centralized shield designs on larger warships while making small-ship shields proportionally weaker.
Shield EM Emissions:
Active shields generate EM signature equal to three times their total shield strength value (see Section 11.1 Thermal and EM Signatures). This is a significant tactical consideration – raising shields broadcasts your position to any EM sensor in range at considerable distance. Many commanders keep shields down during approach and only raise them when combat is imminent.
Design Considerations:
- Shields are the first line of defense against beam and kinetic weapons
- They do not protect against meson weapons (mesons bypass shields and armor)
- High-Powered Microwaves deal triple damage to shields (3 damage per hit vs. the normal 1), making them a shield-stripping threat
- Shield generators require power from the ship’s reactor
- The EM signature trade-off (3x shield strength) means shields are counter-productive for stealth operations
- Consider the regeneration rate when designing for sustained engagements vs. alpha-strike combat
- Shield damage does not trigger shock damage, unlike armor hits – this makes shields especially valuable against heavy weapons that would otherwise cause internal shock
8.6.14 Power Plants
Updated: v2026.01.30
Power plants provide the electrical power needed to fire beam weapons. Each ship should have sufficient power generation capacity to fire all its beam weapons in a single volley; otherwise, weapons must wait for capacitor recharge between shots.

Figure 8.6.14: Power plant boost levels showing the trade-off between additional power output and explosion risk when hit. Note that 100% boost provides only 2x power but increases explosion chance from 5% to 50%.
Power Output Formula:
Power plants use the same square root size-efficiency scaling as engines and shields:
Power Output = Power Tech * Size (HS) * sqrt(Size / 10)
For generators of 1 HS or less, the sqrt scaling does not apply (output is simply Power Tech * Size). The bonus begins at sizes above 1 HS, making larger power plants more efficient per hull space.
Example: A 4 HS reactor with Power Tech 5:
- Output = 5 * 4 * sqrt(4/10) = 5 * 4 * 0.632 = 12.6 power
- A 10 HS reactor: 5 * 10 * sqrt(10/10) = 50 power (reference efficiency)
- A 25 HS reactor: 5 * 25 * sqrt(25/10) = 197.6 power
Power Boost System:
Power plants can be designed with a boost percentage (0% to 100%) that increases output beyond the base formula. However, boosted reactors have an increased chance of catastrophic explosion when damaged in combat:
| Boost Level | Explosion Chance When Hit | Research Cost (RP) |
|---|---|---|
| None (0%) | 5% | 250 |
| 10% | 7% | 500 |
| 20% | 10% | 1,000 |
| 30% | 15% | 2,000 |
| 40% | 20% | 4,000 |
| 60% | 30% | 8,000 |
| 80% | 40% | 15,000 |
| 100% | 50% | 30,000 |
All values verified against AuroraDB.db \hyperlink{ref-8.6-10}{[10]}
Higher boost levels require research in the Power Boost technology line (up to 30,000 RP for 100% boost) \hyperlink{ref-8.6-10}{[10]}. The trade-off is significant: a 60% boost reactor provides 60% more power from the same hull space but has a 30% explosion chance when hit, versus only 5% for an unboosted reactor. Note that the boost progression skips from 40% to 60% and from 60% to 80% – there are no 50%, 70%, or 90% options.
Size Selection:
Power plant sizes range from 0.01 HS to 30.75 HS with no technology restriction on size. The square root efficiency bonus means larger single reactors are more space-efficient than multiple small ones, but represent a single point of failure.
Power Allocation Priority System:
In C# Aurora, when total power demand exceeds reactor output, power is allocated to components in a fixed priority order rather than being distributed equally. This means some systems operate at full capacity while others receive reduced power or none at all:
- Shields (highest priority) – Shield generators receive power first
- Beam Weapons – Weapons receive power next, after shields are fully supplied
- Other Systems (lowest priority) – Sensors, ECM, and other power-drawing systems receive whatever power remains
If a ship’s total power demand exceeds its reactor output, lower-priority systems operate at reduced capacity. The practical consequence is significant: an under-powered ship loses offensive capability (slower beam weapon recharge) before it loses shields. A ship with heavy shields and heavy weapons but an undersized reactor will maintain full shield strength while its weapons fire at a reduced rate.
This priority system also matters when reactors are damaged in combat. Losing reactor capacity means beam weapons degrade first while shields continue operating, which can be either advantageous (staying alive longer) or disadvantageous (unable to kill the enemy) depending on the tactical situation.
Tip: Match your power plant output to your beam weapon requirements. Over-specifying power wastes tonnage; under-specifying means some weapons cannot fire every cycle. For ships with variable weapon loadouts (mixed beam types with different recharge rates), target enough power for the simultaneous maximum draw. The power allocation priority system means that under-powering your reactor degrades weapons before shields – acceptable if you prioritize survivability, but problematic if you need to kill targets quickly. Avoid high boost levels unless the extra power is essential – the explosion risk compounds quickly with each hit taken.
8.6.15 Ship Class Templates
Updated: v2026.01.30
Ship class templates provide pre-configured starting points for common ship designs in C# Aurora. These templates include appropriate components for their intended role and can be modified freely after selection.
Templates speed up the design process for new players and provide baseline configurations that represent functional (if not optimized) designs for standard roles. Experienced players can use them as starting points and customize from there, or ignore them entirely and design from scratch.
Added v2.7.0: Class templates now include a Crew Design Efficiency setting \hyperlink{ref-8.6-21}{[21]}. This parameter controls the crew efficiency multiplier applied to ships built from the template. A higher efficiency value means more crew are required (representing spacious accommodations and redundant staffing), while a lower value reduces crew requirements (representing cramped quarters and skeleton crews). Ships built from a template inherit this efficiency setting, which affects total crew requirements and morale. The setting can be adjusted when modifying templates to match your preferred crew doctrine.
8.6.16 Tractor Beams
Updated: v2026.01.30
Tractor beams allow a ship to tow another vessel, enabling tug operations for ships that have run out of fuel, lack engines, or need repositioning. Tractor-equipped ships (tugs) are essential logistics assets for recovering stranded vessels and moving orbital installations.
Component Limitations:
Ships are limited to one tractor beam each \hyperlink{ref-8.6-24}{[24]}. The database marks tractor beams as a “single system” component type, preventing multiple tractor installations on the same hull \hyperlink{ref-8.6-25}{[25]}.
Multiple Tugs Cannot Combine:
Multiple tugs cannot attach to the same target to combine their towing capacity. The tractor system enforces a strict 1:1 relationship: “you can only tractor one ship each” \hyperlink{ref-8.6-26}{[26]}. Each tug can only tow one entity, and each entity can only be tractored by one tug. If you need to move a massive station faster, you must build larger/heavier tugs rather than assigning multiple smaller tugs to the same target.
Multiple tugs can operate simultaneously on different targets – “multiple ships may be tractored in one set of orders as long as multiple tractoring ships are present” \hyperlink{ref-8.6-24}{[24]}.
Towing Speed Formula:
A tug’s speed while towing depends on the combined engine power and mass of both vessels \hyperlink{ref-8.6-24}{[24]}:
Towing_Speed = (Sum_of_Engine_Powers) / (Sum_of_Masses)
If the towed ship has functional engines, they contribute to the combined speed. For ships without engines (stations, disabled vessels), only the tug’s engines provide thrust.
Simplified Mass Ratio:
When the towed vessel has no engines, this simplifies to:
Towing_Speed = Normal_Tug_Speed * (Tug_Mass / (Tug_Mass + Towed_Mass))
Example:
- Tug normal speed: 2,000 km/s
- Tug mass: 10,000 tons
- Towed ship mass: 90,000 tons (no engines)
- Tug proportion: 10,000 / (10,000 + 90,000) = 0.10
- Towing speed: 2,000 * 0.10 = 200 km/s
The return trip (without the towed vessel) is at full tug speed.
Tug Design Considerations:
- Tugs need high engine power because towing drastically reduces effective speed
- Tugs benefit from having significant mass themselves so the tug-to-total ratio is not too extreme
- A tug that is very light relative to its towed target will crawl; heavier tugs maintain better towing speed
- Tugs can retrieve ships that have run out of fuel, preventing fleet strandings
- Since you cannot combine multiple tugs on one target, plan your tug tonnage based on your largest expected tow
Tip: When designing a tug, prioritize engine power and hull mass. A 10,000-ton tug towing a 90,000-ton station moves at only 10% of its normal speed. If that tug normally moves at 2,000 km/s, towing speed is just 200 km/s. Plan tug operations with these speed reductions in mind – what looks fast on paper becomes very slow under tow.
See Section 9.4 Fleet Organization for tractor beam operational orders and fleet towing procedures.
Related Sections
- Section 8.5 Weapons – Weapons that fire controls direct
- Section 4.4 Jump Points – Jump point mechanics and gate construction
- Section 14.2 Maintenance – Logistical operations using cargo and fuel components
- Section 13.1 Unit Types and Formation Design – Ground forces carried by troop transports
- Section 12.1 Fire Controls – How shields, engineering, and damage control function in battle
- Appendix A: Formulas – Component HTK, MSP storage, and fuel consumption formulas
References
\hypertarget{ref-8.6-1}{[1]}. AuroraDB.db FCT_TechSystem: Single-Weapon Fire Control – 50% size and cost reduction (AdditionalInfo = 0.5)
\hypertarget{ref-8.6-2}{[2]}. AuroraDB.db FCT_TechSystem: Magazine Feed System Efficiency – 75% (1,000 RP) through 99% (250,000 RP), 9 tiers
\hypertarget{ref-8.6-3}{[3]}. AuroraDB.db FCT_ShipDesignComponents: Boat Bay variants – Small (1.05 HS/52.5t, 5 BP, 1 crew, MilitarySystem=1), Standard (5.25 HS/262.5t, 25 BP, 3 crew, MilitarySystem=1), Hangar Deck (21 HS/1,050t, 100 BP, 12 crew, MilitarySystem=1); Commercial Hangar Deck (32 HS/1,600t, 100 BP, 15 crew, MilitarySystem=0)
\hypertarget{ref-8.6-4}{[4]}. AuroraDB.db FCT_TechSystem: Cargo Hold sizes – Shuttle (50t), Tiny (500t), Small (5,000t), Standard (25,000t), Large (125,000t)
\hypertarget{ref-8.6-5}{[5]}. AuroraDB.db FCT_TechSystem: Cargo Shuttle Technology – Conventional (multiplier 1, 1,000 RP), TN (multiplier 2, 5,000 RP), Improved (multiplier 3, 12,500 RP), Advanced (multiplier 5, 40,000 RP)
\hypertarget{ref-8.6-6}{[6]}. AuroraDB.db FCT_ShipDesignComponents: Small Craft Refuelling System – 15,000 LPH (ComponentValue=15000, Size=1.0 HS/50t, Cost=4 BP). FCT_TechSystem: base tech named “5,000 LPH” (TechSystemID 97493), 500 RP development cost. The component applies a 3x multiplier to the tech base value.
\hypertarget{ref-8.6-7}{[7]}. AuroraDB.db FCT_TechSystem: Cryogenic Transport – 2,000 RP development cost
\hypertarget{ref-8.6-8}{[8]}. AuroraDB.db FCT_TechSystem: Shield Types – Alpha (multiplier 1, 1,000 RP) through Omega (multiplier 15, 2,000,000 RP), 12 tiers
\hypertarget{ref-8.6-9}{[9]}. AuroraDB.db FCT_TechSystem: Shield Regeneration Rate – Level 1 (1,000 RP) through Level 15 (2,000,000 RP), 12 tiers at rates 1/1.5/2/2.5/3/4/5/6/8/10/12/15
\hypertarget{ref-8.6-10}{[10]}. AuroraDB.db FCT_TechSystem: Power Plant Boost – None (5% explosion, 250 RP) through 100% (50% explosion, 30,000 RP), 8 tiers with explosion chances: 5%/7%/10%/15%/20%/30%/40%/50%
\hypertarget{ref-8.6-11}{[11]}. AuroraDB.db FCT_ShipDesignComponents and FCT_TechSystem: Mobile Repair Bay – 40 HS (2,000t), 120 BP, 5,000 RP, 1,000 ton repair capacity
\hypertarget{ref-8.6-12}{[12]}. AuroraDB.db FCT_ShipDesignComponents: Fuel Storage variants – Minimal (0.1t/100L) through Ultra Large (5,000t/5,000,000L), all at 1,000 L/ton
\hypertarget{ref-8.6-13}{[13]}. AuroraDB.db FCT_ShipDesignComponents: Commercial Magazines – CM-100 (12 HS, 100 MSP, 25 BP, 5 crew, HTK 1, 100% explosion) and CM-500 (50 HS, 500 MSP, 100 BP, 20 crew, HTK 1, 100% explosion)
\hypertarget{ref-8.6-14}{[14]}. AuroraDB.db FCT_TechSystem: Capacitor Recharge Rate (TechTypeID 1) – 29 levels from 1 to 25, including fractional levels (1.25/1.5/1.75 through 3.75) and intermediate levels (4.5, 5.5, 7, 9, 11, 13-16, 20, 25)
\hypertarget{ref-8.6-15}{[15]}. AuroraDB.db FCT_ShipDesignComponents: Maintenance Storage Bays – Fighter (0.5t/5 MSP), Tiny (2.5t/25 MSP), Small (10t/100 MSP), Standard (50t/500 MSP), Large (250t/2,500 MSP)
\hypertarget{ref-8.6-16}{[16]}. AuroraDB.db FCT_TechSystem: Jump Drive Types (TechTypeID 169) – Military Jump Drive and Commercial Jump Drive
\hypertarget{ref-8.6-17}{[17]}. AuroraDB.db FCT_TechSystem: Base Jump Drive Efficiency (TechTypeID 8) – Efficiency 4 (starting) through 25 (advanced), 10 tiers
\hypertarget{ref-8.6-18}{[18]}. AuroraDB.db FCT_TechSystem: Max Jump Squadron Size (TechTypeID 7) – 3 ships (cost x1.0) through 12 ships (cost x3.0), 10 tiers
\hypertarget{ref-8.6-19}{[19]}. AuroraDB.db FCT_TechSystem: Max Squadron Jump Radius (TechTypeID 6) – 50,000 km (cost x1.0) through 4,000,000 km (cost x3.6), 11 tiers
\hypertarget{ref-8.6-20}{[20]}. AuroraDB.db FCT_ShipDesignComponents: Maintenance Storage Bays – All variants (Fighter through Large) have Crew=0, naming follows “Maintenance Storage Bay - [Size]” format
\hypertarget{ref-8.6-21}{[21]}. AuroraDB.db FCT_ShipClassTemplate: CrewDesignEfficiency column (Double, default 1.0) added to class templates
\hypertarget{ref-8.6-22}{[22]}. AuroraDB.db FCT_TechSystem: Electronic Hardening (TechTypeID 139) – Level 0 (100% ECM effect) through Level 6 (5% ECM effect), 7 tiers
\hypertarget{ref-8.6-23}{[23]}. AuroraDB.db FCT_TechSystem: Cargo Hold descriptions – “1 ton of minerals = 2.5 CP” (cargo points). A Standard 25,000 CP hold carries 10,000 tons of minerals.
\hypertarget{ref-8.6-24}{[24]}. AuroraWiki2 (aurorawiki2.pentarch.org), “Tractor Beam” – “Ships are limited to one tractor beam each.” Speed formula: “(SumOfEnginePowers)/(SumOfMasses) of the two ships.” Multiple ships may be tractored if multiple tractoring ships are present.
\hypertarget{ref-8.6-25}{[25]}. Aurora C# game database (AuroraDB.db v2.7.1) – DIM_ComponentType: Tractor Beam (ComponentTypeID=37) has SingleSystem=1, indicating only one tractor beam system per ship is allowed.
\hypertarget{ref-8.6-26}{[26]}. Aurora Forums, “Fleet Haulers: Multiple Tractor Beam Ships” (aurora2.pentarch.org/index.php?topic=13474.0) – “you can only tractor one ship each” confirms 1:1 tug-to-target relationship. Also: “Tugs and Tractor Beams” thread (topic=2274.0) – “It can only attach to 1 ship… Putting more tractors on does NOT let you tow more ships.”