12.6 Damage and Armor
Updated: v2026.02.15

When weapons hit their targets, Aurora resolves damage through a detailed system that models armor penetration, internal component destruction, crew casualties, and secondary effects. Understanding this system is essential for both designing survivable ships and selecting weapons that can defeat enemy armor.
Contents
Updated: v2026.02.15
12.6.1 Damage Resolution
Updated: v2026.02.15
Each hit in Aurora is resolved individually against the target ship’s defenses. The process follows a sequence: first checking shields, then armor penetration, then internal damage if the armor is breached.
Damage Resolution Sequence
- Shield Check: If the target has active shields, they absorb damage first. Each point of shield strength absorbs one point of damage. Shields regenerate over time.
- Hit Location: A random armor column is selected. The ship’s armor is divided into columns corresponding to hull sections.
- Armor Penetration Check: The weapon’s damage (which also represents its penetration value) is compared against the armor depth at that column.
- Armor Damage: The weapon reduces armor at the hit column. Each point of damage destroys one layer of armor at that location.
- Internal Damage: If the weapon’s damage exceeds the remaining armor depth, excess damage penetrates to internal components.
Shields
Shields are the first line of defense and absorb damage before it reaches armor:
Damage to Armor = max(0, Incoming Damage - Current Shield Strength)
Shield characteristics:\hyperlink{ref-12.6-1}{[1]}
- Shields absorb damage point-for-point
- Shields regenerate at a rate determined by shield technology and the number of shield generators
- As of v2.0.0, shield regeneration occurs before the movement phase (previously it occurred after movement). This means shields recover slightly earlier in the turn sequence, potentially absorbing more damage before ships close range. (unverified — #837 – requires changelog verification or live testing for v2.0.0 timing change)
- Shields produce EM signature while active (see Section 11.1 Thermal and EM Signatures)
- Shield strength is shared across all hit locations (not per-column)
- A single large hit can deplete shields entirely, allowing remaining damage through

Armor System
Armor in Aurora is modeled as a grid of columns and layers:
Armor Grid = Columns (based on hull size) x Depth (layers of armor)
- Columns: The number of armor columns is determined during ship class design and stored in the ArmourWidth field. Database analysis shows the ratio of ship size to armor width varies between ship classes (observed ratios range from approximately 5:1 to 11:1), confirming that armor width calculation depends on multiple factors including hull size and armor technology rather than a simple divisor formula.\hyperlink{ref-12.6-7}{[7]} Larger ships generally have more columns, spreading hits across more locations.
- Depth: The number of armor layers is set during ship design. More layers = more protection but more mass and cost.
- Per-column tracking: Armor damage is tracked per column. A hit at column 5 only damages column 5’s armor, leaving other columns intact.

Armor Penetration
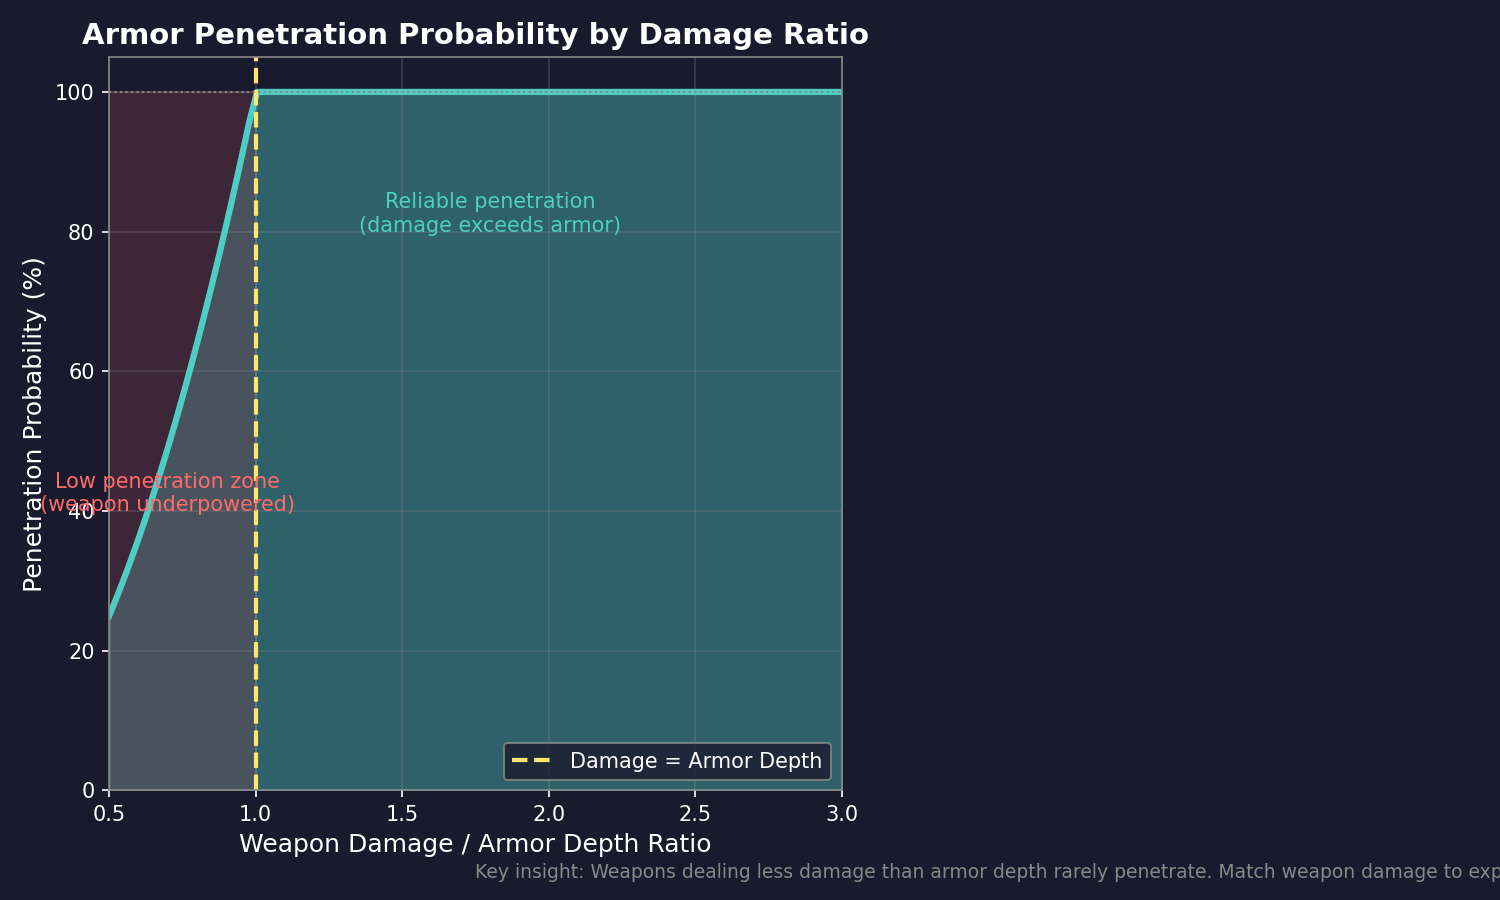
A weapon’s penetration value equals its damage value. To breach armor:
If Weapon Damage > Armor Depth at hit column:
    Internal Damage = Weapon Damage - Armor Depth
    Armor at that column = 0
Else:
    Armor at that column -= Weapon Damage
    No internal damage occurs
This means:
- Low-damage weapons cannot penetrate thick armor regardless of how many hit
- Each hit at the same column progressively thins that column’s armor
- Multiple hits at different columns spread damage without penetrating
- A single high-damage weapon can breach in one shot where many small weapons cannot
Range and Penetration
Beam weapons lose damage (and therefore penetration) at range. A 20-damage laser at 50% range does only 10 damage, meaning it can only penetrate 10 layers of armor. This is why closing range is critical when facing heavily armored opponents.
Missile Warhead Penetration
Missile warheads apply their full damage value regardless of the range they traveled. A missile with a 10-damage warhead always has penetration 10, making missiles more consistent against armor than beam weapons at long range.
Damage Types
Different weapon types interact with armor differently:
| Weapon | Armor Interaction |
|---|---|
| Lasers | Standard penetration, reduced by range |
| Railguns | Standard penetration, does not reduce with range |
| Plasma Carronades | High damage, short range (10,000 km for a 15cm C3 variant – roughly 20% of an equivalent laser’s maximum range), standard penetration |
| Mesons | Bypasses armor entirely (damages internals directly) |
| Microwaves | Base damage 1 (3x vs shields = 3 damage); after shields down, targets electronic systems only |
| Gauss Cannons | 1 damage per shot, cannot penetrate meaningful armor |
| Missile Warheads | Full damage regardless of flight distance |
Shock Damage (C# Aurora):
When a weapon damages armor, there is a chance of shock damage – secondary internal damage caused by the kinetic force of the impact even without full armor penetration. Critically, shields completely negate shock damage – any hit absorbed by shields, regardless of strength, cannot cause shock. This makes shields particularly valuable against heavy weapons that would otherwise have high shock probability.
Probability Formula:\hyperlink{ref-12.6-2}{[2]}
Shock Damage Chance = Damage to Armor / Ship Size (in Hull Spaces)
- Any damage with less than a 5% chance is ignored as too small (i.e., any damage where the strength is less than 5% of the ship HS)
- This creates a minimum threshold: the weapon damage must be at least 5% of the ship’s hull spaces to trigger a shock check
Examples:
- A 9-point warhead hitting a 6,000-ton ship (120 HS): 9/120 = 7.5% shock chance
- A 16-point energy impact on a 10,000-ton ship (200 HS): 16/200 = 8% shock chance
- A 3-point hit on a 10,000-ton ship: 3/200 = 1.5% – below 5% threshold, ignored
Shock Damage Amount:
When shock damage triggers, it randomly rolls up to 20% of the armor damage dealt. For damage easily divisible by 5 (like 15 points), the maximum shock damage is 3 points. For values like 12-point warheads, the shock generates approximately 2 maximum shock damage 60% of the time and 3 maximum shock damage 40% of the time.
Design Implications:
- Small weapons rarely trigger shock on large ships (below 5% threshold)
- Heavy weapons against small ships have significant shock probability
- Shock damage can cause internal component damage even when armor holds
- This represents a significant change from VB6’s shock damage system, balanced for higher-tier weaponry
12.6.2 Internal Damage
Updated: v2026.01.30
When a weapon penetrates armor, excess damage is applied to internal components. Internal damage is the primary means of disabling and destroying ships in Aurora.
Component Hit Determination
When internal damage occurs, the game randomly selects which internal components are hit based on their relative size. Larger components are more likely to be hit:
Hit Probability for Component = Component Size (HS) / Total Internal HS
Note: The hit probability is based on component size in hull spaces (HS), not on the component’s HTK (hit-to-kill) value. HTK determines how much damage a component can absorb before being destroyed, while HS determines how likely it is to be hit.
This means:
- Large engines are frequently hit
- Small sensors or fire controls are rarely hit directly
- Fuel tanks, when present, are proportionally likely targets
Component Destruction
Each internal component has a hit points value (typically 1 per HS of component size). When hit:
- Component takes 1 point of damage per point of penetrating damage
- If total damage equals or exceeds component HP, the component is destroyed
- Destroyed components cease to function immediately
- Partially damaged components still function normally until destroyed
Critical Components
Some component hits have catastrophic effects:
| Component | Effect When Destroyed |
|---|---|
| Engineering Spaces | Reduced damage control capability |
| Fuel Tanks | Fuel leak (ongoing fuel loss), potential explosion |
| Magazines | Potential magazine detonation (catastrophic explosion) |
| Engines | Reduced speed proportional to engine loss |
| Power Plants | Reduced power generation |
| Bridge | Ship loses command capability |
| Sensors | Loss of detection in that sensor’s band |
| Fire Controls | Weapons assigned lose targeting |
| Life Support | Crew begins taking casualties over time |
Magazine Detonation (C# Aurora)
Magazine hits are the most feared internal damage result. The system has been redesigned in C# Aurora:
- HTK: Magazines have HTK equal to the square root of their size (rounded down) – larger magazines are harder to destroy
- Explosion probability: Base chance is divided by the square root of magazine size (much rarer on large ships)
- Chief Engineer bonus: Explosion chance is reduced by the Chief Engineer’s Engineering Bonus percentage
- Ordnance destruction: When a magazine is damaged, a proportion of ordnance is destroyed based on destroyed capacity / total ship capacity
- Detonation severity: Destroyed ordnance detonates at FULL warhead strength (not 20% as in VB6)
- Magazine Neutralisation System: Replacement for ejection technology – represents warhead inactivation during damage events
- Empty magazines cannot detonate
- Civilian magazines: 100% explosion chance if destroyed (no square root reduction) (unverified — #864)
Magazine Explosion Probability Formula: (unverified — #864)
Explosion Chance = 15% / sqrt(Magazine Size in HS)
| Magazine Size (HS) | Base Explosion Chance |
|---|---|
| 1 | 15.00% |
| 5 | 6.71% |
| 10 | 4.74% |
| 20 | 3.35% |
| 30 | 2.74% |
The net effect: explosions are much rarer on larger vessels but far more devastating when they occur.
Secondary Explosions
Fuel tank hits can cause fires and secondary explosions:
- Fuel leaks reduce available fuel over time
- In severe cases, fuel ignition can cause additional internal damage
- Fuel tank hits are more dangerous on ships carrying large fuel reserves
Crew Casualties
Internal hits cause crew casualties proportional to the damage:
- Each penetrating hit kills crew members
- Crew losses reduce the ship’s operational efficiency
- Sufficient crew losses can render a ship combat-ineffective
- Crew grade and morale affect combat performance even before total loss
Microwave Weapon Effects
High Power Microwave (HPM) weapons have a unique damage profile that differs from other beam weapons:
- HPM deals 3 damage against shields (base DamageOutput is 1 in the database, multiplied by 3x vs shields) \hyperlink{ref-12.6-6}{[6]}
- Once shields are depleted, HPM targets electronic systems only
- After shields are down, each hit damages electronic components (fire controls, sensors, ECM) rather than structural systems
- Does not bypass armor – requires shields to be down first to affect internals
- Effective for disabling ships by destroying their targeting and detection systems
- Used strategically to blind and disable ships while preserving hull integrity for capture
- See Section 12.2.7 Beam Weapon Reference Tables for full HPM specifications
Meson Weapon Effects
Meson weapons pass through shields but face the Meson Armor Retardation system in C# Aurora:
- Bypass shields entirely
- Each armor layer has a percentage chance to stop the meson. The stop chance per layer is determined by the meson weapon’s focal size – larger mesons have lower per-layer stop chance:\hyperlink{ref-12.6-3}{[3]}
| Meson Focal Size | Stop Chance Per Armor Layer |
|---|---|
| 10 cm | 40% |
| 12 cm | 32% |
| 15 cm | 25% |
| 20 cm | 20% |
| 25 cm | 16% |
| 30 cm | 12.5% |
| 35 cm | 10% |
| 40 cm | 8% |
| 50 cm | 6.4% |
| 60 cm | 5% |
| 70 cm | 4% |
| 80 cm | 3.2% |
- The stop chance is checked independently for each armor layer. With N layers, the probability the meson reaches internals is: (1 - Stop_Chance)^N
- Example: 30 cm meson (12.5% stop) vs. 6 layers of armor: (1 - 0.125)^6 = 44.9% chance of reaching internals
- If stopped by armor, scores 1 point of damage on armor at that location
- If not stopped, damages internal components directly (always 1 damage)
- Destroy missiles without penalty (missiles are unarmored in C# Aurora)
- Cost is equivalent to same-size laser at same tech level
12.6.3 Repair and Damage Control
Updated: v2026.01.30
Ships in Aurora can repair damage using their engineering sections and maintenance supplies. Damage control is the difference between a ship limping home for full repair and being abandoned in deep space.
Engineering Sections
Engineering spaces (also called Damage Control sections) provide repair capability:
- Each engineering section contributes repair capacity
- More engineering sections = faster repairs
- Engineering sections can themselves be damaged, reducing repair speed
- Ships without engineering sections cannot repair at all
Damage Control Rating (DCR) and Instant Damage Control Rating (IDCR)
As of v2.2.0, the damage control system introduces an Instant Damage Control Rating alongside the traditional DCR:
- DCR: Functions as a multiplier to the chance of repairing damaged systems during a given time period (traditional repair mechanic)
- IDCR: A new metric providing immediate component preservation during hits
IDCR = Damage Control Rating x (200 / Class Size in tons)
Example calculations:
- 20,000-ton ship with DCR 12: IDCR = 12 x (200 / 20000) = IDCR 0.12
- 8,000-ton ship with DCR 12: IDCR = 12 x (200 / 8000) = IDCR 0.30
Engineering Bonuses:
- Main Engineering component boosts IDCR by the Chief Engineer’s bonus plus half the Commander’s bonus
- Maximum IDCR is capped at 50 (plus any engineering bonus)
- For standard damage control, the Engineering Bonus is multiplied by 5
Component Preservation (Instant DC):
When internal damage destroys a component, there is a percentage chance equal to the IDCR that the component remains intact:
- Maintenance supplies are consumed equal to the component’s cost
- Event reported as “damage control”
- The component continues to function despite the hit
Display Format: Ship class summaries show DCR as two numbers: “DCR 10-15” representing the standard and instant ratings respectively.
Damage Control Process
Repairs are performed automatically during time advancement:
- The ship’s damage control crew assesses damaged components
- Repairs are attempted based on engineering capacity and available supplies
- Each repair cycle can fix a portion of damage based on crew skill and engineering rating
- Armor cannot be repaired in the field (requires a shipyard)
- Destroyed components can be repaired to functional status given enough time and supplies
Maintenance Supplies
Repairs consume Maintenance Supply Points (MSP):
- Each repair operation uses MSP proportional to the component being repaired
- Ships carry MSP in dedicated storage
- When MSP is exhausted, no further repairs can be made
- MSP can be resupplied from maintenance-capable ships or colonies
MSP Usage per Repair = Component Size * Repair Complexity Factor
Repair Priorities
The damage control system prioritizes repairs automatically:
- Life-threatening damage (life support, fuel leaks)
- Propulsion (engines, to restore mobility)
- Weapons and fire controls
- Sensors
- Non-critical systems
Players cannot manually set repair priorities – the system handles this automatically. However, understanding the priority order helps predict which systems come back online first.
Automated Damage Control Default (v2.0.0+): As of v2.0.0, all newly constructed ships have Automated Damage Control enabled by default. This ensures damage control operations begin immediately without requiring manual activation. Players can still disable this setting for specific ships if desired.
Field Repair vs. Shipyard Repair
| Repair Type | Capability |
|---|---|
| Field (Engineering) | Repairs components to functional; cannot repair armor |
| Tender/Supply Ship | Provides MSP resupply; same repair limitations |
| Shipyard | Full repair including armor; complete component replacement |
| Orbital Station | Depends on station capabilities |
Armor Repair
Armor damage cannot be repaired by shipboard engineering. A ship with depleted armor columns must return to a shipyard for armor restoration. This makes armor a non-renewable resource in combat – once it is gone, the ship becomes progressively more vulnerable to subsequent hits.
Crew and Repair Speed
Repair speed is affected by:
- Engineering section capacity: More sections = faster
- Crew training: Better-trained crews repair faster
- Commander skill: Engineering-skilled commanders provide bonuses
- Available MSP: No supplies = no repairs
- Damage severity: More damage overall means repairs take longer (more to fix)
Maintenance and Reliability
Beyond combat damage, ships require ongoing maintenance:
- Ships accumulate maintenance clock time based on distance traveled and time deployed
- Components can fail randomly as maintenance clock increases
- Maintenance failures are repaired using the same system as combat damage
- Regular maintenance at shipyards resets the maintenance clock
- Ships deployed for extended periods without maintenance become unreliable (see Section 14.2 Maintenance)
Design Tips for Survivability
- Include at least 1-2 engineering sections on every warship
- Carry sufficient MSP for expected combat duration (plan for multiple engagements, plus 2% weapon failure rate)
- Use larger magazines (square root scaling of both HTK and explosion probability favors larger sizes)
- Assign a skilled Chief Engineer to missile-heavy ships (reduces explosion probability)
- Distribute critical systems (do not put all fire controls on one ship if possible)
- Armor depth should exceed the expected weapon damage of your opponents
- Redundant engines ensure a crippled ship can still limp home
- Ships expecting extended deployments need larger MSP reserves
- A dedicated repair/tender ship supporting a battle group provides MSP resupply and extends combat endurance
12.6.4 Planetary Bombardment
Updated: v2026.01.30
Orbital bombardment in C# Aurora uses distinct mechanics for missiles and energy weapons. Atmospheric conditions no longer affect energy weapon effectiveness.
Atmospheric Effects:
In C# Aurora, there is no penalty for energy weapons firing in or through an atmosphere. This is a significant change from VB6 Aurora, making orbital energy bombardment viable without atmospheric degradation.
Installation Destruction
Planetary installations can be targeted by both missiles and energy weapons. The destruction probability depends on the weapon and target:
Destruction Chance = Weapon Damage / Target Size
For example, a construction factory has a Target Size of 20,\hyperlink{ref-12.6-4}{[4]} so a 10cm laser (3 damage) has a 15% chance to destroy it per hit.
Missile vs. Energy Weapon Damage:
Missile warheads receive special treatment for bombardment: they are calculated as 20x warhead strength for targeting purposes. This means:
- A single 1-point warhead missile has a 100% chance to destroy a construction factory (20/20 = 100%)
- A 5-point warhead (100 effective damage) destroys its target and applies remaining damage to the next installation
Energy weapons can only destroy one target per hit, regardless of excess damage. Missile warheads apply damage across multiple targets sequentially until depleted.
Environmental Effects:
| Effect | Missile Warheads | Energy Weapons |
|---|---|---|
| Radiation increase | Equal to warhead size | None |
| Dust level increase | Equal to warhead size | 5% of damage amount |
| Civilian casualties | 100,000 per damage point | 2,000 per damage point |
Surrender Mechanics:
Populations no longer surrender from orbital bombardment alone – ground forces (see Section 13.3 Ground Combat) must land to force surrender. This means bombardment can destroy infrastructure and kill civilians but cannot conquer a planet without ground troops.
Energy Weapon Bombardment Strategy:
Energy weapons provide an alternative to missile bombardment for destroying infrastructure:
- No radiation effects (important for planets you want to colonize)
- No ordnance consumption (unlimited shots if power and MSP hold out)
- Much lower civilian casualties per damage point (2,000 vs. 100,000)
- Only 5% dust generation vs. full warhead equivalent
- Requires sustained presence in orbit
- MSP consumed through weapon failure mechanic (2% per shot)
- Lower per-hit destruction chance requires more time
Bombardment Cannot Remove Atmospheres: (unverified — #870)
Orbital bombardment provides only temporary cooling effects and cannot actually remove a planetary atmosphere. Bombardment fills the atmosphere with dust and radiation, which:
- Causes population unrest
- Takes a long time to dissipate naturally
- Does not change the base atmospheric composition
Traditional terraforming (see Section 5.5 Terraforming) is required to actually remove or modify atmospheres. Players seeking to make a hostile world habitable through bombardment will be disappointed.
Targeting Restrictions: Missiles cannot be fired at uncolonized planets – bombardment requires a target colony. Workaround: establish a colony, deploy a ground unit, declare independence via the Colony Window, then bombard the now-hostile colony.
Practical Tips for Bombardment:
- Use missiles for rapid destruction of critical infrastructure (20x damage multiplier is devastating)
- Use energy weapons for sustained, low-collateral bombardment campaigns
- Energy weapons are preferred for planets you intend to colonize (no radiation)
- Always bring ground forces for actual conquest – bombardment alone cannot force surrender
- Factor in MSP consumption for energy bombardment (2% weapon failure rate adds up over thousands of shots)\hyperlink{ref-12.6-5}{[5]}
- Larger warheads are more efficient for bombardment (damage cascades across multiple targets)
12.6.5 Radiation and Decontamination
Updated: v2026.01.30
Radiation accumulates on planets primarily through nuclear warhead bombardment. Managing radiation levels is important for long-term colonization viability.
Radiation Reduction (v2.2.0):
Radiation diminishes passively over time with the following formula:
Annual Reduction = max(100, Current Radiation Level x 0.10)
Radiation reduces at 100 units per year OR 10% of the current level per year, whichever is greater. This change from v2.1.0 (which used a flat 100 per year) dramatically accelerates cleanup of heavily irradiated areas. For example, a contaminated zone with 10,000 radiation units would require approximately 32 years to reach zero under the v2.2.0 formula, compared to 100 years under the flat-rate system.
Decontamination Units (v2.2.0):
A new ground force component allows active acceleration of radiation cleanup:
| Parameter | Value |
|---|---|
| Size and Cost | Equivalent to Xenoarchaeology component |
| Vehicle Requirement | Medium or larger vehicles only |
| Effect per Component | +0.01% annual radiation reduction rate |
Practical Example: A formation of 100 vehicles, each equipped with two decontamination components, boosts the radiation reduction rate by 2% annually at a cost of only 872 BP.
Commander Bonus:
A rare Decontamination bonus exists for ground force commanders, appearing in approximately 1 in 14 randomly generated commanders. This bonus further accelerates radiation cleanup operations.
Strategic Considerations:
- For lightly irradiated worlds (below 1,000 units), passive reduction is adequate
- For heavily irradiated worlds, deploying decontamination units can save decades of waiting
- Energy weapon bombardment produces no radiation, making it the preferred choice for worlds you intend to colonize
- Plan decontamination force composition early if nuclear bombardment campaigns are anticipated
UI References and Screenshots
Updated: v2026.02.15
- Forum screenshots:
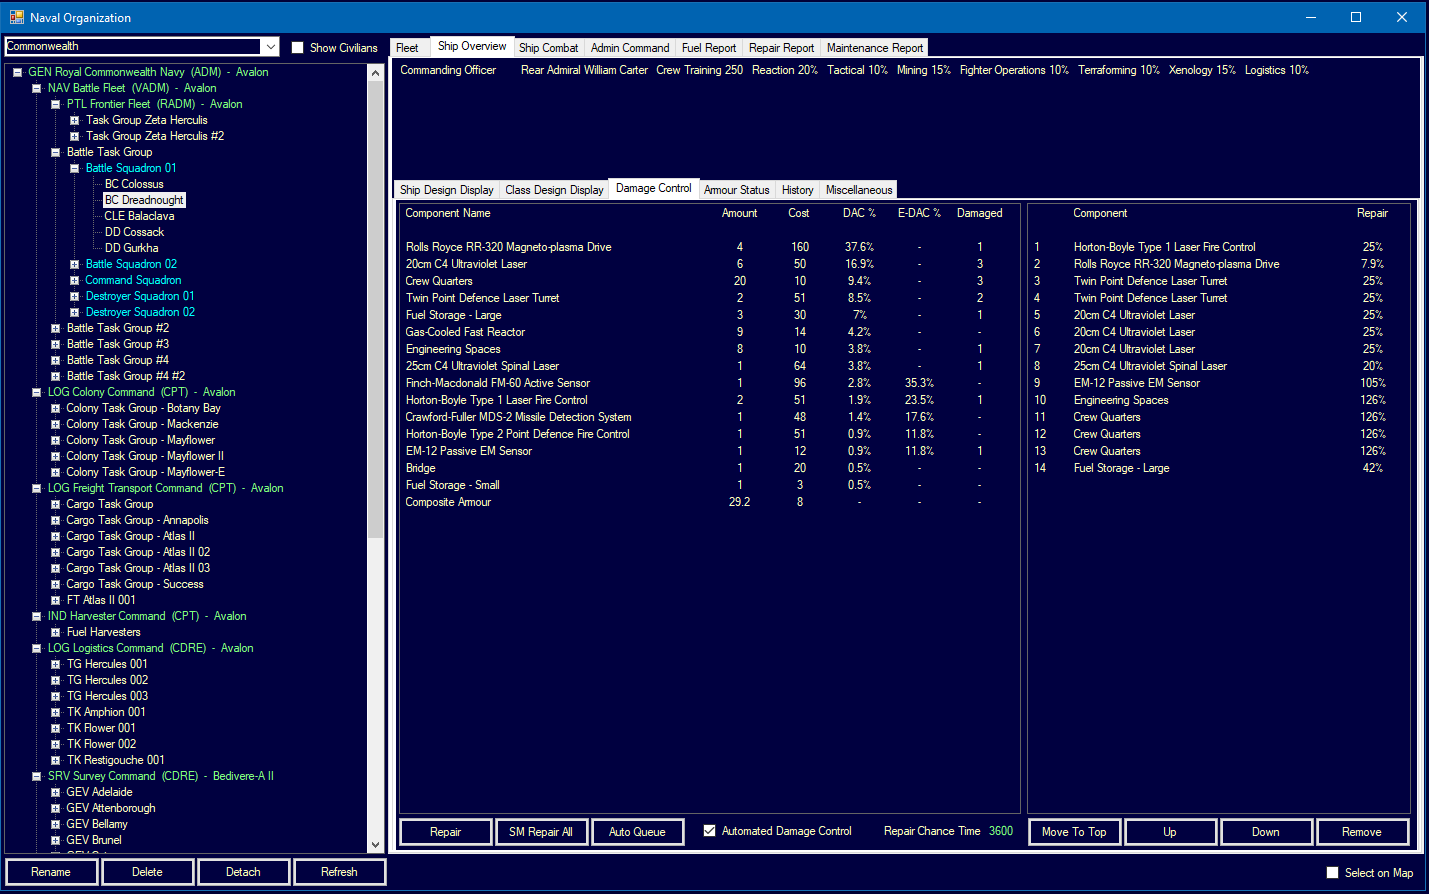
- Damage Report — combat damage breakdown
- Armour Generations — armor technology comparison
- Damage Control — repair operations
References
\hypertarget{ref-12.6-1}{[1]}. Aurora C# game database (AuroraDB.db v2.7.1) – FCT_TechSystem (TechTypeID=16): Shield Type technology, 12 levels from Alpha Shields (1.0/HS, 1,000 RP) to Omega Shields (15.0/HS, 2,000,000 RP). FCT_TechSystem (TechTypeID=14): Shield Regeneration Rate technology, 12 levels from Rate 1.0 (1,000 RP) to Rate 15.0 (2,000,000 RP). Note: TechTypeID=6 is Max Squadron Jump Radius, not shields.
\hypertarget{ref-12.6-2}{[2]}. Aurora Wiki (C-Beam_Weapons, Shock_Damage) and official forum sources – Shock Damage Chance = Damage to Armor / Ship Size (HS). Minimum 5% threshold below which shock is ignored. Shock amount: up to 20% of armor damage dealt.
\hypertarget{ref-12.6-3}{[3]}. Aurora C# game database (AuroraDB.db v2.7.1) – FCT_TechSystem (TechTypeID=72): Meson Focal Size technology, 12 levels from 10cm (1,000 RP, 40% AR) to 80cm (2,000,000 RP, 3.2% AR). The Armor Retardation (AR) percentage is embedded in the focal size tech name and decreases with larger focal sizes.
\hypertarget{ref-12.6-4}{[4]}. Aurora C# game database (AuroraDB.db v2.7.1) – DIM_PlanetaryInstallation: Construction Factory TargetSize = 20. Verified directly in database.
\hypertarget{ref-12.6-5}{[5]}. Aurora Wiki (C-Ship-Combat) – Weapon failure rate of 2% per firing event. Applied equally to beam weapons and missile launchers.
\hypertarget{ref-12.6-6}{[6]}. Aurora C# game database (AuroraDB.db v2.7.1) – FCT_ShipDesignComponents ComponentTypeID=44 (HPM): “R15/C3 High Power Microwave” has DamageOutput=1, Size=3.0, MaxWeaponRange=15000, Cost=10.4. The 3x shield damage multiplier is a game mechanic applied during combat resolution, not stored as a component property. Base damage is always 1 regardless of HPM variant.
\hypertarget{ref-12.6-7}{[7]}. Aurora C# game database (AuroraDB.db v2.7.1) – FCT_ShipClass: ArmourWidth field is stored per ship class. Database analysis of Size/ArmourWidth ratios shows variation from approximately 5:1 to 11:1 across different ship classes, indicating armor width calculation involves multiple design factors, not a simple ship-size divisor.
Related Sections
- Section 8.2 Hull and Armor – Armor design and ship survivability
- Section 13.3 Ground Combat – Ground forces for planetary conquest
- Section 14.2 Maintenance – MSP supply and maintenance operations
- Section 14.3 Supply Ships – MSP resupply from tenders
- Section 5.5 Terraforming – Radiation effects on colonization
- Section 12.7 Planetary Defence Centres – PDC armor, shields, and bombardment resistance
- Appendix A: Formulas – Damage resolution and armor formulas