4.4 Jump Points
Updated: v2026.02.02

Jump points are the fundamental mechanism for interstellar travel in Aurora C#. They connect star systems in pairs, forming the navigable topology of the galaxy. Understanding how to find, traverse, and exploit jump points is central to exploration, commerce, and warfare.
Contents
Updated: v2026.01.30
- 4.4 Jump Points
4.4.1 Discovery
Updated: v2026.01.30
Jump points are fixed locations in space where the fabric of spacetime is thin enough to allow transit to another star system. Each jump point connects exactly two systems \hyperlink{ref-4.4-1}{[1]} – when you transit one, you emerge at the paired counterpart in the destination system. Discovering jump points is essential for expanding beyond your home system.
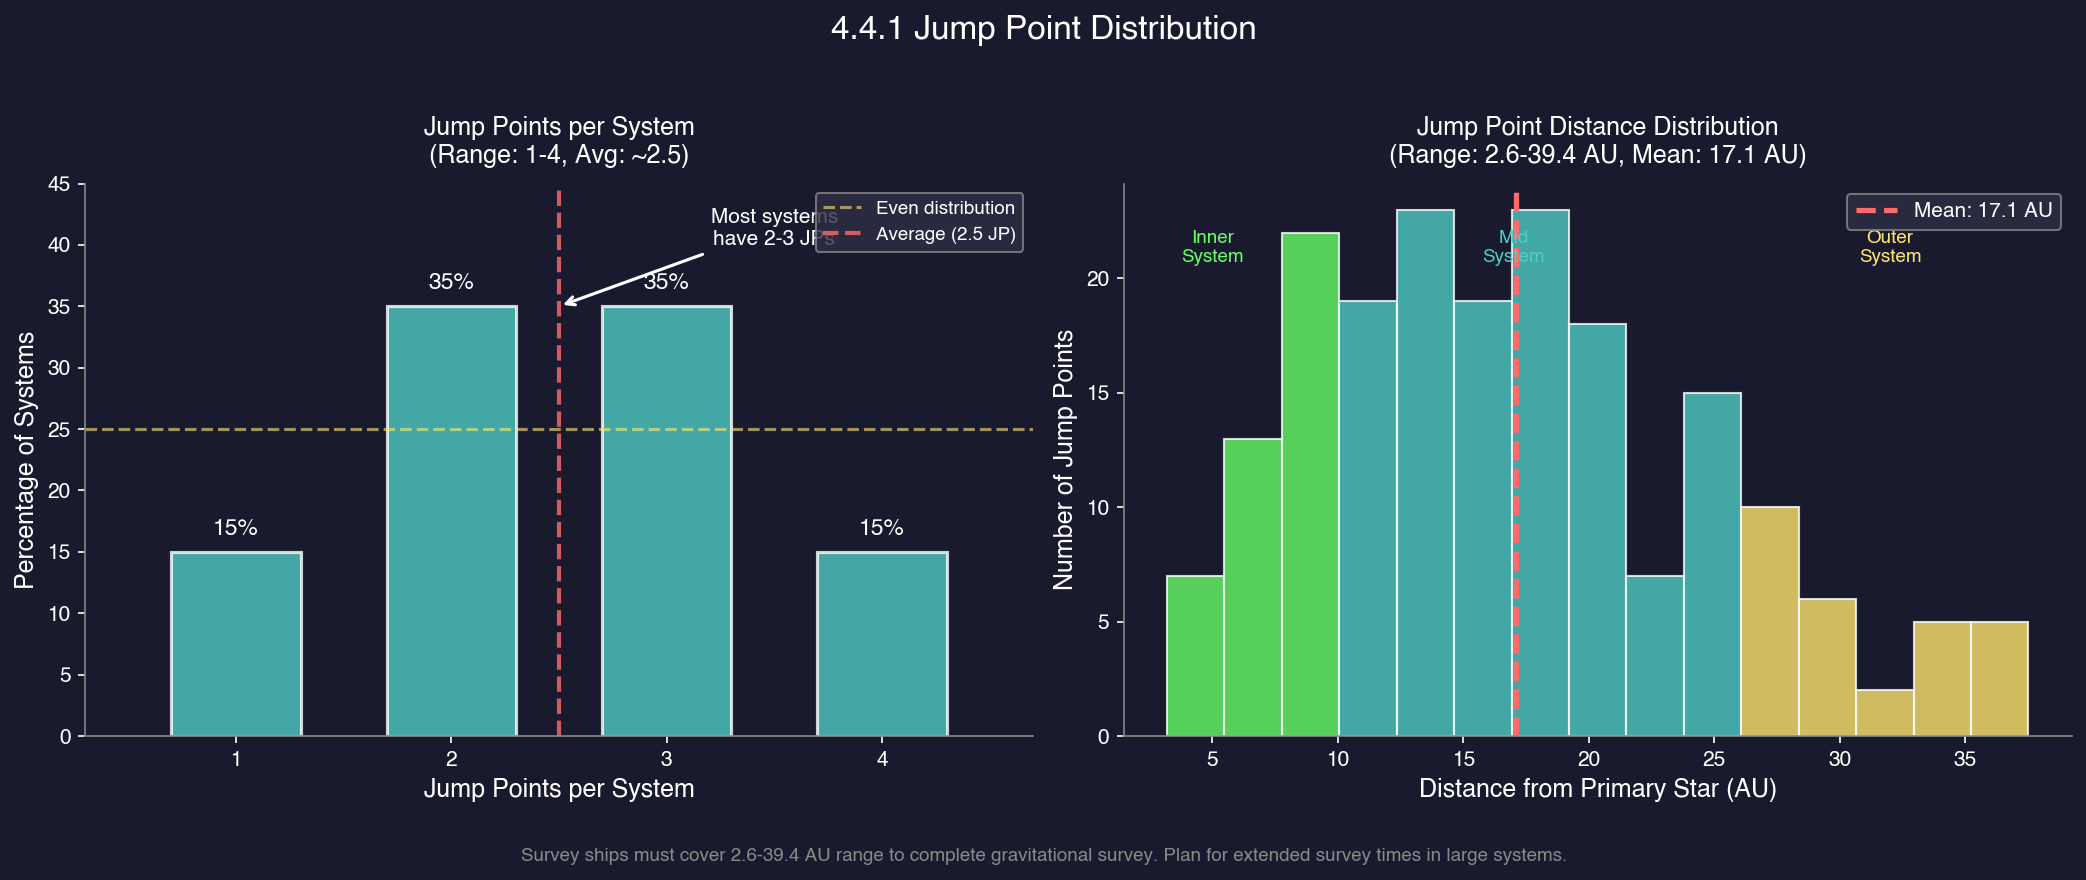
Jump Point Distribution:
Systems typically contain 1-4 jump points, with an average of approximately 2.5 per system \hyperlink{ref-4.4-12}{[12]}. Jump points are located at varying distances from the system primary, ranging from approximately 2.6 AU to 39.4 AU with an average distance of about 17.1 AU \hyperlink{ref-4.4-12}{[12]}. This distribution means:
- Most systems have 2-3 jump points to explore
- Some systems are dead ends with only one connection (the one you entered through)
- Jump points can be found anywhere from close to the star to the outer reaches of the system
- Survey ships must cover significant distances to complete a gravitational survey
4.4.1.1 Gravitational Survey
Jump points are discovered through gravitational surveys conducted by ships equipped with gravitational survey sensors. Unlike geological surveys (which scan individual bodies), gravitational surveys scan fixed points in space distributed throughout the system.

Survey Process:
- Design and build a ship with gravitational survey sensors (found in the ship design component list; see Section 8.4 Sensors).
- Assign the ship to a fleet and set its orders to “Gravitational Survey” for the target system.
- The ship will automatically navigate to different gravitational survey points within the system.
- At each survey point, the sensor has a chance of detecting a jump point based on sensor strength and survey time.
- Once all survey points have been checked, the system’s gravitational survey is complete.
Survey Point Mechanics:
- Each system has a fixed number of gravitational survey points, determined during system generation \hyperlink{ref-4.4-2}{[2]}.
- Survey points are distributed throughout the system at various distances from the star.
- The ship must physically travel to each point and spend time surveying.
- Larger gravitational survey sensors complete each point faster.
Tip: A discovered jump point’s physical location in the system is typically NOT at the survey location that revealed it. Survey locations are simply the points your ship travels to in order to use gravitational fields for detection. The actual jump point will appear at a different position on the system map. Do not confuse survey location markers with jump point locations.
4.4.1.2 Standard vs. Hidden jump points
Aurora C# features two categories of jump points:
| Type | Detection | Survey Skill Required | Notes |
|---|---|---|---|
| Standard | Normal gravitational survey | Base sensor capability | Most jump points are standard |
| Hidden | Requires higher survey skill | Enhanced sensor strength or extended survey time | Fewer in number; may remain undetected even after a “complete” standard survey |
Hidden jump points:
- Hidden jump points have a much lower detection probability per survey increment. The
FCT_RaceJumpPointSurveytable includes a Hide column that tracks hidden jump point status per race \hyperlink{ref-4.4-7}{[7]}. - A system may appear fully surveyed while still containing hidden jump points.
- Higher-tech gravitational survey sensors or commanders with high survey skill ratings improve hidden JP detection.
- Hidden jump points are identical to standard jump points once detected – the only difference is discovery difficulty.
- Enemies can use hidden jump points you haven’t discovered, making them a potential security blind spot.
Warning: A “complete” gravitational survey does not guarantee all hidden jump points have been found. If you suspect a system has hidden connections (e.g., unexplained alien contacts), re-survey with better sensors or higher-skilled officers.
4.4.1.3 Detection Probability
The chance of detecting a jump point at a survey point depends on:
- Sensor Strength: More powerful gravitational survey sensors have higher detection chances per increment of time.
- Survey Time: The longer a ship surveys a point, the higher the cumulative probability of detection. Eventually, a point is considered fully surveyed even if no jump point was found (because no jump point exists there).
- Jump point size: Larger jump points (those connecting to more massive star systems) are slightly easier to detect. (unverified — #729)
- Jump point type: Standard jump points are detected at normal probability; hidden jump points have significantly reduced detection rates.
4.4.1.4 Undiscovered jump points
It’s important to note:
- A system may have jump points that your survey ships haven’t found yet if the survey is incomplete.
- Hostile ships can arrive through jump points you haven’t discovered, emerging from unknown connections.
- A complete gravitational survey of a system reveals all jump points present.
- Some systems may have no jump points at all beyond the one you entered through (dead ends).
4.4.1.5 Survey Ship Design Tips
- Speed vs. Sensor Size: Faster survey ships complete surveys sooner because they spend less time in transit between survey points. Balance sensor size with engine power.
- Range: Ensure survey ships have enough fuel range to complete a system survey without refueling, especially for larger systems.
- Multiple Ships: Assigning multiple survey ships to the same system speeds up the survey, as they will divide the survey points between them.
- Jump Capability: Survey ships should either have jump drives (see Section 8.1 Design Philosophy) or be accompanied by a jump-capable escort to reach new systems.
Tip: Design your gravitational survey ships early in the game. A fast survey ship with a reasonably sized gravitational sensor and long fuel range will serve you throughout the early and mid-game. The faster you map jump point connections, the sooner you can identify resource-rich systems and potential threats.
4.4.2 Transit Mechanics
Updated: v2026.01.30
Transiting a jump point moves a ship (or fleet) instantaneously from one star system to another. However, several mechanics govern how jump transit works.
4.4.2.1 Jump point pairing
Every jump point exists as one half of a matched pair:
- Each jump point has exactly one counterpart in exactly one other system.
- The pairing is permanent and fixed at system generation – it cannot be changed (except via SpaceMaster Mode regeneration; see Section 4.4.5 Regenerating jump points (SpaceMaster Mode)).
- Transiting a jump point always delivers you to the same paired endpoint.
- The paired endpoints may be at different distances from their respective system primaries.
- Jump points are bidirectional: you can transit in either direction (subject to gate/drive requirements). Each jump point record in the database has a WPLink field linking to its paired counterpart \hyperlink{ref-4.4-1}{[1]}.
4.4.2.2 Jump Drive Requirements
To transit a jump point without a jump gate, a ship requires a jump drive. Jump drives are ship components designed in the Ship Designer (see Section 8.6 Other Components). Building a jump drive requires researching Jump Point Theory \hyperlink{ref-4.4-3}{[3]} and its three sub-technologies (Base Jump Drive Efficiency, Max Jump Squadron Size, and Max Squadron Jump Radius) \hyperlink{ref-4.4-4}{[4]}; see Section 7.4 Tech Categories for the full prerequisite chain.
Jump Drive Types:
| Drive Type | Squadron Transit | Size Efficiency | Typical Use |
|---|---|---|---|
| Military Jump Drive | Yes | Compact | Warships, escorts, jump tenders |
| Commercial Jump Drive | No | Larger per ton moved | Freighters, colony ships, commercial vessels |
- Military Jump Drives: Compact drives that allow the equipped ship and its squadron to transit \hyperlink{ref-4.4-5}{[5]}. They have a maximum ship tonnage rating and a squadron transit capability, making them essential for fleet operations in ungated space.
- Commercial Jump Drives: Larger but simpler drives designed for commercial vessels. They allow bigger ships to jump but only carry the ship itself (no squadron transit) \hyperlink{ref-4.4-5}{[5]}. They are heavier relative to military drives for the same tonnage rating.
- Jump Drive Tonnage Rating: The jump drive must be rated for at least the tonnage of the ship it’s installed on. A ship with an undersized jump drive cannot transit. Check the drive’s rated tonnage in the ship design summary. Note: in C# Aurora, the ship mounting the jump drive does not need to be as large as the ships it tenders – small jump tenders can open jump points for much larger ships \hyperlink{ref-4.4-10}{[10]}.
Jump Drive Design Considerations:
- Drive efficiency improves with technology – higher-tech drives are smaller for the same tonnage rating.
- Fuel consumption per transit is based on the jump drive’s size and efficiency rating. Jump transit is instantaneous. See Section 14.1 Fuel for fuel consumption details.
- A ship can mount only one jump drive; multiple drives provide no benefit. (unverified — #729 – ship design constraint not directly verifiable from database)
- The decision between military and commercial drives is primarily about squadron transit capability vs. cost/size efficiency for solo jumpers.
4.4.2.3 Squadron Transit
A ship with a military jump drive can bring other ships through a jump point with it, using squadron transit. This is the primary mechanism for moving non-jump-capable warships through ungated jump points.

Squadron Transit Mechanics:
- Maximum Squadron Size: Each military jump drive has a maximum tonnage it can move through the jump point in a single transit. This includes the drive ship itself.
- Formation: Ships using squadron transit must be in the same fleet as the jump-capable ship (see Section 9.4 Fleet Organization for fleet organization).
- Timing: All ships transit simultaneously in a squadron jump.
- Limitations: If the total fleet tonnage exceeds the jump drive’s squadron transit capacity, multiple jumps are required, with the jump-capable ship making round trips.
Squadron Transit Example:
A jump tender with a 50,000-ton squadron transit rating leads a fleet with:
- Tender itself: 8,000 tons
- 4x Destroyers: 6,000 tons each (24,000 tons total)
- 2x Cruisers: 10,000 tons each (20,000 tons total)
- Fleet total: 52,000 tons (exceeds 50,000-ton limit)
The tender must make two trips: first carrying some ships through, then returning to escort the remainder. During this process, the fleet is temporarily split across two systems.
Tip: “Jump tenders” – ships designed primarily around a large military jump drive with minimal other equipment – are a common fleet design. They allow your combat ships to forego jump drives entirely, dedicating that tonnage to weapons and armour instead. However, this creates a critical dependency: if the tender is destroyed, the fleet is stranded until another jump-capable ship arrives or a gate is built.
4.4.2.4 Transit Effects
Standard Transit (with Jump Drive):
- Instant transit to the destination system
- Ship arrives at the corresponding jump point in the destination system
- No damage or negative effects under normal circumstances
- Ships suffer “jump shock” (sensor/fire control disruption) after transit – see below
- All ships in a squadron transit arrive simultaneously
Gate Transit (no Jump Drive required):
- Instant transit, identical to jump drive transit
- Available to any ship regardless of tonnage or drive status
- Requires a gate on the side the ship is departing from
- Gate transits also cause jump shock, with the same duration as a standard (non-squadron) transit \hyperlink{ref-4.4-8}{[8]}
Jump Shock (Transit Delay):
After any jump transit, ships experience jump shock where fire controls and active sensors stop functioning temporarily \hyperlink{ref-4.4-8}{[8]}:
- Squadron transit: 10 + 1d20 seconds base delay (11-30 seconds)
- Standard/gate transit: 120 + 1d60 seconds base delay (121-180 seconds)
- The base delay is multiplied by a crew grade factor (maximum trained crew reduces delay to 66% of base)
- Engines are NOT affected – ships can still move immediately after jumping
- Tactical significance: squadron transit provides dramatically shorter jump shock (as low as 8 seconds vs 80+ seconds), making it critical for combat entry at defended jump points
Overloaded Transit:
- If a ship attempts to transit with a drive too small for its tonnage, transit fails
- Squadron transit beyond drive capacity requires multiple trips
- The game will automatically calculate and execute multiple transits if ordered
4.4.2.5 Jump point stabilization
Each jump point has two endpoints: one in each connected system. These endpoints can be stabilized independently by constructing jump gates:
- An unstabilized jump point can only be transited by ships with jump drives
- A stabilized endpoint (jump gate) allows any ship to transit from that side
- Stabilizing one side does NOT stabilize the other – gates are one-way structures
- Both sides must be gated independently for unrestricted two-way transit
- See Section 4.4.3 Jump Gates for full jump gate construction details

Display Convention:
Stabilized jump points display with an “(S)” suffix in the interface to indicate their stable status \hyperlink{ref-4.4-13}{[13]}.
Changed: v2.6.0 – The suffix was previously “(JG)” for “Jump Gate” but was changed to “(S)” for “Stable” to better reflect the underlying mechanic.
Stabilization States:
| Your Side | Far Side | Who Can Transit (Your Side -> Far Side) | Who Can Transit (Far Side -> Your Side) |
|---|---|---|---|
| No Gate | No Gate | Jump-drive ships only | Jump-drive ships only |
| Gate | No Gate | Any ship | Jump-drive ships only |
| No Gate | Gate | Jump-drive ships only | Any ship |
| Gate | Gate | Any ship | Any ship |
4.4.2.6 Blind Jumps
When a jump point has been detected but not yet transited, the first ship through performs a “blind jump”:
- The destination system is unknown until the first transit
- There is no way to know what awaits on the other side
- Once transited, the connection is established and both endpoints become known
- Subsequent transits to that system are normal
Tip: Always send a fast, expendable ship (or at least one you can afford to lose) on blind jumps into unknown systems. You never know if the other side contains a hostile alien fleet sitting on the jump point. A fast frigate with good sensors makes an ideal pathfinder.
4.4.3 Jump Gates
Updated: v2026.01.30
Jump gates are permanent structures built at jump point locations that stabilize the jump point, allowing any ship to transit without requiring a jump drive. They are the backbone of interstellar commerce and the foundation of a connected empire.
4.4.3.1 Construction
Requirements:
- A specialized military vessel equipped with Jump Point Stabilisation Module(s) must be positioned at the jump point
- The construction process takes time based on the module’s construction rate and technology level
- Jump gate construction ships are designed in the Ship Designer with the Jump Point Stabilisation Module component (see Section 8.6 Other Components)
Construction Process:
- Design and build a ship with a Jump Point Stabilisation Module.
- Move the construction ship to the jump point where you want to build a gate.
- Issue the “Build Jump Gate” order from the fleet orders menu.
- The ship remains stationary at the jump point during construction (it cannot move or perform other tasks).
- Once complete, the jump gate is operational on that side of the jump point.
- The construction ship is then free to move to the next jump point.
Tip: Queue multiple “Build Jump Gate” orders for different jump points. The construction ship will complete one gate, then automatically move to the next jump point and begin construction there.
Construction Time:

- The base-level jump point stabilization module (the starting technology) stabilizes a jump point in 180 days with a single module \hyperlink{ref-4.4-6}{[6]}. Higher technology levels reduce this to 150, 120, 90, 60, 45, 30, and 20 days \hyperlink{ref-4.4-6}{[6]}. A small variant stabilizes a jump point in 360 days \hyperlink{ref-4.4-6}{[6]}. The Small Jump Point Stabilisation Module automatically unlocks when you research the standard 180-day module – no separate research is required \hyperlink{ref-4.4-14}{[14]}.
- Stabilization modules do NOT stack: only one ship can construct a gate at a jump point at a time, and multiple modules on the same ship provide no benefit. The only ways to reduce construction time are researching faster stabilization module technology or assigning a commander with the Factory Production Bonus \hyperlink{ref-4.4-9}{[9]}.
- Typical construction times range from 20 days (highest-tech module) to 360 days (small module).
- The stabilization module component description in the Ship Designer shows its build rate.
Tip: The jump point stabilization module is the C# Aurora equivalent of the VB6 “Jump Gate Construction Module.” The function is the same: install the module on a ship, fly it to the jump point, and it constructs a jump gate (stabilizes the jump point). The terminology changed between versions.
Construction Ship Design Tips:
| Priority | Design Choice | Reasoning |
|---|---|---|
| High | Single stabilization module | Modules do not stack; use highest-tech module available |
| High | Jump drive (military) | Can reach ungated jump points independently |
| Medium | Good fuel range | Can operate far from refueling points |
| Medium | Moderate speed | Reduces transit time between jump points |
| Low | Armour/shields | Construction ships should not be in combat zones |
Warning: Jump gate construction ships are specialized military vessels that consume shipyard capacity and mineral resources. They produce no direct combat value. Plan your construction ship builds carefully – one well-designed constructor can gate an entire chain of systems, but building too many diverts resources from your combat fleet.
4.4.3.2 Gate Properties
Once built, jump gates have the following characteristics:
- Permanent: Gates cannot be destroyed or dismantled. Once constructed, they permanently stabilize the jump point and cannot be deconstructed under normal circumstances \hyperlink{ref-4.4-9}{[9]}
- Instant Activation: The gate is operational immediately upon construction completion
- One-Way: A gate only allows transit from the side it is built on; the far side must be gated separately
- Universal Access: Any ship can transit through a gate regardless of size, tonnage, or drive status
- No Maintenance: Gates require no crew, fuel, or upkeep after construction
- No Transit Limit: Any number of ships can transit a gate in the same time increment. Standard (non-squadron) jumps have no limit on the number of ships \hyperlink{ref-4.4-8}{[8]}
4.4.3.3 Benefits of Jump Gates
Commercial Traffic:
- Civilian shipping lines will only use gated jump points – they never build jump-capable ships or utilize jump tenders (see Section 14.1 Fuel). A jump gate network on both sides of each jump point is required for civilian shipping to operate between systems \hyperlink{ref-4.4-10}{[10]}
- Establishing gates opens trade routes for your civilian economy
- Colony supply ships and freighters can operate freely through gated systems
Military Flexibility:
- Warships without jump drives can transit gated jump points
- This allows smaller, more combat-focused designs without dedicating tonnage to jump drives
- Rapid reinforcement becomes possible through gated routes
Fleet Logistics:
- No jump drive needed – any ship can transit through a gated jump point
- Ships can transit immediately upon reaching the jump point
- Multiple transits in quick succession are possible (though jump shock still applies)
4.4.3.4 Strategic Considerations
Gate Priority Framework:
When deciding which jump points to gate first, consider the following priority order:
| Priority | Gate Target | Reason |
|---|---|---|
| 1 | Home system connections | Enables civilian economy immediately |
| 2 | Resource-rich system routes | Allows freighter access to mines/colonies |
| 3 | Core network interior links | Builds robust trade network |
| 4 | Secondary colony connections | Expands civilian shipping reach |
| 5 | Frontier/border jump points | Only when area is secured |
Defensive Value:
- An ungated jump point acts as a natural bottleneck: only jump-capable ships can pass through
- Enemies must either gate the far side themselves (requiring construction ships in your space) or use only jump-drive-equipped vessels
- This limits hostile force composition – they cannot send non-jump-capable ships through ungated points
- Station defenses at jump points are extremely effective since you know exactly where ships will arrive (see Section 12.1 Fire Controls)
- Jump point defense bases (PDCs or orbital stations) can engage arriving ships during their transit delay window
Jump point defence strategies:
- Layered Defence: Station a defensive fleet at the jump point backed by orbital weapons platforms. Arriving enemies suffer transit delay while your forces engage at point-blank range.
- Picket Ships: Station fast sensor ships at ungated border jump points to detect incoming threats and relay warnings. Even without combat capability, early warning is invaluable.
- Gate Denial: Deliberately leave border jump points ungated to prevent mass invasion. The enemy must commit jump-capable ships only, limiting their force projection.
- Minefield: Deploy mines around known jump point locations. Ships arriving via jump transit emerge at the jump point location where mines can be deployed (see Section 12.3 Missiles for missile and mine mechanics).
Warning: Defending a jump point means your fleet knows where the enemy will appear, but the enemy also knows where your fleet must be. A sufficiently powerful attacking force can overwhelm a static defense. Consider mobile reserves that can reinforce jump point garrisons.
Gate Networks:
- A fully gated network of systems allows maximum flexibility for fleet deployment and redeployment
- Commercial shipping thrives in gated networks, boosting civilian economy through expanded trade routes
- However, a fully gated border also means enemy fleets have easy access if they reach your gate network
- The ideal network has a gated interior for commerce and ungated frontier chokepoints for defence
One-Way Gate Tactics:
- Remember that each side of a jump point is gated independently
- You can gate your side (for easy departure) without gating the far side
- This creates asymmetric access: your ships can leave easily but returning requires a jump drive unless you also gate the return side
- Useful for forward-deploying fleets that have jump tenders for the return trip
- An enemy gating “their” side of a border jump point is a strong indicator of imminent invasion preparation
Gating Strategy for Empire Expansion:
The typical expansion pattern follows this sequence:
- Explore: Send gravitational survey ships (with jump drives) to map new systems.
- Assess: Determine which discovered systems have valuable resources or strategic position.
- Secure: Deploy military assets to ensure the system is safe from hostiles.
- Gate Inward: Build a gate on the new system’s jump point facing back toward your core (allows easy retreat/reinforcement).
- Gate Outward: Build a gate on the core system’s jump point facing the new system (enables civilian access to the new system).
- Develop: Once both sides are gated, civilian shipping and freighters can reach the system freely.
Tip: A common early-game strategy is to gate the jump points between your core systems for commerce, but leave frontier jump points ungated. This forces potential enemies to bring jump-capable ships while your civilian economy benefits from the gated core. As you secure territory, expand the gate network outward. Keep in mind that your own warships will need jump drives or jump tenders to operate in ungated space.
Tip: When you discover a system adjacent to a known hostile race, do NOT gate that jump point. The ungated connection forces the enemy to use only jump-capable vessels, severely limiting what they can throw at you. Meanwhile, prepare your defences at the jump point on your side.
4.4.4 Military restricted jump points
Updated: v2026.01.30
Military restricted jump points allow players to prevent civilian traffic from using specific jump point connections while maintaining broader system accessibility.
4.4.4.1 Functionality
When a jump point receives the Military Restricted designation, it blocks civilian ships from using that connection. The MilitaryRestricted flag is tracked per-race in the FCT_RaceJumpPointSurvey table \hyperlink{ref-4.4-7}{[7]}. However, civilian vessels can still access the systems themselves through other routes – the restriction applies only to the specific jump point, not the system as a whole.
4.4.4.2 Configuration
The restriction is configured through the System View window, where affected jump points display an “(MR)” tag next to their destination indicator. The MilitaryRestricted column in the database stores this setting per jump point per race \hyperlink{ref-4.4-7}{[7]}. (Whether the change automatically applies to both sides simultaneously is unverified.)
4.4.4.3 Galactic Map Integration
The Galactic Map includes a display option to visualize all restricted connections, helping players strategically plan civilian trade routes and identify military-only corridors.
4.4.4.4 Strategic Applications
- Border Security: Restrict jump points leading to contested or dangerous space while allowing civilian traffic through safer routes.
- Trade Route Control: Force civilian shipping through specific chokepoints where they can be more easily protected.
- Military Corridors: Designate jump points as military-only to prevent civilian ships from entering active combat zones.
- Exploration Frontiers: Keep civilian traffic away from newly discovered and unsecured jump points.
4.4.5 Regenerating jump points (SpaceMaster Mode)
Updated: v2026.02.02
In SpaceMaster Mode, the System View window includes a “Regen JP” button that allows players to regenerate all jump points in the currently selected system. (unverified — #729 – SpaceMaster UI features cannot be verified from the database)
4.4.5.1 Process
The regeneration function performs the following operations:
- Deletion: Removes all existing jump points from the selected system.
- Breaking Links: Severs any established connections between the selected system and other systems.
- Generation: Creates a new set of jump points following standard generation procedures.
- Configuration: A popup dialog allows the player to specify a minimum number of jump points for the regenerated system. (unverified — #729)
4.4.5.2 Related SpaceMaster Functions
SpaceMaster Mode also provides complementary survey removal options:
- “No Geo Survey” removes geological survey data for the viewing race in the system. (unverified — #729)
- “No Grav Survey” resets gravitational survey progress for the viewing race in the system. \hyperlink{ref-4.4-15}{[15]}
Note: Setting “No Grav Survey” does NOT remove previously discovered jump points from your knowledge. This setting only resets survey parameters, allowing you to search for suspected dormant jump points in previously surveyed areas. Jump points that have already been found remain visible and usable.
Warning: Regenerating jump points is a significant action that permanently changes system connectivity. Any gated jump points are lost, and previously established routes through the system will be broken. Use this feature carefully, particularly in systems that are part of established trade networks.
4.4.6 Jump Point Link Management (SpaceMaster Mode)
Updated: v2026.02.02
SpaceMaster Mode provides tools for directly manipulating jump point connections between systems without regenerating entire jump point sets \hyperlink{ref-4.4-11}{[11]}.
4.4.6.1 Break Link
The Break Link function severs the connection between two jump points, leaving both endpoints as unlinked jump points in their respective systems.
Use Cases:
- Isolating a system from unwanted connections
- Restructuring galactic topology for scenario design
- Removing problematic connections created during galaxy generation
4.4.6.2 Connect JP
The Connect JP function links two previously unconnected jump points, creating a new transit route between systems.
Requirements:
- Both systems must already be known (explored)
- Both jump points must be unexplored (not yet transited)
- The connection creates a bidirectional link as with naturally generated jump points
4.4.6.3 NPC Empire Protection
The system includes a safeguard to prevent accidental fragmentation of NPC empires when breaking jump point links. If severing a connection would isolate portions of an NPC empire’s territory, the game warns the player before proceeding.
Override: Players can override this protection and proceed with the break link operation despite the fragmentation warning. This allows intentional scenario modifications that split NPC empires.
Warning: Breaking jump point links that fragment NPC empires may cause unexpected behavior in NPC AI decision-making, as their empire becomes disconnected. Use this override carefully in active games.
Related Sections
- Section 8.1 Design Philosophy – Ship design philosophy including jump-capable vs. non-jump designs
- Section 8.4 Sensors – Gravitational survey sensor design and capabilities
- Section 8.6 Other Components – Jump drive and jump gate construction module components
- Section 9.4 Fleet Organization – Fleet organization and squadron transit operations
- Section 10.1 Movement Mechanics – Interstellar navigation and route planning through jump networks
- Section 12.1 Fire Controls – Jump point defense engagement tactics
- Section 12.3 Missiles – Mine deployment at jump points
- Section 14.1 Fuel – Civilian shipping, trade routes, and jump drive fuel consumption
- Section 17.2 Gravitational Survey – Gravitational surveys and jump point discovery mechanics
References
\hypertarget{ref-4.4-1}{[1]}. Aurora C# game database (AuroraDB.db v2.7.1) – FCT_JumpPoint table. Each jump point record contains a WPLink field pointing to its paired counterpart, confirming one-to-one pairing between jump points in two systems.
\hypertarget{ref-4.4-2}{[2]}. Aurora C# game database (AuroraDB.db v2.7.1) – FCT_System.JumpPointSurveyPoints column. Each system has a stored value for the number of gravitational survey points, confirming they are fixed at system generation.
\hypertarget{ref-4.4-3}{[3]}. Aurora C# game database (AuroraDB.db v2.7.1) – FCT_TechSystem. “Jump Point Theory” (TechSystemID=738) is confirmed as a prerequisite technology. Its only prerequisite is Trans-Newtonian Technology (TechSystemID=27434).
\hypertarget{ref-4.4-4}{[4]}. Aurora C# game database (AuroraDB.db v2.7.1) – FCT_TechSystem. Three jump drive sub-technology lines confirmed: “Base Jump Drive Efficiency” (levels 4-25, starting prerequisite: Jump Point Theory), “Max Jump Squadron Size” (levels 3-12), and “Max Squadron Jump Radius” (levels 50k-4000k). Correction: The manual originally named the third technology “Jump Squadron Radius”; the database name is “Max Squadron Jump Radius.” Updated for accuracy.
\hypertarget{ref-4.4-5}{[5]}. Aurora C# game database (AuroraDB.db v2.7.1) – FCT_TechSystem. “Military Jump Drive” (TechSystemID=33302) and “Commercial Jump Drive” (TechSystemID=33303) confirmed as distinct technologies. Commercial drive description states: “Commercial Jump Drives are larger, less efficient and cannot be used by ships with military engines.”
\hypertarget{ref-4.4-6}{[6]}. Aurora C# game database (AuroraDB.db v2.7.1) – FCT_TechSystem. Jump Point Stabilisation Modules confirmed with build times: 180, 150, 120, 90, 60, 45, 30, and 20 days. A “Small Jump Point Stabilisation Module” at 360 days also exists. All descriptions follow the pattern: “A ship equipped with this module can stablise a jump point in N days.”
\hypertarget{ref-4.4-7}{[7]}. Aurora C# game database (AuroraDB.db v2.7.1) – FCT_RaceJumpPointSurvey table. Contains per-race jump point knowledge including: Explored (transit status), Charted, Hide (hidden jump point flag), MilitaryRestricted (MR designation), and IgnoreForDistance columns.
\hypertarget{ref-4.4-8}{[8]}. AuroraWiki (Jump shock) – Jump shock disables fire controls and active sensors after transit. Squadron transit: 10 + 1d20 seconds base (11-30s). Standard/gate transit: 120 + 1d60 seconds base (121-180s). Crew grade training reduces delay (max 34% reduction, multiplier 0.66). Engines are not affected. Practical minimum for squadron transit is approximately 10 seconds (game minimum time increment is 5 seconds).
\hypertarget{ref-4.4-9}{[9]}. AuroraWiki (Jump Gate, C-Ship Modules) – Stabilization modules do NOT stack: only one ship can construct a gate at a jump point at a time. Multiple modules on the same ship provide no benefit. Construction speed can only be improved by researching faster module technology or using an officer with Factory Production Bonus. Once constructed, jump gates are permanent and cannot be destroyed or deconstructed.
\hypertarget{ref-4.4-10}{[10]}. AuroraWiki (Commercial Shipping, Jump Gate, Jump Drive) – Civilian shipping lines never build jump-capable ships or utilize jump tenders. jump gate networks on both sides of each jump point are required for civilian shipping between systems. A jump gate permanently links systems and can be used by any ship including hostile ships. In C# Aurora, the ship mounting the jump drive does not need to be as large as the ships it tenders.
\hypertarget{ref-4.4-11}{[11]}. Aurora Forums – https://aurora2.pentarch.org/index.php?topic=13884.msg176533 – Steve Walmsley, December 28, 2025. SpaceMaster mode jump point management tools: Break Link severs connections, Connect JP links unexplored jump points between known systems, includes NPC empire fragmentation protection with override capability.
\hypertarget{ref-4.4-12}{[12]}. Aurora C# game database (AuroraDB.db v2.7.1) – FCT_JumpPoint table. Analysis of jump point distribution: systems contain 1-4 jump points (average ~2.5). Jump point distances from system primary range from 2.6 AU to 39.4 AU (average ~17.1 AU). Distance calculated from XSystem/YSystem coordinates relative to primary star position.
\hypertarget{ref-4.4-13}{[13]}. Aurora Forums v2.6.0 Changes List – https://aurora2.pentarch.org/index.php?topic=13463.0 – “Jump point suffix changed from ‘(JG)’ to ‘(S)’ for stable.”
\hypertarget{ref-4.4-14}{[14]}. Aurora C# game database (AuroraDB.db v2.7.1) – FCT_TechSystem. Small Jump Point Stabilisation Module (TechSystemID=33215) has AutomaticResearch=TRUE with Prerequisite1=24990 (Jump Point Stabilisation Module 180). Confirmed in v2.7.0 Changes List: https://aurora2.pentarch.org/index.php?topic=13814.0
\hypertarget{ref-4.4-15}{[15]}. Aurora Forums – Steve Walmsley post (January 31, 2026). Confirmed “No Grav Survey” does NOT remove discovered jump points; it only resets survey parameters to allow searching for dormant jump points. Developer response: “Working as intended.”