10.3 Survey Operations
Updated: v2026.02.02

Survey operations are how you discover the resources and connections that fuel your empire’s expansion. Aurora C# features two distinct survey types – gravitational surveys that locate jump points, and geological surveys that identify mineral deposits. Both require specialized ships and patient execution, but their payoffs are the foundation of everything else you do in the game.
Contents
Updated: v2026.02.02
10.3.1 Gravitational Survey
Updated: v2026.01.30
Gravitational surveys detect jump points – the naturally occurring connections between star systems. Without gravitational surveys, you cannot find new systems to explore and colonize.
How Gravitational Survey Works:
- Each star system has a fixed number of jump points (determined at system generation) \hyperlink{ref-10.3-1}{[1]}
- Jump points exist at specific locations in the system but are invisible until surveyed
- A ship equipped with a gravitational survey sensor can detect jump points by surveying “gravitational survey points” – locations in the system where a jump point might exist
- The number of survey points per system is typically much larger than the number of actual jump points
Survey Points: Each system generates a set of gravitational survey points distributed throughout the system. These points represent locations where gravitational anomalies suggest a jump point might exist. A survey ship must travel to each point and spend time surveying it. Most points will yield nothing; a few will reveal actual jump points.
Survey Process:
- Assign a gravitational survey ship to a system
- Issue the “Survey Next Point” or “Survey All Points” order
- The ship automatically travels to the nearest unsurveyed point
- Upon arrival, it conducts the survey (time depends on sensor capability)
- If a jump point is discovered, a notification is generated
- The ship proceeds to the next point
Post-Jump Recalibration Delay: After jumping into a new system, survey ships require a brief recalibration period before they begin executing standing survey orders. During this delay, the ship sits idle while its sensors recalibrate and the crew establishes positional bearings. The ship will then automatically select its first gravitational survey point and begin moving toward it. This delay is separate from combat-related transit shock (see Section 10.2.4 Transit Effects) and is a normal part of survey operations – players should expect a short pause after transit before survey work begins. (v2.6.0)
Survey Automation: The “Gravitational Survey All Points” order fully automates the process. The ship will survey every point in the system sequentially, traveling to each in the most efficient order. You only need to intervene to refuel the ship or redirect it to another system.
Discovery: When a jump point is found:
- Its location is permanently revealed on the system map
- The destination system is identified (but unexplored until you transit)
- The jump point can now be transited by ships with jump drives, or a construction ship can stabilise the jump point for unrestricted transit (see Section 10.2.3 Stabilised Jump Points)
Survey Completion: A system is considered “gravitationally surveyed” when all survey points have been checked. After this, no new jump points can exist in the system (they are all found or confirmed absent).
Tip: Gravitational survey should be your first priority in any new system. Jump points are your empire’s highways – finding them determines your strategic options and threat axes.
Note: Survey points closer to the star tend to be checked first by the automated order. This means jump points in the inner system are usually discovered before outer-system ones. If you need to find all exits quickly, consider multiple survey ships working the same system.
10.3.2 Geological Survey
Updated: v2026.01.30
Geological surveys identify mineral deposits on planets, moons, asteroids, and comets. This information determines where you build mining colonies and what resources are available throughout your empire.
How Geological Survey Works:
- Each body in a system may or may not have mineral deposits
- Mineral deposits are invisible until the body is geologically surveyed
- A ship with a geological survey sensor must orbit each body and conduct a survey
- The survey reveals all mineral types present, their quantities, and their accessibility
Survey Results: For each body surveyed, you learn:
- Mineral Types Present: Which of the 11 minerals exist on this body \hyperlink{ref-10.3-2}{[2]} (see Section 6.1 Minerals)
- Quantity: How much of each mineral is available (in tons)
- Accessibility: A value from 0.1 to 1.0 representing how easily the mineral can be extracted \hyperlink{ref-10.3-3}{[3]}. Higher accessibility means faster mining rates.
Survey Process:
- Assign a geological survey ship to a system
- Issue the “Geological Survey” order (can target specific bodies or all bodies in the system)
- The ship travels to each body and enters orbit
- The survey takes time proportional to the body’s size and the ship’s sensor capability
- Results are immediately available in the colony/minerals display
Survey Order Options:
- Survey Specific Body: Survey one designated target
- Survey All Bodies: Automatically survey every unsurveyed body in the system
- Survey Asteroids: Focus on asteroid belts (often mineral-rich)
- Survey Moons: Survey moons of a specific planet
- Survey Next Three Bodies or Locations: Designed for ships equipped with both geological and gravitational sensors. The ship conducts either geological or gravitational surveys depending on whether survey locations or system bodies are closer \hyperlink{ref-10.3-4}{[4]}. The system creates a mixed order list that may alternate between target categories – for example, a system body, then a survey location, then another system body. This optimizes operational efficiency by automatically directing ships to the nearest survey objective regardless of type, reducing unnecessary travel time and fuel consumption for multi-purpose survey vessels.
Survey Duration: The time to survey a body depends on:
- The body’s size (larger bodies take longer)
- The ship’s geological survey sensor rating (higher rating = faster survey)
- The number of survey sensors on the ship (more sensors = faster)
Multiple Surveyors: Multiple ships surveying the same body do not speed up the survey of that specific body (unverified — #712 – reported by players on Aurora Forums; the game likely processes each ship’s survey independently per body, but simultaneous survey acceleration has not been confirmed or denied in patch notes). However, multiple ships in a system can survey different bodies simultaneously, completing the system survey faster.
Tip: Not every body is worth the transit time to survey. Focus geological surveys on rocky planets, moons, and asteroid belts first. Gas giants rarely have accessible mineral deposits worth mining (though their moons often do).
Tip: Once you find a body with high-accessibility deposits of critical minerals (especially Gallicite, Duranium, and Sorium), flag it for immediate colonization. Accessibility matters more than raw quantity for early-game mining – a 10,000-ton deposit at 1.0 accessibility yields minerals faster than a 100,000-ton deposit at 0.1.
10.3.3 Survey Ship Design
Updated: v2026.01.30
Effective survey ships balance sensor capability, speed, range, and endurance. This section covers design principles for both gravitational and geological survey vessels.
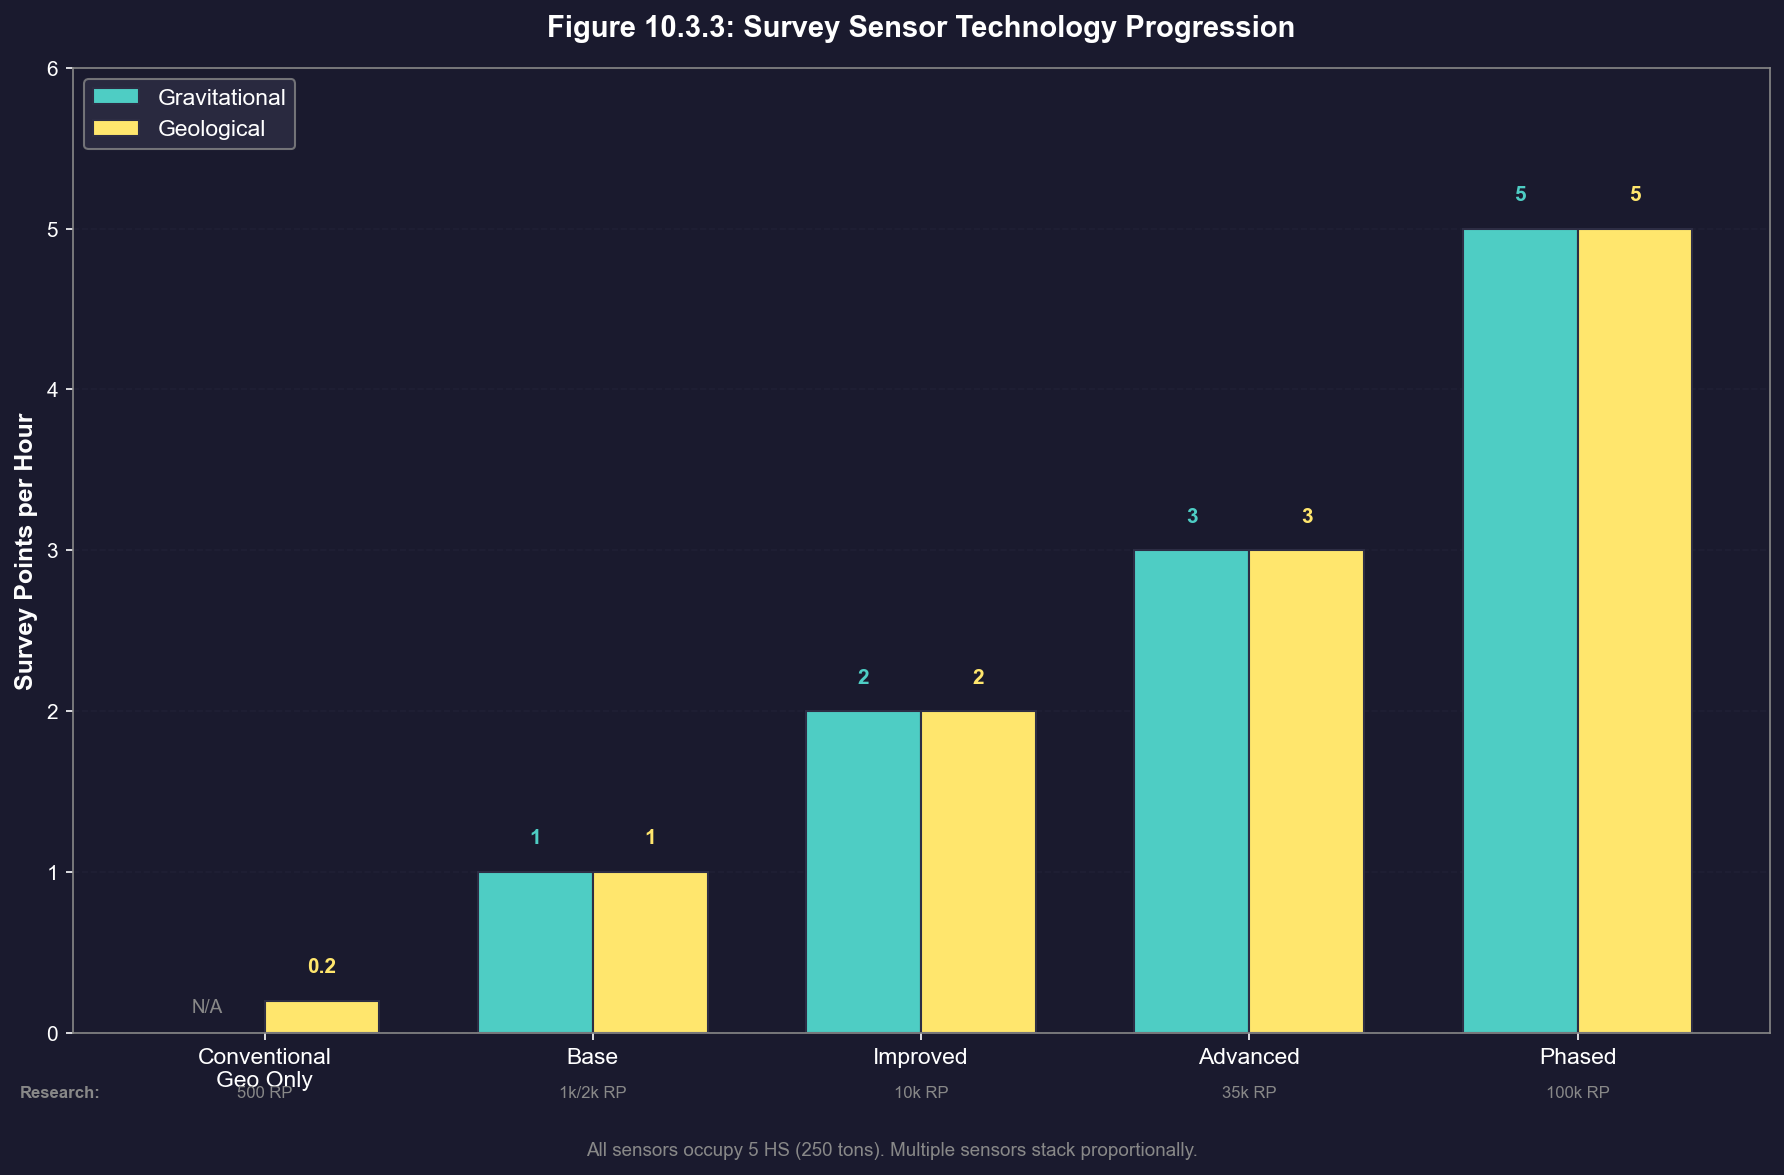
10.3.3.1 Survey Sensor Technology Tiers
Survey sensors improve through technology research. Higher-tier sensors produce more survey points per hour, directly reducing survey time per location or body.
Gravitational Survey Sensors \hyperlink{ref-10.3-6}{[6]}:
| Technology | Survey Points/Hour | Size (HS) | Cost (BP) | Crew | Research (RP) |
|---|---|---|---|---|---|
| Gravitational Survey Sensors | 1 | 5.0 (250t) | 100 | 10 | 2,000 |
| Improved Gravitational Sensors | 2 | 5.0 (250t) | 150 | 10 | 10,000 |
| Advanced Gravitational Sensors | 3 | 5.0 (250t) | 200 | 10 | 35,000 |
| Phased Gravitational Sensors | 5 | 5.0 (250t) | 300 | 10 | 100,000 |
Geological Survey Sensors \hyperlink{ref-10.3-7}{[7]}:
| Technology | Survey Points/Hour | Size (HS) | Cost (BP) | Crew | Research (RP) |
|---|---|---|---|---|---|
| Conventional Geological Sensors | 0.2 | 5.0 (250t) | 50 | 10 | 500 |
| Geological Survey Sensors | 1 | 5.0 (250t) | 100 | 10 | 1,000 |
| Improved Geological Sensors | 2 | 5.0 (250t) | 150 | 10 | 10,000 |
| Advanced Geological Sensors | 3 | 5.0 (250t) | 200 | 10 | 35,000 |
| Phased Geological Sensors | 5 | 5.0 (250t) | 300 | 10 | 100,000 |
All survey sensors occupy the same physical size (5.0 HS / 250 tons) regardless of technology tier. Multiple sensors on the same ship stack proportionally – for example, 3 base-tech gravitational sensors produce 3 survey points per hour \hyperlink{ref-10.3-5}{[5]}.
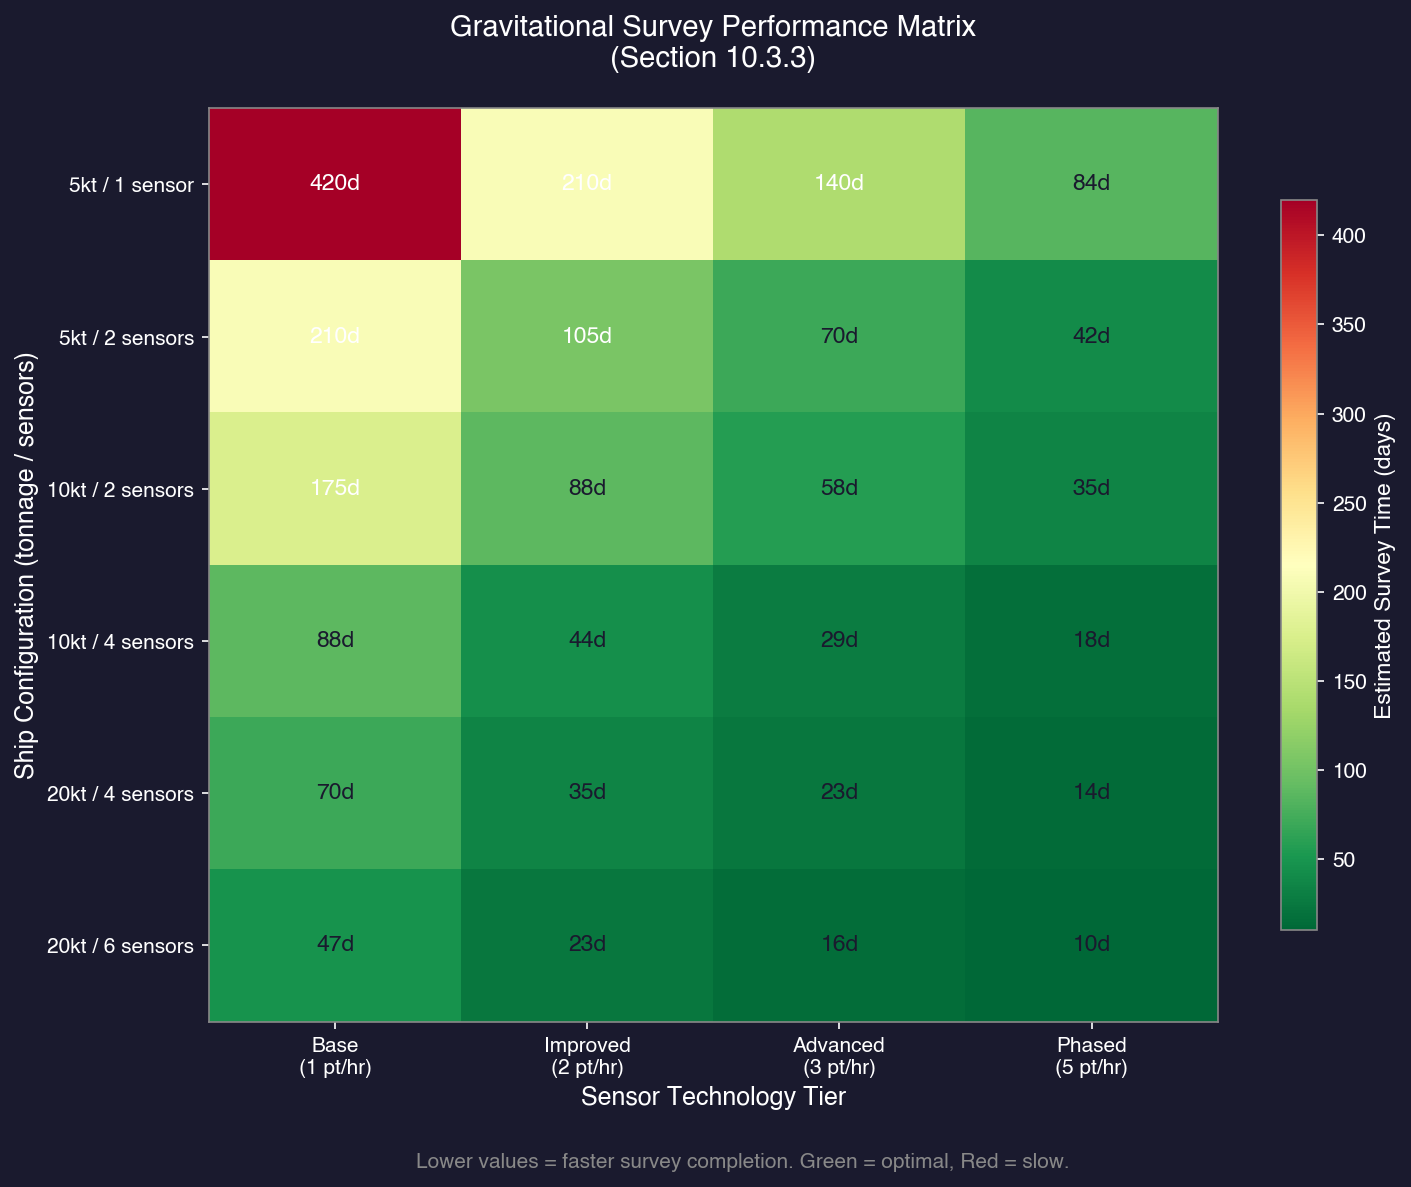
Tip: For gravitational surveys, a single Phased sensor (5 points/hour) equals five base sensors in output but occupies 1/5 the tonnage. For geological surveys where sensor count directly reduces per-body survey time, investing in higher-tier sensors before adding additional sensors is usually more hull-efficient.
Gravitational Survey Ship Design:
Key Components:
- Gravitational Survey Sensor: The primary component. Higher-tech sensors survey faster but cost more \hyperlink{ref-10.3-6}{[6]}. Multiple sensors increase survey points per hour proportionally \hyperlink{ref-10.3-5}{[5]}, though for gravitational survey ships the transit time between distant survey points typically dominates total survey time, making additional sensors less impactful than for geological survey ships.
- Engines: Speed is critical. Survey ships spend most of their time in transit between survey points. Faster ships complete system surveys dramatically sooner.
- Fuel Tanks: Must have sufficient range to reach all survey points in a system and return to base. Outer-system points can be very distant.
- Jump Drive: Highly recommended so the ship can explore newly discovered jump points independently (see Section 10.2 Jump Transit).
Design Priorities (in order):
- Sufficient fuel for full-system survey
- Maximum speed (reduces transit time between points)
- Jump drive capability (for independent exploration)
- Crew endurance (for extended missions)
- Minimal armor/weapons (keep tonnage low for speed)
Example Early-Game Gravitational Survey Ship:
- 5,000-6,000 tons
- Commercial or military engines (depending on budget)
- 1 gravitational survey sensor
- 1 jump drive (sized for self-transit)
- Large fuel tanks (aim for multi-year endurance)
- Basic crew facilities
Geological Survey Ship Design:
Key Components:
- Geological Survey Sensor: The primary component \hyperlink{ref-10.3-7}{[7]}. Multiple geological sensors on one ship reduce survey time per body proportionally \hyperlink{ref-10.3-5}{[5]}.
- Engines: Less speed-critical than grav survey ships (transit distances between bodies are typically shorter), but speed still helps.
- Fuel Tanks: Moderate requirements since geological surveys stay within one system.
Design Priorities (in order):
- Multiple geological survey sensors (directly speeds up surveys)
- Sufficient fuel for surveying all bodies in a system
- Good speed (not as critical as for grav survey)
- Jump drive optional (can transit with a fleet if you prefer)
Example Early-Game Geological Survey Ship:
- 4,000-8,000 tons
- 2-4 geological survey sensors
- Commercial engines (cost savings over military)
- Moderate fuel tanks
- Optional jump drive
Combined Survey Ships: Some players build ships with both gravitational and geological survey sensors. This is convenient for small fleets but suboptimal – the ship cannot survey both types simultaneously, and the added mass reduces speed. Dedicated designs for each role are more efficient as your economy grows. However, combined survey ships gain access to the “Survey Next Three Bodies or Locations” order, which intelligently alternates between geological and gravitational targets based on proximity, making them more practical for automated survey operations in sparsely-explored systems.
Survey Fleet Composition: A typical early-game survey force for exploring a new system might include:
- 2 gravitational survey ships (to cover the system faster)
- 2-3 geological survey ships (to survey discovered bodies)
- 1 armed escort (if hostile contacts are possible)
- 1 tanker (for extended operations)
Tip: Speed is king for gravitational survey ships. The actual survey at each point takes minutes; transit between points takes days or weeks. A ship that is 50% faster completes a system survey in roughly 2/3 the time.
Tip: For geological survey ships, invest in multiple sensors rather than speed. The survey time per body dominates total time, and each additional sensor directly reduces that duration. A ship with 4 sensors surveys each body 4x faster than a ship with 1.
Tip: Send your gravitational survey ships through first, then follow with geological surveyors. There is no point surveying minerals in a system until you know where the jump points are – you might discover a route to a much richer system.
References
\hypertarget{ref-10.3-1}{[1]} AuroraWiki “Survey” and “Jump point” pages – Each system has a fixed number of jump points determined at system generation, discovered via gravitational survey.
\hypertarget{ref-10.3-2}{[2]} AuroraDB.db FCT_MineralDeposit table – 11 distinct MaterialID values (1-11): Duranium, Neutronium, Corbomite, Tritanium, Boronide, Mercassium, Vendarite, Sorium, Uridium, Corundium, Gallicite.
\hypertarget{ref-10.3-3}{[3]} AuroraDB.db FCT_MineralDeposit table – Accessibility column values range from 0.1 to 1.0 across all mineral deposits in the database.
\hypertarget{ref-10.3-4}{[4]} AuroraWiki “C-Ship Tasks” page – “Survey Next Three Bodies or Locations” order creates a mixed list based on proximity for dual-sensor ships.
\hypertarget{ref-10.3-5}{[5]} AuroraWiki “Gravitational Survey Sensors” and “Geological Survey Sensors” pages – Multiple sensors increase survey points per hour proportionally (e.g., 3 sensors = 3 survey points per hour at base tech). Both sensor types stack identically.
\hypertarget{ref-10.3-6}{[6]} AuroraDB.db (v2.7.1): FCT_TechSystem table (TechTypeID=88) lists 4 gravitational survey sensor tiers: base (1.0 points, 2000 RP), Improved (2.0 points, 10000 RP), Advanced (3.0 points, 35000 RP), Phased (5.0 points, 100000 RP). FCT_ShipDesignComponents table (ComponentTypeID=6) confirms all tiers at Size=5.0 HS, Crew=10.
\hypertarget{ref-10.3-7}{[7]} AuroraDB.db (v2.7.1): FCT_TechSystem table (TechTypeID=89) lists 5 geological survey sensor tiers: Conventional (0.2 points, 500 RP), base (1.0 points, 1000 RP), Improved (2.0 points, 10000 RP), Advanced (3.0 points, 35000 RP), Phased (5.0 points, 100000 RP). FCT_ShipDesignComponents table (ComponentTypeID=7) confirms all tiers at Size=5.0 HS, Crew=10.
Related Sections
- Section 6.1 Minerals – Mineral types and their uses
- Section 6.2 Mining – Exploiting surveyed mineral deposits
- Section 8.4 Sensors – Survey sensor component design and detailed sensor specifications
- Section 14.1 Fuel – Fuel range planning for survey missions
- Section 17.1 Geological Survey – Detailed geological survey procedures
- Section 17.2 Gravitational Survey – Detailed gravitational survey procedures