10.2 Jump Transit
Updated: v2026.02.02

Interstellar travel in Aurora C# is accomplished through jump points – naturally occurring connections between star systems. Ships cannot travel between stars directly; they must locate and transit through these points. The mechanics of jump transit significantly influence fleet composition, strategic planning, and defensive doctrine.
Contents
Updated: v2026.02.02
- 10.2 Jump Transit
10.2.1 Jump Drive Requirements
Updated: v2026.01.30
To transit a jump point without a stabilised jump point, a ship must either carry its own jump drive or be part of a squadron transit led by a jump-capable vessel.
Jump Drive Basics:
- Jump drives are ship components designed in the Component Design window (see Section 8.6 Other Components)
- Each jump drive has a maximum ship tonnage it can transit (the drive’s “jump capability”)
- The jump drive must have sufficient capability for the mass of the ship carrying it (for self-transit)
- Jump drives add mass and cost to a ship design, creating a significant design trade-off
Jump Drive Size Requirements: In Aurora C#, when a jump drive opens a jump point for other ships, only the jump drive’s capability needs to be large enough for the transiting ship. There is no requirement for the ship mounting the jump drive to match the size of the transiting vessel. This means relatively small jump tenders or bases can open a jump point for much larger ships – a significant change from VB6 Aurora where the jump drive-equipped ship had to be comparably sized to the vessels it was facilitating jumps for.
Jump Drive Sizing Formulas (v2.4.0+):
The jump drive system was redesigned to make drives significantly smaller and more practical for large ships. Key formulas:
Military Jump Drive Efficiency Modifier:
Efficiency Modifier = max(1, (Hull Spaces / 20) ^ (1/4))
As of v2.5.0, the efficiency modifier has a minimum value of 1, preventing penalties for very small ships \hyperlink{ref-10.2-5}{[5]}.
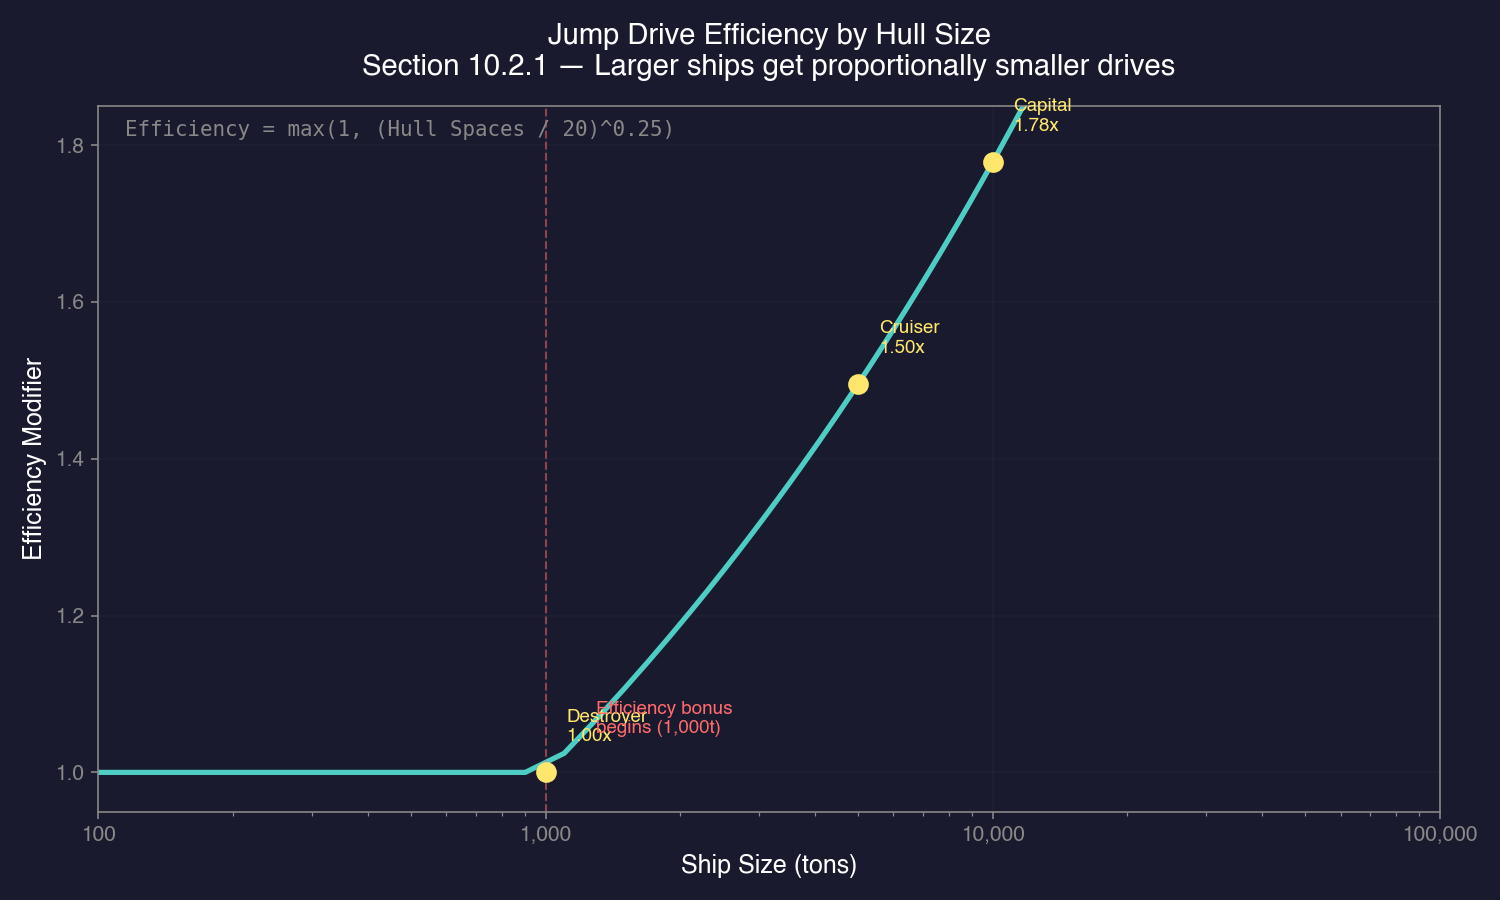

This creates a scaling bonus for larger vessels – ships of 1,000+ tons receive improved efficiency, making jump drives proportionally smaller on larger hulls.
Jump Drive Size:
Drive Size = Jump Capability in HS / (Base Efficiency x Efficiency Modifier)
Military Drive Cost:
Cost = (Jump Capability in HS / Base Efficiency) x 5
These formulas were introduced in v2.4.0 \hyperlink{ref-10.2-1}{[1]}.
Jump Capability Parameter: In the ship design window, the primary jump drive parameter is now displayed as “Jump Capability” rather than drive size. This value represents the maximum tonnage the drive can transit, making it more intuitive than the raw hull space value used in earlier versions. The 10,000-ton multiplier in jump drive design was corrected in v2.5.0 \hyperlink{ref-10.2-5}{[5]}.
Base Jump Drive Efficiency Technology: The “Jump Drive Efficiency” techs have been renamed to “Base Jump Drive Efficiency” and their research costs halved \hyperlink{ref-10.2-1}{[1]}. These techs determine the Base Efficiency value in the formulas above. The efficiency value ranges from 4 to 25 across all available technology levels \hyperlink{ref-10.2-2}{[2]}, with higher values producing smaller, more cost-effective drives. This efficiency value also determines fuel cost per transit – higher efficiency means less fuel consumed per jump.
Maximum Squadron Size: Jump drives designed for squadron transit can support between 3 and 12 ships in a single transit, determined by the Squadron Size technology line \hyperlink{ref-10.2-2}{[2]}. Higher squadron size technologies allow more ships to transit simultaneously, reducing the number of jump-capable vessels required in a fleet.
Commercial Jump Drives: Commercial jump drives are treated as military drives with 20% of their stated capability for size and cost calculations \hyperlink{ref-10.2-1}{[1]}. Additionally:
- No efficiency reduction applies to commercial jump drives \hyperlink{ref-10.2-1}{[1]}
- Squadron size is reduced by 1 compared to military drives \hyperlink{ref-10.2-3}{[3]}
- Commercial drives are larger but cheaper per unit of capability
- Commercial drives apply a 10x multiplier on the maximum ship tonnage they can transit (allowing very large commercial vessels to jump) \hyperlink{ref-10.2-3}{[3]}
- Less fuel-efficient per transit than equivalent military drives
- Cannot transport ships with military engines – military engines create instabilities in the wormhole stabilization field generated by a commercial jump drive \hyperlink{ref-10.2-3}{[3]}
Squadron Size and Jump Radius: These parameters now increase cost only, not physical size. This fundamentally changes ship design economics – you can have wide squadron radius or large squadron capacity without the drive growing proportionally larger. The jump radius represents the maximum distance (in thousands of kilometres) that the task group containing the jump ship will appear from the far side of the jump point upon transit. Commercial drives produce half the jump radius of equivalent military drives.
Max Squadron Jump Radius Options: (unverified — #863)
Available radius settings: 50, 100, 250, 500, 750, 1,000, 1,500, 2,000, 2,500, 3,000, or 4,000 thousand kilometres. Larger radii allow combat ships to appear farther from camped jump points, reducing exposure to defensive fire during the jump shock window.
Military vs Commercial Jump Drives:
- Military Jump Drives benefit from the hull-size efficiency modifier, becoming proportionally smaller on larger ships \hyperlink{ref-10.2-1}{[1]}. They are more fuel-efficient per transit and physically smaller. Military drives can perform both standard and squadron transit, and can transport ships with either military or commercial engines \hyperlink{ref-10.2-3}{[3]}.
- Commercial Jump Drives are simpler (no efficiency modifiers) but treated as 20% capability for sizing. They apply a 10x multiplier on max ship tonnage, are physically larger, less fuel-efficient, and their squadron size is reduced by 1 \hyperlink{ref-10.2-3}{[3]}. However, they cannot transport ships with military engines – this is a critical limitation for fleet composition \hyperlink{ref-10.2-3}{[3]}.
- Military drives are more cost-effective for large warships and mixed fleets containing military-engined vessels
- Commercial drives are suitable for fleets consisting entirely of commercial-engined vessels
Design Trade-offs:
- The v2.4.0 changes make jump drives practical as standard equipment on large warships rather than requiring dedicated jump-only vessels
- Small ships still face a significant mass penalty for mounting jump drives
- Dedicated jump tenders remain viable for fleets of smaller ships
- The hull-size efficiency bonus means battleship-class vessels can mount jump drives with minimal impact on their design
Tip: For large warships (5,000+ tons), the efficiency modifier makes self-mounted jump drives much more practical than in earlier versions. Consider giving all capital ships their own jump drives for maximum operational flexibility.
Tip: For small ship classes (destroyers, frigates), dedicated jump tenders remain the most mass-efficient approach. A single tender can open the jump point for many smaller ships without each needing its own drive.
Warning: Always have redundant jump capability in any task force operating far from home. If your only jump-capable ship is destroyed, the rest of the fleet is stranded.
10.2.1.1 Jump Drive Design Parameters (Create Research Project)
Jump drives are created through the Create Research Project window. The interface presents several key parameters that determine the drive’s characteristics:
Jump Capability (Tonnage): The maximum tonnage the drive can transit through a jump point. Set in tons using a tonnage increment selector that adjusts the list granularity (by 1,000, 100, or 10 tons). For example, a 6,000-ton capability drive can transit any ship up to 6,000 tons. The jump drive itself adds significant weight – approximately 1,000 tons for a 6,000-ton capability drive (unverified — #708) – so size the capability above your intended hull mass to accommodate the drive’s own weight and provide margin for future design changes.
Squadron Size: Determines how many other ships can transit alongside the drive-equipped vessel. A squadron size of 3 means the jump ship plus 2 additional ships transit together. Only one ship in a squadron needs to carry the jump drive. Squadron size is governed by the Squadron Size technology line (ranging from 3 to 12 ships).
Jump Radius: The spread distance in kilometres from the jump point on the destination side. For example, a 50,000 km jump radius means the transiting task group appears up to 50,000 km from the far side of the jump point. Larger jump radii increase cost but not physical drive size. Commercial drives produce half the jump radius of equivalent military drives.
Military vs. Commercial: Select Military for ships carrying military-grade components (such as gravitational survey sensors, weapons, or military engines). Select Commercial for dedicated transports and tenders.
Technology Selection: The design interface automatically selects the latest researched technology for each parameter (efficiency, squadron size, jump radius). Higher-tier technologies produce more capable drives.
Naming Convention: A common convention is to encode the drive type and capability in the component name – for example, “MJD6000” for a Military Jump Drive with 6,000-ton capability, or “CJD10000” for a Commercial Jump Drive with 10,000-ton capability.
Tip: Size your jump drive capability slightly above your ship’s expected final tonnage (e.g., 6,000 tons for a ship currently at 5,000 tons). This provides margin for design iterations and component additions without needing to redesign the drive.
10.2.2 Squadron Transit
Updated: v2026.01.30
Squadron transit allows a single jump-capable ship to bring multiple non-jump-capable ships through a jump point simultaneously. This is the primary mechanism for moving large fleets without requiring every ship to carry its own jump drive.
How Squadron Transit Works:
- A jump-capable ship (the “jump ship”) initiates a squadron transit
- All ships within the jump ship’s squadron transit radius are carried through the jump point
- The jump ship’s squadron transit rating determines the maximum total tonnage it can transit (including itself)
Squadron Transit Limits:
Squadron transit is governed by two independent constraints, both of which must be satisfied:
-
Number of ships: The jump drive’s Squadron Size parameter (set during drive design) determines the maximum number of ships that can transit together. This ranges from 3 to 12 ships \hyperlink{ref-10.2-2}{[2]}, determined by the Squadron Size technology line. The count includes the jump ship itself – a squadron size of 3 means the jump ship plus 2 additional vessels.
-
Tonnage per ship: Each ship in the squadron must individually fit within the jump drive’s Jump Capability (maximum tonnage rating). A drive with 6,000-ton capability can transit any individual ship of up to 6,000 tons, but cannot transit a single 7,000-ton ship even if other squadron slots are empty.
There is no aggregate tonnage multiplier – squadron transit is limited by ship count and per-ship tonnage, not total fleet tonnage.

Multiple Jump Ships: If a fleet’s total tonnage exceeds one jump ship’s squadron transit capacity, you can use multiple jump ships. Each jump ship transits its portion of the fleet. The game handles the allocation automatically – ships are distributed among available jump ships.
Requirements for Squadron Transit:
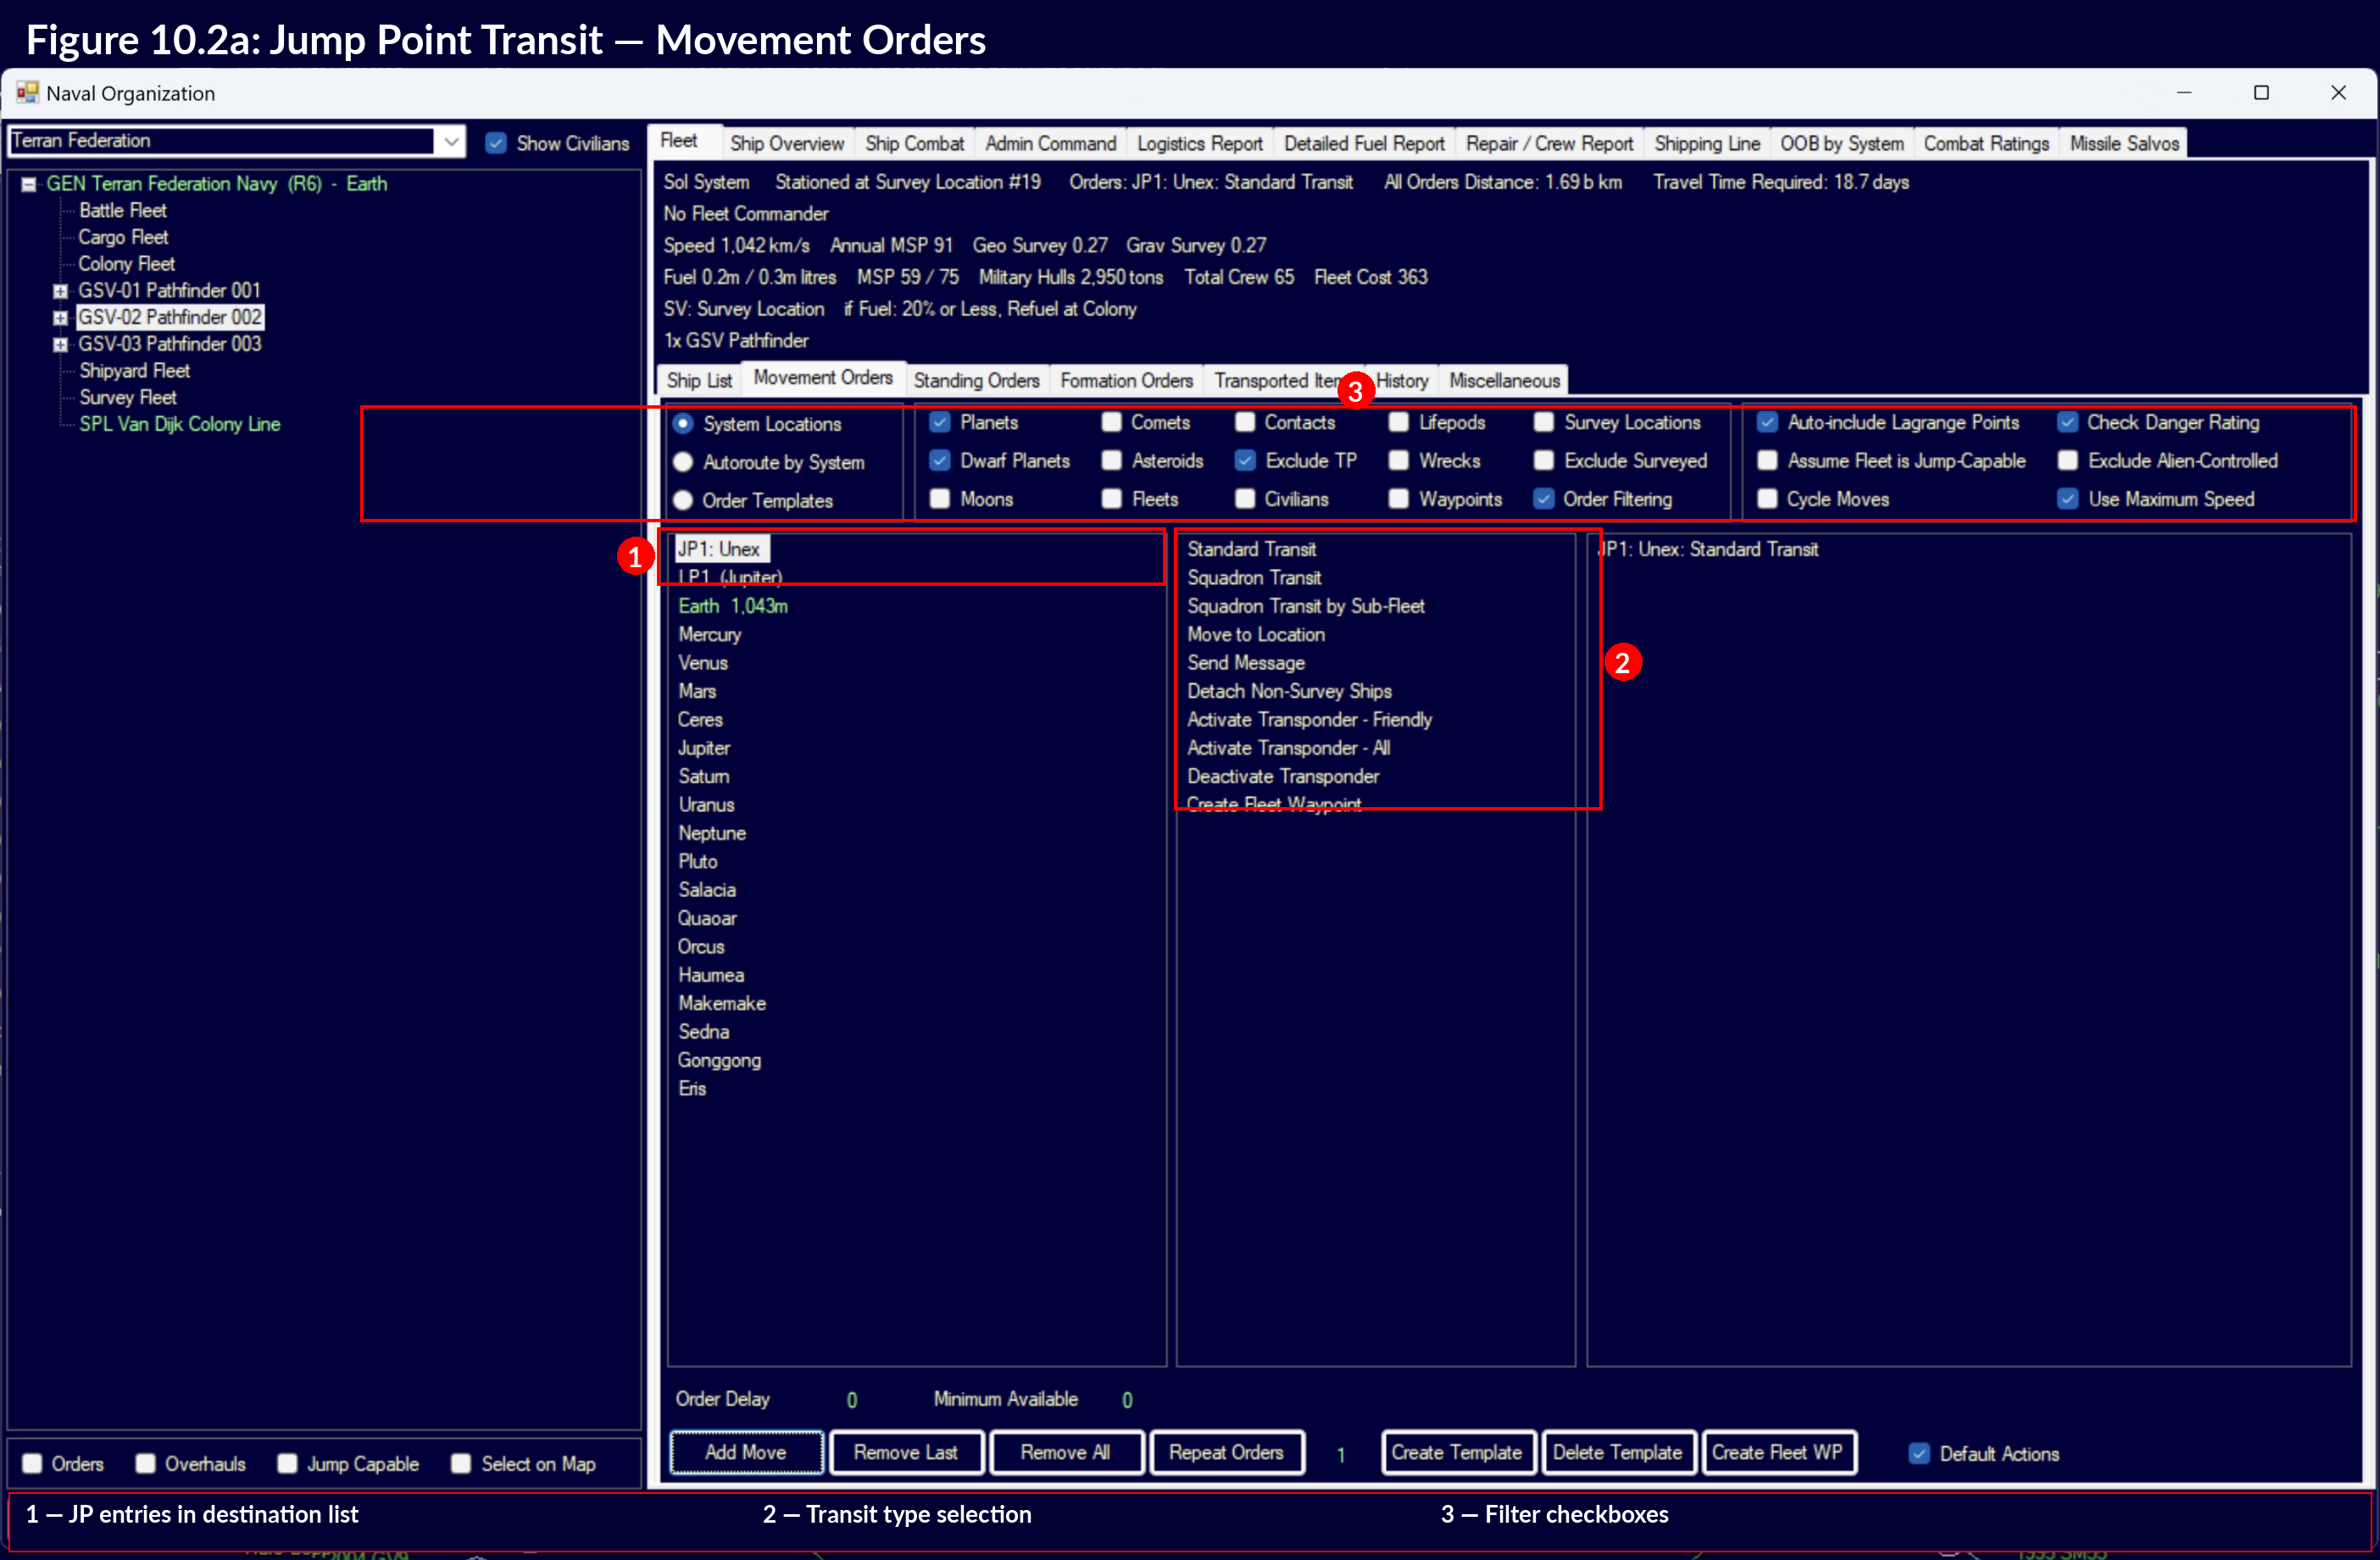
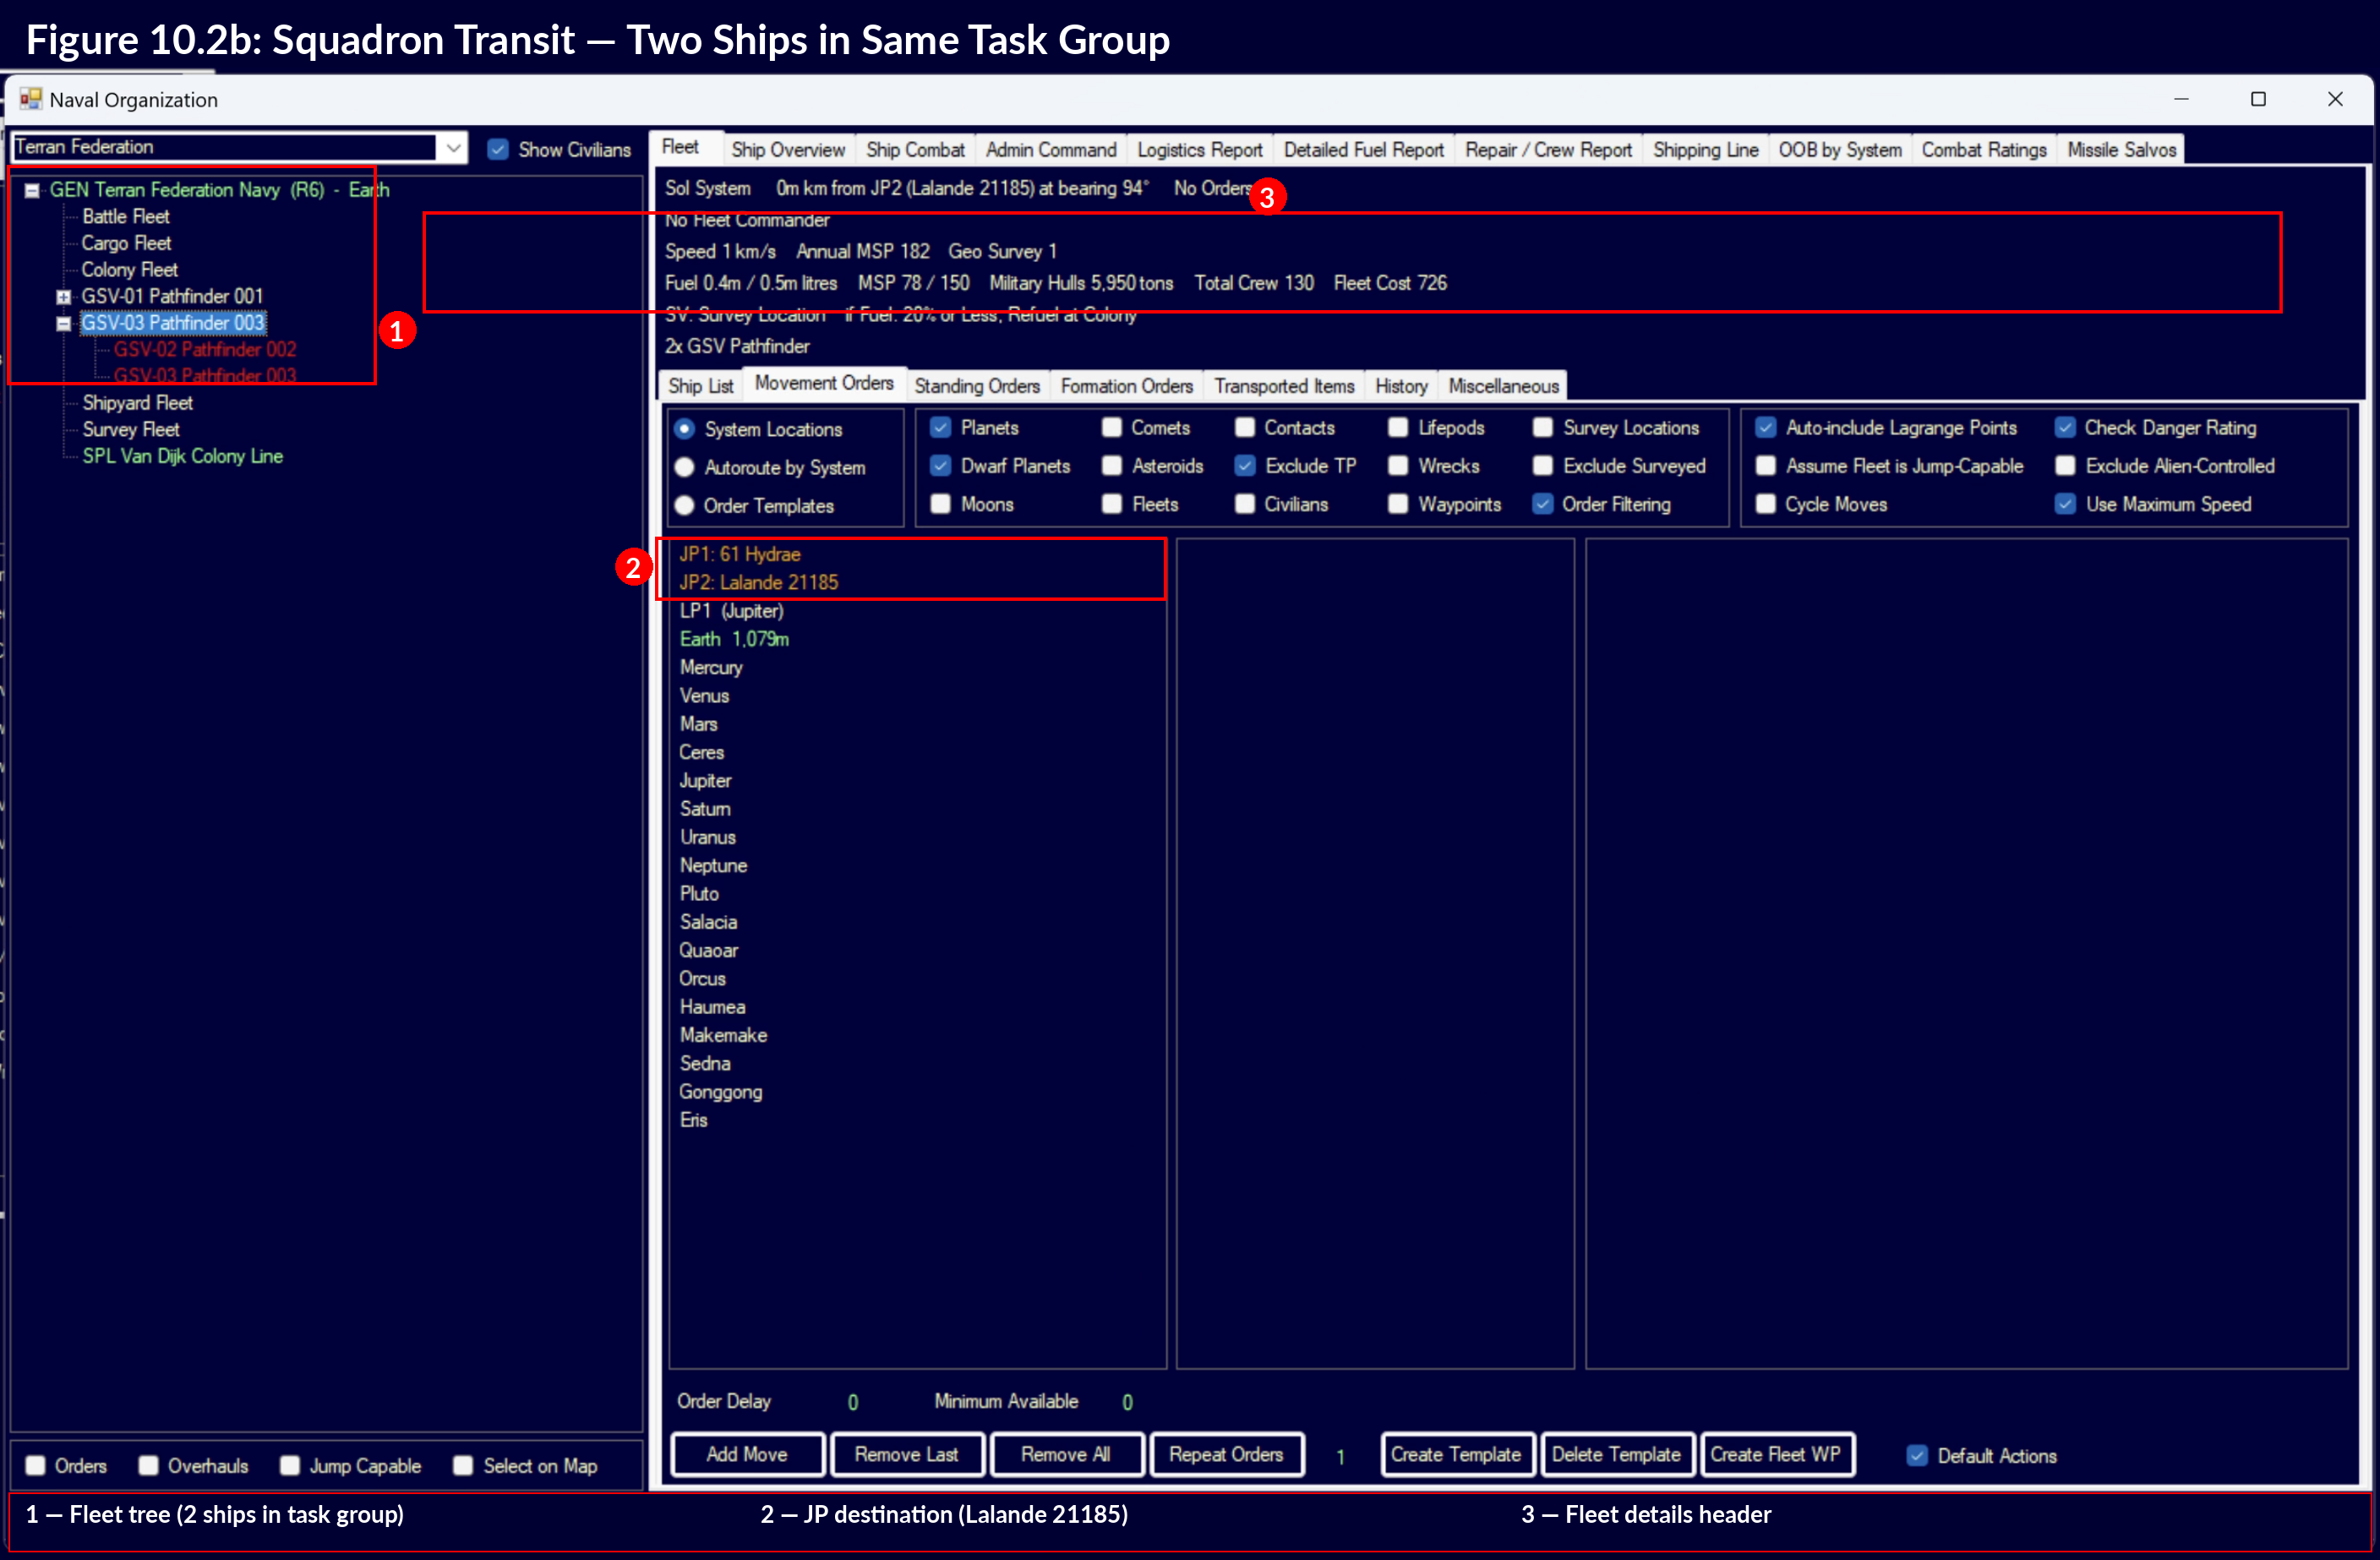
- All ships must be in the same task group — ships from other task groups at the same jump point are not included in the transit. To transit multiple ships together, first merge them into a single task group using the “Join Fleet” order \hyperlink{ref-10.2-10}{[10]}
- The jump ship(s) must have sufficient combined squadron transit rating for the total fleet tonnage
- All ships must be at the jump point when transit is initiated
- The squadron transit happens instantaneously (no partial transits)
Warning: Sharing a jump point location is not sufficient for squadron transit. Only ships within the initiating task group are pulled through. If you need to bring a stranded ship home via squadron transit, first merge it into the jump-capable ship’s task group with “Join Fleet”, then issue the squadron transit order.
Failed Transits: If the jump ship’s capacity is insufficient for the entire group, the transit will not occur. You must either reduce the group’s tonnage (detach ships) or add more jump-capable vessels.
Mixed Engine Type Fleets: When a fleet contains both commercial-engined and military-engined ships, standard transits treat each engine type separately. For a successful standard transit:
- Commercial-engined ships must have adequately-sized commercial jump drives available
- Military-engined ships must have adequately-sized military jump drives available
- Each engine type is evaluated independently
However, if any ship with either engine type cannot jump, the entire fleet fails to transit. This means a single underpowered vessel – regardless of engine type – prevents the entire fleet from jumping. Military jump drives can be used for transit by ships with either military or commercial engines; this applies to both standard and squadron jumps.
Tip: When building fleet tenders (dedicated jump ships for squadron transit), size their drives for your expected fleet composition plus growth margin. A tender that can barely handle your current fleet will be obsolete the moment you add another cruiser.
Tip: Commercial-engine jump tenders make excellent jump platforms for large fleets. They are slow but cheap, and their larger squadron transit multiplier means fewer tenders per fleet. Pair them with military escorts for protection.
Warning: When mixing commercial and military ships in the same fleet, verify that appropriate jump drives exist for both engine types before ordering a transit. A single commercial freighter without adequate jump drive access will strand your entire battle fleet at the jump point.
10.2.3 Stabilised jump points
Updated: v2026.01.30
Stabilised jump points (previously called “Jump Gates” in VB6 Aurora) \hyperlink{ref-10.2-6}{[6]} are permanent structures built at jump points that allow any ship to transit without a jump drive. The terminology change reflects a different technobabble explanation – instead of constructing a physical gate, ships with jump point stabilisation modules stabilise the jump point itself. The mechanics are functionally identical to the old Jump Gate system \hyperlink{ref-10.2-6}{[6]}.
Construction:
- Stabilised jump points are built by construction ships equipped with jump point stabilisation modules (renamed from Jump Gate Construction Modules)
- The construction ship must be at the jump point to begin the Stabilise jump point order (renamed from Build Jump Gate)
- Building a stabilised point takes time proportional to the project’s size (determined by game settings) \hyperlink{ref-10.2-7}{[7]}
- Both sides of a jump point must be stabilised for two-way traffic (stabilising only one side allows transit only from that side)
Stabilised jump point properties:
- Allow unlimited transits per increment – there is no capacity limit \hyperlink{ref-10.2-6}{[6]}
- Any ship can use a stabilised point regardless of size or whether it has a jump drive
- Permanent once established (can be destroyed by enemy action but do not degrade)
- Visible to anyone who surveys the jump point
Strategic Implications:
- Stabilised points eliminate the need for jump drives on established routes, allowing more combat-optimized ship designs
- They reveal the locations of your jump points to anyone transiting from the other side
- Stabilising a point into unexplored space is a risk – it enables easy access from the other side as well
- Defensive doctrine often involves NOT stabilising certain approaches, forcing enemies to use jump drives (which limits their fleet composition)
Stabilisation ships: Purpose-built vessels with jump point stabilisation modules. These are typically:
- Large, slow commercial vessels
- Equipped with their own jump drive (to reach the far side of a jump point to stabilise it)
- Sometimes paired with escorts in hostile space
Tip: Stabilise your core systems and established colony routes early. The economic benefit of allowing commercial ships to transit without jump drives far outweighs the construction cost. Every freighter that doesn’t need a jump drive has more cargo capacity.
Warning: Think carefully before stabilising frontier jump points, especially those leading toward known or suspected hostile territory. An unstabilised approach forces attackers to bring jump-capable ships, limiting their force composition. A stabilised approach allows anything to pour through.
Tip: Always stabilise both sides of a commercial route. A one-sided stabilisation means ships can only transit in one direction without a drive, which is useful for some military applications but terrible for trade routes.
10.2.4 Transit Effects – Jump point transit shock
Updated: v2026.01.30
Jumping through a jump point is not seamless. The transit process imposes jump point transit shock, a temporary disabling of critical ship systems that creates a period of vulnerability immediately after arrival in a new system.
Affected Systems: Transit shock temporarily disables:
- Active sensors – The ship cannot detect contacts during the shock period
- Fire control systems – Weapons cannot be aimed or fired
- Jump drives – The ship cannot immediately jump again (preventing instant retreat)
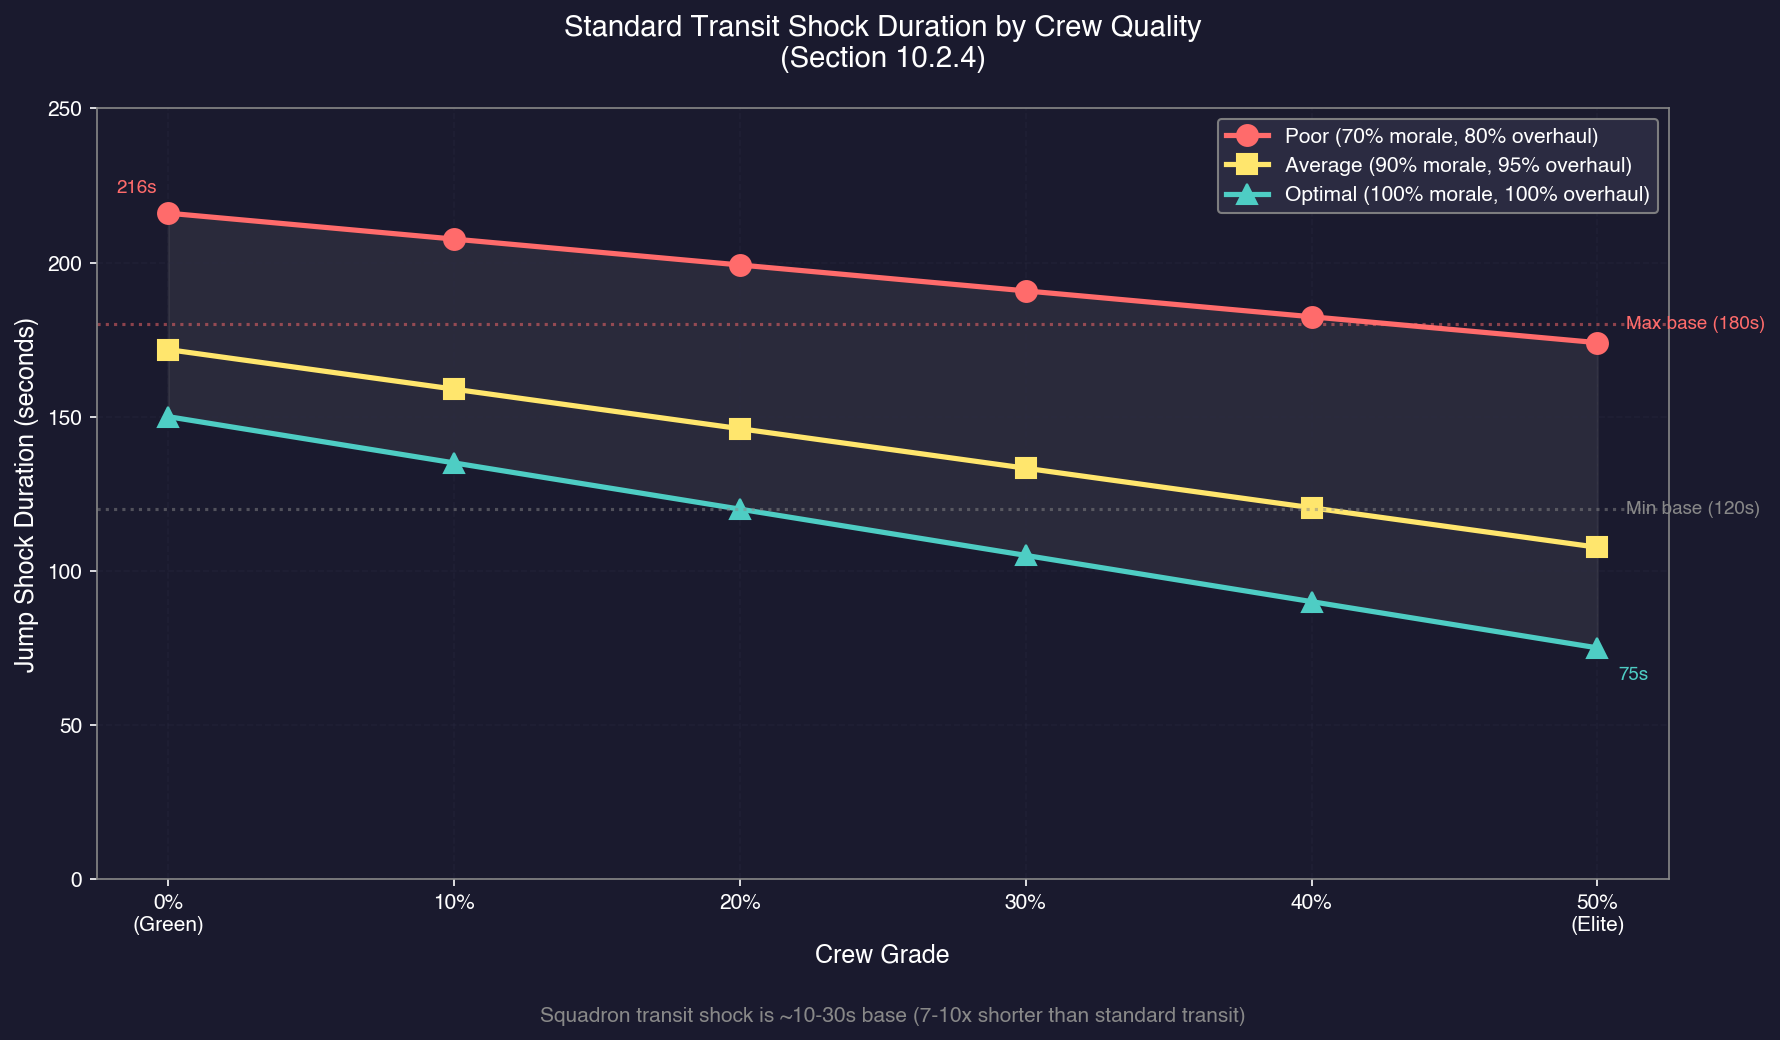
Standard Transit Shock Duration:
Shock Duration = (120 seconds + Random(1 to 60 seconds)) x Ship Bonus
This gives a base shock window of 121-180 seconds (approximately 2-3 minutes) before the Ship Bonus modifier \hyperlink{ref-10.2-4}{[4]}.
Squadron Transit Shock Duration:
Shock Duration = (10 seconds + Random(1 to 20 seconds)) x Ship Bonus
Squadron transits produce significantly shorter shock periods (approximately 11-30 seconds before Ship Bonus modifier) \hyperlink{ref-10.2-4}{[4]}, representing the more controlled nature of a coordinated jump.
Ship Bonus Modifier: The shock duration is multiplied by a ship-specific modifier calculated as \hyperlink{ref-10.2-8}{[8]}:
Ship Bonus = 2 - ((1 + Crew Grade) x Morale x Overhaul Factor)
Example: A vessel with 100% morale, standard overhaul factor (1.0), and 10% crew grade would have:
- Ship Bonus = 2 - ((1 + 0.10) x 1.0 x 1.0) = 2 - 1.10 = 0.90
- This reduces shock duration by 10% compared to baseline
Well-trained, high-morale crews (see Section 16.2 Skills and Bonuses) with well-maintained ships (see Section 14.2 Maintenance) recover from transit shock faster. Conversely, ships with poor crew grades, low morale, or overdue overhauls suffer extended shock periods.

NPR Adjustment: The length of jump shock for Non-Player Races (NPRs) is reportedly halved, compensating for their less sophisticated tactical decision-making regarding fleet composition and jump timing (unverified — #708 – reported by players but not confirmed in patch notes or game code). If accurate, this means defenders at jump points have significantly less free-fire time against NPR fleets than against player-controlled opponents.
Parasite Jump Shock (v2.0.0+): As of v2.0.0, parasite craft (fighters, FACs, and other Light Naval ships in hangars) reportedly suffer jump shock when their mothership transits a jump point (unverified — #708 – reported by players but not confirmed in patch notes). If accurate, this means carriers cannot immediately launch combat-ready fighters upon arrival in a hostile system – the parasites must recover from shock before becoming fully operational. Plan carrier assault timing accordingly; if parasite shock is real, the mothership’s own shock recovery must complete before launch, and then parasites need additional recovery time after deployment.
Survey Ship Recalibration: In addition to combat-related shock effects, survey ships experience a brief post-jump recalibration delay before they begin executing survey orders in a new system. See Section 10.3.1 Gravitational Survey for details.
10.2.4.1 Fuel Cost Per Jump Transit
Each jump transit consumes fuel. The fuel cost is determined by the jump drive’s efficiency rating – higher Base Jump Drive Efficiency values produce more fuel-efficient transits. The relationship between efficiency and fuel cost is inversely proportional: a drive with efficiency 10 consumes roughly half the fuel per transit of a drive with efficiency 5 (unverified — #708 – the exact formula for fuel per transit has not been confirmed, but efficiency is the primary factor).
Planning for Multi-Jump Expeditions:
When planning operations that require multiple jump transits, budget fuel for both in-system travel and jump transit costs:
- Each jump consumes a fixed amount of fuel based on the ship’s jump drive, not the distance traveled in-system
- A multi-jump expedition through 5 systems consumes jump fuel for each transit (10 transits for a round trip)
- Ships without their own jump drives do not consume jump fuel – only the jump ship providing the squadron transit expends fuel
- The Ship Designer displays estimated range which accounts for engine fuel consumption but may not clearly separate jump transit fuel from in-system travel fuel
Fuel Budgeting Guidelines:
- For short expeditions (2-3 jumps), jump fuel cost is typically a small fraction of total fuel consumption
- For deep exploration (10+ jumps), cumulative jump fuel becomes a significant planning factor
- Carry additional fuel reserves or plan refueling stops for extended multi-system operations
- Higher Base Jump Drive Efficiency technologies directly reduce fuel cost per transit, making them valuable for exploration-focused empires
See Section 14.1 Fuel for comprehensive fuel logistics mechanics.
Tactical Implications:
- A defending fleet positioned at a jump point can fire on transiting ships during their shock period with impunity
- Standard transits (2-3 minutes of vulnerability) are far more dangerous than squadron transits (11-30 seconds)
- Transiting into a defended system via standard transit is extremely costly – attackers are blind and defenseless for a significant window
- Squadron transits are strongly preferred for assault operations due to the much shorter shock window
- Carriers cannot immediately deploy parasites after transit due to parasite jump shock
Transit Signature: Jump transits produce a detectable signature:
- Ships transiting a jump point create an energy pulse detectable by sensors at significant range
- This means a defending force is usually aware that something has transited, even if they cannot immediately identify what
- The signature reveals the jump point location to anyone who detects it
Jump point assault doctrine: Given the shock mechanics:
- Scout with expendable ships first to assess defenses (a single ship’s 2-3 minute shock is acceptable for reconnaissance)
- Use squadron transits for combat assaults to minimize the vulnerability window to 11-30 seconds
- Ensure jump ships have sufficient squadron capacity to transit your assault force in one jump
- Consider overwhelming force – even 30 seconds of free fire from a large defensive fleet can be devastating
- Time follow-up squadron transits to arrive after the first wave’s shock has worn off, providing covering fire for subsequent arrivals
Tip: Invest in crew training and morale to reduce your transit shock duration. The Ship Bonus modifier can reduce shock time by up to 50% for elite crews, significantly narrowing the window of vulnerability.
Tip: When defending a jump point, position your forces at maximum weapons range from the point. Standard transiting enemies give you 2-3 minutes of free fire; squadron transiting enemies give you only 11-30 seconds. Plan your defensive DPS accordingly.
Tip: For assault operations, always use squadron transits. The difference between 2-3 minutes of vulnerability (standard) and 11-30 seconds (squadron) is often the difference between a successful assault and a massacred fleet.
Tip: Stagger squadron transits of large fleets if your jump ships cannot handle the entire force in one transit. Time subsequent waves to arrive after the first wave has recovered from shock and can provide sensor coverage and fire support.
10.2.5 Jump point survey and star mass
Updated: v2026.01.30
The mass of a system’s primary star significantly affects jump point survey requirements. Larger stars produce more complex gravitational environments that require more survey points to locate jump points, and those jump points can be located at greater distances from the primary.
Base Parameters (Sol-equivalent, 1 solar mass) \hyperlink{ref-10.2-9}{[9]}:
- 400 survey points per potential jump point location
- 40 AU maximum distance from primary star
Mass Modifier Formula:
The survey point requirement and maximum distance are multiplied by a mass modifier based on the primary star’s mass in solar masses:
- For stars of 1 solar mass or less: modifier uses the square root of the star’s mass \hyperlink{ref-10.2-9}{[9]}
- For stars greater than 1 solar mass (v2.0.0+): modifier uses the cube root of the star’s mass \hyperlink{ref-10.2-9}{[9]}
The v2.0.0 change from square root to cube root for large stars makes very large systems easier to survey while still representing a considerable effort.
Example Survey Requirements (v2.0.0 cube root formula):
| Star | Solar Masses | Survey Points | Max Distance (AU) |
|---|---|---|---|
| Sol | 1.0 | 400 | 40 |
| Altair | 3.1 | 583 | 58 |
| Ras Alhague | 9.6 | 850 | 85 |
| Rigel | 21 | 1,103 | 110 |
These example values are derived from the base parameters and mass modifier formula above \hyperlink{ref-10.2-9}{[9]}.
Practical Implications:
- Survey ships operating in systems with large primary stars need significantly more time per survey location
- Jump points in large-star systems can be located much farther from the primary, requiring survey ships with greater range
- The cube root scaling (v2.0.0) means extremely massive stars are now more accessible than under the previous square root formula, though still demanding
- Survey mission planning should account for star mass when estimating deployment times (see Section 17.2 Gravitational Survey)
10.2.6 Blockade and Jump Point Denial
Updated: v2026.02.02
Aurora C# has no formal “blockade” order. Instead, blockades are an emergent tactic produced by the interaction of jump point control, combat mechanics, and civilian pathfinding.
Military Blockade
Stationing combat ships at or near a jump point creates a military blockade:
- Jump shock exploitation: Any ship transiting into the system suffers 121-180 seconds of disabled sensors and weapons (standard transit) or 11-30 seconds (squadron transit). Defenders fire with impunity during this window. See Section 10.2.4 Transit Effects for shock formulas.
- Chokepoint control: All interstellar movement passes through jump points. Controlling a jump point controls access to the system.
- Unstabilised approaches as force multipliers: Deliberately leaving a jump point unstabilised forces attackers to bring their own jump-capable ships, limiting enemy fleet composition and requiring squadron transits that carry fewer vessels per jump.
Trade Blockade
A hostile fleet presence disrupts civilian trade without requiring direct engagement:
- Civilian pathfinding avoidance: Civilian freighters account for danger when selecting trade routes. A hostile fleet in a system causes civilian ships to reroute, cutting off trade to any colonies reachable only through that system. See Section 6.5.1.8 Movement Restrictions for details on civilian route avoidance.
- Economic strangulation: Colonies dependent on civilian trade for minerals, trade goods, or population transport are gradually starved of resources when trade routes are disrupted.
- No shots required: The mere presence of hostile ships is sufficient to divert civilian traffic. The blockading force does not need to engage or destroy civilian vessels.
Counter-Blockade Tactics
- Squadron transit offset: Squadron transits arrive at a random distance from the jump point (determined by jump drive technology). At higher tech levels, this offset can place arriving ships outside beam weapon range, buying time to recover from jump shock before engaging defenders.
- Overwhelming force: Transit enough combat power in a single squadron jump to survive the shock window and engage the blockading fleet.
- Alternate routes: If multiple jump point chains connect two systems, route traffic through unblocked paths.
- Escort convoys: Military escorts can accompany civilian traffic to suppress threats along the route, though civilian ships may still avoid the system if danger is detected.
Tip: When blockading an enemy system, position your fleet at the jump point rather than deep in-system. This maximises jump shock exploitation and ensures you intercept all traffic. Deep in-system positioning allows enemies to transit unmolested and gives them time to organise before engagement.
Tip: Defensive blockade of your own frontier is one of the most effective strategies in Aurora. Leave frontier jump points unstabilised, station a fleet at the jump point, and let jump shock do the work. Attackers must either accept 2-3 minutes of vulnerability (standard transit) or bring squadron-capable jump ships that limit their force size.
Related Sections
- Section 6.5 Civilian Economy – Trade route disruption and civilian danger avoidance
- Section 8.6 Other Components – Jump drive component design
- Section 9.5 Orders – Jump transit orders and fleet commands
- Section 12.1 Fire Controls – Systems disabled during transit shock
- Section 14.2 Maintenance – Overhaul factor affecting shock duration
- Section 16.2 Skills and Bonuses – Crew grade effects on transit shock
- Section 17.2 Gravitational Survey – Locating jump points
References
\hypertarget{ref-10.2-1}{[1]} Aurora 4x Forums, “v2.4.0 Changes List” – Steve Walmsley’s official patch notes detailing jump drive formula redesign
\hypertarget{ref-10.2-2}{[2]} AuroraDB.db FCT_TechSystem table – Game database containing technology definitions including Base Jump Drive Efficiency (4-25) and Max Jump Squadron Size (3-12)
\hypertarget{ref-10.2-3}{[3]} Aurora Wiki, “Jump drive” – Community wiki documenting military vs commercial jump drive differences and engine compatibility
\hypertarget{ref-10.2-4}{[4]} Aurora Wiki, “Jump shock” – Community wiki documenting transit shock duration formulas (standard: 120 + random 1-60 seconds; squadron: 10 + random 1-20 seconds)
\hypertarget{ref-10.2-5}{[5]} Aurora 4x Forums, “v2.5.0 Changes List” – Steve Walmsley’s official patch notes confirming efficiency modifier minimum of 1 and 10,000-ton multiplier correction
\hypertarget{ref-10.2-6}{[6]} AuroraWiki “Jump Gate” and “Interstellar travel” pages – Stabilised jump points (renamed from Jump Gates) allow unlimited transit with no capacity restrictions; terminology change confirmed as purely cosmetic
\hypertarget{ref-10.2-7}{[7]} AuroraWiki “Jump Point Stabilisation Module” – Stabilisation time and construction mechanics for jump point stabilisation
\hypertarget{ref-10.2-8}{[8]} AuroraWiki “Jump shock” and “C-Ship Crew” pages – Ship Bonus modifier formula: 2 - ((1 + Crew Grade) x Morale x Overhaul Factor), with crew grade derived from grade points
\hypertarget{ref-10.2-9}{[9]} AuroraDB.db FCT_System and FCT_Star tables – Sol system (1.0 solar mass) has JumpPointSurveyPoints = 400; secondary system (0.82 solar mass) has 362 points, confirming sqrt formula. Cube root formula for >1 solar mass confirmed by calculation: 400 x CubeRoot(3.1) = 583, 400 x CubeRoot(9.6) = 850, 400 x CubeRoot(21) = 1104
\hypertarget{ref-10.2-10}{[10]} In-game testing (Game 2 playthrough, Discussion #1350) – Confirmed: squadron transit from Lalande 21185 with two ships in separate task groups failed (only the jump-capable ship transited). After merging via “Join Fleet”, squadron transit succeeded with both ships.